
| Go Articles
|
 |
|
| Setpiece Kos |
NB: Game references are given in the style Black player-White player. The dates are in year-month-day order, and are given as the best identifying key.
One easily-recognised pattern of ko is created by a player blocking on the second line, in a way that depends on a third-line ko.
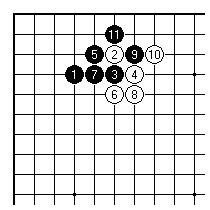
We'll look at this attach-block joseki variation. The question is how White now makes shape.
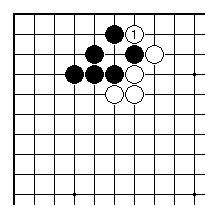
Playing atari with 1 to close off the upper edge is the normal move. Naturally there may now be a ko fight here. The timing of this fight is, however, something difficult for both players. Few joseki variations depend on a ko fought in the opening, as you'd expect from the shortage of early threats: this is an example where the ko is to be seen as a follow-up sequence.
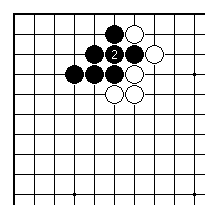
For Black to connect here is absurdly defensive. It also goes against the theoretical way of thinking we shall introduce shortly under Concept A.
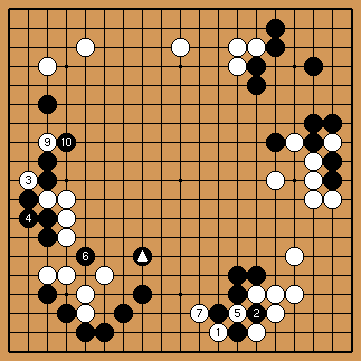
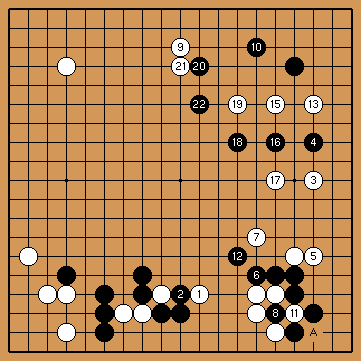
White provokes the ko immediately after Black adds the
marked stone to the framework on the lower side. Black's
play also had attacking force: White intends to treat
the weak group to the left lightly. White 5 and Black 8
take in the ko.
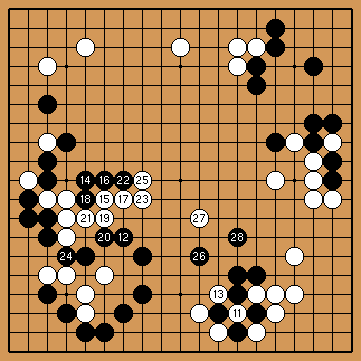
White 7 had enlarged the ko, so as to finish it off on a grander scale with 13. Black is compensated by a capture of white stones and some continuing chances of attack in the centre.
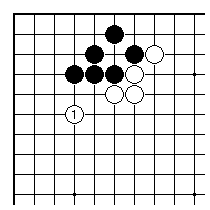
White may prefer to play on the other side in the joseki. The reasons might be that the upper side isn't very interesting to close off, that the left side is more interesting, or that White is unable to make good use of two plays in a row elsewhere if Black starts the ko immediately.
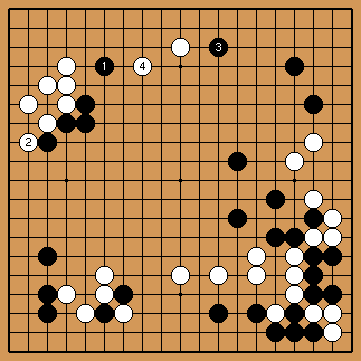
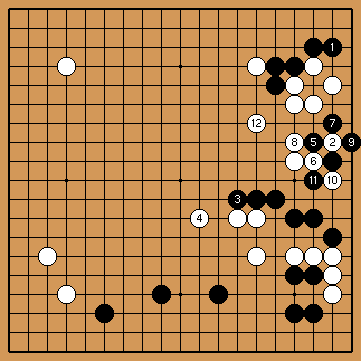
Black finds it more attractive to expand the upper right
corner than the low left side.
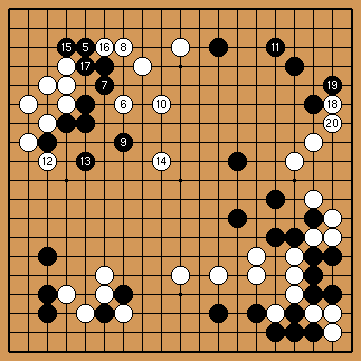
Two weak groups are formed, but neither is seriously weak. This became a close game.
A basic role in the analysis of ko fights is played by counting. Everyone becomes familiar with the idea of evaluation of exchanges. Two other major aspects are the identification of loss-making threats, and the question of value for money for the number of stones played in the area of the ko.
It is the last of these that is under discussion here. What we mean by 'local tally' is simple enough: keep track of the balance of plays in one part of the board. The excess after a ko of black over white stones, or white over black, is the result of several possible factors: who provoked the ko or started it, whether a move implying ko was ignored earlier, plays in the midst of a ko fight that enlarge or diminish its value. One must keep sight also of the way that the initiative may change hands in a ko fight, if the player winning the ko wasn't the one with first capture in it.
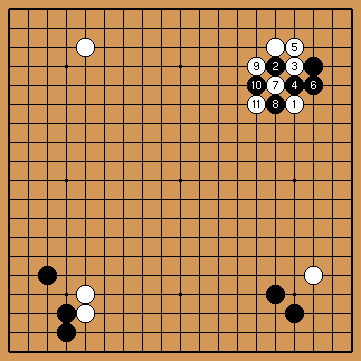
The joseki in the upper right corner is a taisha
variation with a hidden ko. White 11 is a very
aggressive play - the Ishida Joseki Dictionary speaks
of only one example, but current databases contain
half-a-dozen.
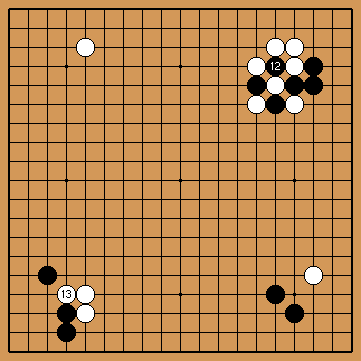
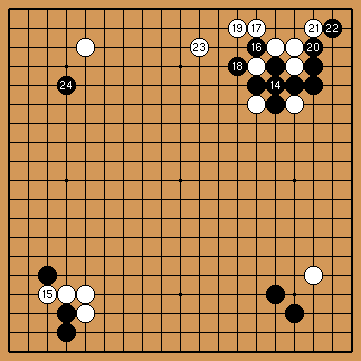
After Black ignores White's threat in the lower left, the local tallies have been changed. The lower left was BBBWW, or if you cancel black and white stones, just B. Now it has become W, because White played two moves in a row there. Correspondingly, the tally in the upper right was BWW, or just W, when White started the taisha. Black follows connecting the ko by a sente sequence up to 24, which doesn't affect the tally. The upper right tally must be B after Black connects the ko. Clearly you don't just count the stones remaining on the board: the white stones captured in the ko and later on must also be allowed for.
This example gives the basic tally idea. It also of course shows that the tally count isn't everything. White in the lower left has destroyed the co-ordination of Black's stones, for a much greater local dominance than an excess of one stone would suggest. Black in the upper right has become very thick, and two white stones clinging to Black's wall are nearly useless.
Returning to Theme 1, discussion in terms of the local tally is very revealing about some possible variations.
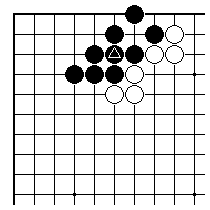
For instance, if Black did connect the ko first with the marked stone, and then capture on the edge later, we might get this result. This resembles what happens if Black starts and wins the ko, and White simply defends, but the local tally is one worse than it should be, because Black has in effect filled in a point of territory with the marked stone, while White has had a play elsewhere. This is unacceptable for Black, even if White has also played somewhat passively.
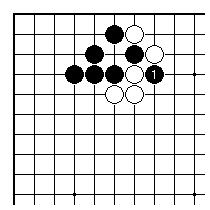
Another variation comes up if Black decides that a favourable ladder can be exploited with the cut 1 here. There are problems with this highly aggressive idea . If White can use ladder plays as ko threats, who will benefit? But there is another difficulty even if White doesn't go down that dangerous path.
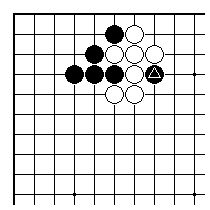
If White ignores a ko threat and simply connects in this way, Black's marked cutting stone is in a wasted position. This is often the case with the most provocative ways to start ko fights: if the fight is subsequently lost, the tally shows them to have been close to redundant plays.
Therefore very often one should heed the
Ko fights in which you add to the local tally become more urgent for you to win.
There is of course a matching
Ko fights in which your opponent adds to the tally become less worrying for you.
This second way of putting it is in line with the idea that strong players try to win the game rather than the ko fight. This is in general made easier if your opponent adds plays in the ko fight and you play elsewhere. Naturally this assumes the loss is affordable and limited in some way: the tally theory can only identify a trend.
There is a double approach 4-4 opening that has much in common with Theme 1.
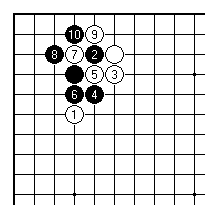
Here Black 6 does damage to the approach stone White 1. Black 10 is the normal play. Black shouldn't be too afraid of White cutting and provoking the ko.
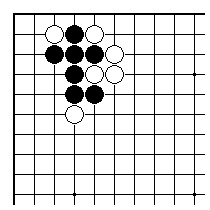
Thinking about the tally principles just introduced, this result is really very good for Black locally.
White 11 and Black 14 take the ko. After 14 Black would answer White's capture in the ko by connecting at A.
If Black chooses this way to play in the corner, it shouldn't be out of fear of the ko, but because the ko possibility makes White lighter. That is, Black descends at 1 with an attacking intention.
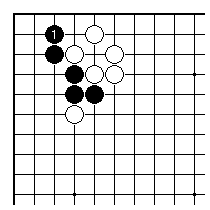
Black descends with 1 to deny White eye shape. If White could fight a ko in the corner the upper right group would be lighter, from the point of view of giving up the stones, or could use escaping plays as ko threats.
Here's a joseki variation that was in fashion for a while.
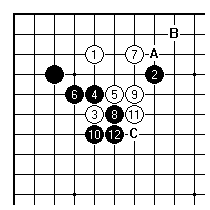
After these plays it is a bit too honest for pro players to add another stone immediately to White's group on the top side at A or B: sometimes White does play C.
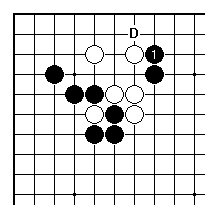
Therefore Black will often get a chance to play 1 here. Answering at D is probably again too slow for White.
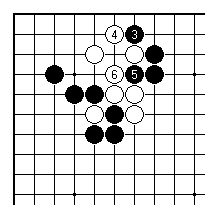
Therefore Black 3 is seen, and if White now answers with 4, a ko can arise with Black 5 and White 6. How worrying is this ko for White? This question ought to be answered in relation to the tally principles annouced earlier, because White has made a habit of taking sente elsewhere after play here.
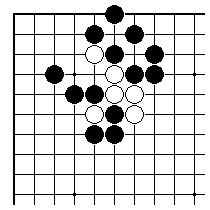
By winning the ko twice Black can get this excellent result. It must be realised though how this reads on the local tally: B13 W8, or overall BBBBB. White has presumably made enormous gains with five plays elsewhere.
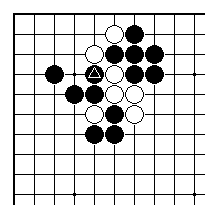
By employing the marked stone to cut, before connecting the ko on ignoring a second threat, Black could take a couple more points but this is unattractive.

This result is caused by White winning that ko by connecting with the marked stone - it is really ridiculous for Black, considering that Black's marked stone has been made less than useless (it fills in a liberty for Black without having any serious effect on White).
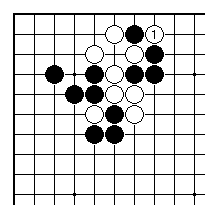
Should White push on and try to win the ko a second
time, with White 1 here, instead of connecting? The
tally position was very much biased towards White, who
on that basis could relax about this part of the board.
If White puts extra stones here, Black would feel an
easing of pressure, an illustration of the Subtraction
Tally Principle. But if White wins this ko, the overall
result is going to be very good for White in an area
with a tally still B.
The conclusion is that White probably would start this
second fight if (but only if) it is winnable on the
balance of ko threats. That is, White here should note
the Addition Tally Principle.
Therefore this type of Black attack based on a ko fight is unlikely to be seen in a normal middlegame, unless for example as part of an attack on a very large group or attempt to control a substantial area. If there are prospects of Black capturing White on a large scale, then that changes everything.
| Posted 16 June 2002. Copyright © 2002 Charles Matthews | ||
| Previous edition | Index | Next edition |