 |

Daigo, episode 6
A monthly column by Pieter Mioch featuring a thorough
game commentary tastefully seasoned with go-related
stories and clues to the meaning of life.
"If you never question anything, you won't get very far"
Introduction
You might have read through part 1 and 2 of the
interview I did with Catalin Taranu 5p. Part 3 is almost
finished and it has turned out bigger than the first
two articles combined. It's completely about Japan and
contains a lot of information about Catalin you won't be
able to find anywhere else so, by all means, go and have
a look.
Recently it has become clear that you don't need to
be born in South East Asia in order to make it to pro
level. There was James Kerwin and others who kind of
raised that suspicion already some time ago but now
Michael Redmond has made it all the way to 9 dan (hope
he'll win a title someday) and the latest pros Hans
Pietsch and Catalin Taranu are also doing fine there's
no doubt in my mind, given a little talent and a lot of
stamina anybody can become pro.
Some years ago I would help out as an interpreter
(=gofer) at the world amateur championship and the
nicest part of that job was that you get to sit knee to
knee to a strong pro who would show the participants,
both from Europe, useful stuff about their games
afterwards. It was during such an occasion that the 9
dan doing the commentary would mutter to himself: "wow,
how many joseki does this guy know?" while shaking his
head in disbelieve. The pro was visibly impressed by the
vast knowledge of obscure corner patterns one of the
players was displaying (showing of) and most likely he
was not the first pro to be amazed by technical memory
of foreign amateur champions. In Japan, to be sure, the
average amateur is not that knowledgeable when talking
about joseki.
Unfortunately this technical skill alone is not enough
to make somebody a pro (although quite a few have tried
this approach, and failed). What is most needed now -
also judging from the Catalin interview - seems to be a
change in attitude and improving the mentality of the
player. As to what the exact nature of these changes
would be and how to work such a miracle you can find a
few hints Catalin made in the interview, I hope somebody
will find them (useful).
Please, don't get me wrong I don't say that you have
to learn how to play the sitar and wear bright orange
clothing, however a nice color it may be. You also
needn't worry about doing Zen meditation and Ying and
Yang philosophy. Although I'm positive some people will
be helped by this. One thing is sure, most pro's I met
here did not seem to be particularly interested in the
aforementioned. I did, however, meet a pro who confessed
he was a Jehovah's witness.
The Game
The diagrams below are printed in two colors, one for the actual
game and one for the explanatory diagrams and side-tracks, as follows:
Common Approach |
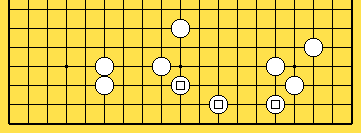
A perfectly common way of answering the white kosumi
would be black 1. It is important to be aware that once
you play a move like 1 you make it more difficult to
sacrifice and treat the situation lightly. It is equally
important though to understand that black 1 is not
directly played with the idea of securing eyes at the
side yet as it is played mainly to get a solid formation
which black can use to jump from and somewhere along the
line, while attempting to get away, make life.
If, for example, white descends with 2 black will not
block at the right of 2 but he'll jump out at 3 and
although it is not clear exactly how many eyes the black
stones have it seems unlikely they'll die.
Instead of the keima black 3 he also can think of
playing an attachment at A or an attachment at B. As
you'll know for sure, the weaker your stones the more
attachments you (want to) play because you are not
worried about strengthening your opponent anymore,
you're much too busy securing life.
|
Diagram 1 |
|
|
|
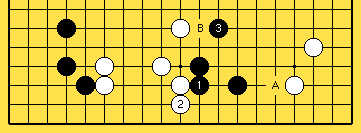
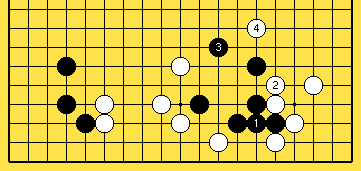
Skillful Probe? |
The probe of black 1 is a very interesting move in this
situation. If it works is open for discussion but it
will undoubtedly succeed in giving white a headache
trying to find the best way to deal with it.
First of all, black 1 is a light move and it is not
really black's intention to start some big time
fighting. After white 2 black plays another light move,
the hane of black 3. Probably the best thing for white
to do is to capture one black stone with 4 and 6.
White got stronger where he already was pretty strong
and black is happy since he got a bit stronger, too.
Contrary to the original white position, however, the
black stones were rather weak. Next black has a few
moves to consider. A, B, C and D all have there merits,
in my own game I'd have a hard time deciding on which
one to play. Moves like C and D do not attempt to move
out as much as they are creating local eye shape. Before
black chooses either one he'd better be pretty sure that
he's indeed able to make eyes were white to prevent him
from escaping in any direction.
|
Diagram 1a |
|
|
|
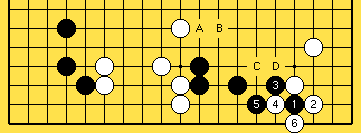
Variation |
If white feels the former dia is too meek a way of
dealing with the black stones he can play at 2 and try
to stir things up a bit. Black 3 is the only move here
(well, black might want to keep it in reserve and leave
it unplayed, but it locally would be the most natural
move) and from white 4 it feels like a one way street.
Next black A and B are excellent points, white did not
really succeed in putting black on the spot, although he
made a couple extra points in the corner.
|
Diagram 1b |
|
|
|
Attaching |

In the game black choose to play a probe at 87 right
away. This is a good move. Playing an attachment when
your stones are still weak and do not have much room for
eyes is a powerful strategy. Ideally you would pose your
opponent with the following dilemma:
- Do I play the most solid move, which protects my territory but has
little or none attacking value? or,
- Do I play the most aggressive looking counter which aims at
capturing the whole enemy group although failing to kill the stones
would mean a considerable loss in territory?
|
Game Diagram 40 |
|
|
|
By the way, if you try this "play attachments with weak
stones" approach, be sure to check if your opponent
does not have a move which does both, A) defend his
territory and B) keeps on a severe attack. If your move
can be countered in such a way your attachment was ill
selected.
Defending |
After black played the marked stone white might for
example answer at 1 or A. Both these white moves are not
necessarily bad but because of this simple exchange of
moves a lot of pressure disappears and black is happy,
his stones are not even weak looking anymore.
|
Diagram 2 |
|
|
|
Attacking |
Now this is a move to my heart, ignoring the opponent
probes and just carry on with an eye stealing strategy.
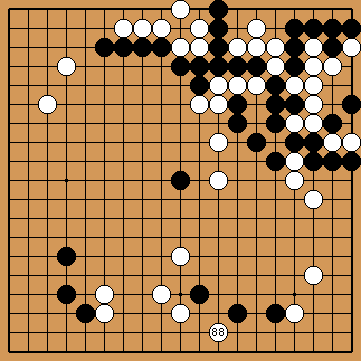
All the same, it is questionable if white 88 is correct
or not. If in the end the black stones make eyes move 88
probably will have cost white some points. What to do
next when playing black is very hard to decide on. It is
not that I wouldn't know what black should play. It's
just that he has quite a few moves he can choose from
which all require extensive reading ahead (Darn, I don't
know what black should do:-)
|
Game Diagram 41 |
|
|
|
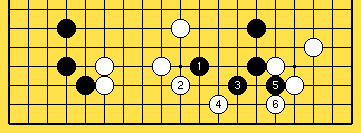
Making Eyes at the Side |
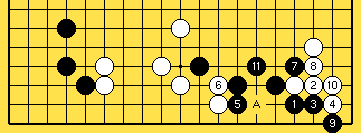
One possible approach which looks natural is shown
here. Black enlarges his eye space with 1 and 3 before
blocking at 5. White 6 is necessary to keep the pressure
on but when black first plays two forcing moves at 7 and
9 and then comes back at 11 the black stones look not
about to die.
Having said this, black is not alive yet either. White
can strike at A after which it is no longer possible to
make eyes at the side for black. Let's see what happens
in the next dia
|
Diagram 3 |
|
|
|
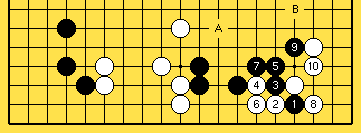
Black is Not Impressed |

After white strikes at 1 black is tempted to answer at
3 or 5. These moves, however, invite white to cut at
the place of black 2 next and black will have to add
another move in order to prevent his three stones at the
right from being captured. If doing so would at the same
time ensure eyes or make a living group there wouldn't
be anything wrong with it. But, you saw it already,
adding another move does not result in more then one eye
for black and next it is white's turn again. The above
sequence could very well be dangerous for black.
So, for this reason there is nothing for black to do
but to patiently connect at 2 in order to hold the
initiative. After black 6 things might not look so
good for him but because the outside white liberties
are filled in now black 8 has become sente and after
this black 10 makes an excellent move. Next black has
either the play at A or B to further make eye space or
threaten to do something. Black is not worried about
white playing at C and stealing an eye. A move like this
is still much to early and white only should think about
it if black is completely surrounded and has nowhere
left to make eyes.
|
Diagram 3a |
|
|
|
Black Dodges |

Black chose to play at 89, maybe in an attempt to
leapfrog out of the white sphere of influence. I suspect
this move was much played because of the huge lead black
has. It does not look like the most normal move and it
seems a bit sweet because black is running away from
a chance to do some damage to the white corner before
worrying about eyes.
|
Game Diagram 42 |
|
|
|
On the other hand, black might just be a very
calculating person who has figured out that he can
sacrifice a couple of stones in order to make a safe
escape with the rest and still be ahead in the game.
This way of thinking puts things in a whole different
kind of light, black 89 may not be the best move or not
even very sharp but it could turn out to be the move
which is the safest way of keeping black in the lead.
To twist this a little, if black were to lose this game
he might want to blame black 89 although the same move
could easily be interpreted as the winning move in case
of the game ending favorable for black.
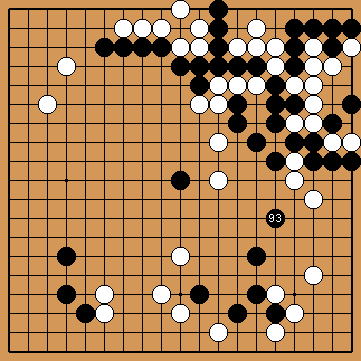
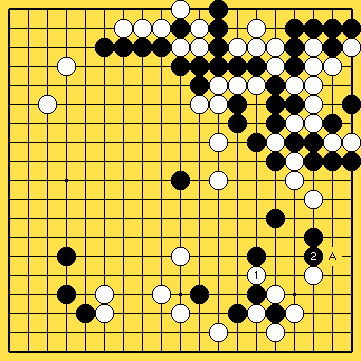
Best Move Problem |
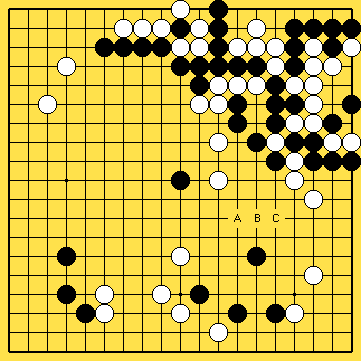
This is what the board looks after 89 moves. Although it
looks far from easy, if possible at all, white has no
choice but to keep going after the black group.
Sometimes during teaching games people may ask: "What
is the best move here?" Well, I think that question
next to impossible to answer. The best move for what?
Going out in style? Staging a miracle upset? The optimal
*reasonable* move? The thickest move leaving the least
bad aji?
In other words, "the best move" is too undefined a term,
at least for me, to do something with. Here the strategy
for white is too find that move which, if successful,
will bring him back in the game. Needles to add, white
should try to avoid coming up with a move which is just
too aggressive and far out. To rephrase: white should
make an overplay which is not easy to punish.
A move at/ around A, B or C comes to mind but you will
not hear me say that that line of playing is "the best"
, whatever that means.
|
Diagram 4 |
|
|
|
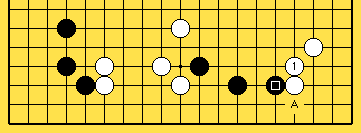
A Reasonable Move |

White 90 is not an overplay, it is a normal move
attacking the black stones while strengthening the
corner. In one aspect or another it might even be "the
best move". The scale of the attack, however, is rather
small and even if white manages to capture some stones
the question remains whether this'll be enough to close
the gap.
Black 91 is maybe not a very inspired move (black
keeps refusing to play towards the white corner
as in answer to white 90 a move to the right of
92 looks possible too) but it is also a kind of a
waiting to see what white is going to do
move. White's atari at 92 is, again, a normal move
it is also a bit low, though.
|
Game Diagram 43 |
|
|
|
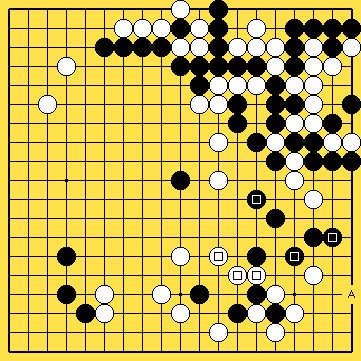
White's Shape |
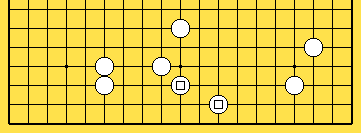
This is the shape of the territory white made at the
bottom before move 90. The corner itself and the three
white stones at the right look all right but the marked
stones are far from being in optimal position.
Granted that white very well might expand his territory,
the low position of the white stones is a valuable
indication for black, signaling that he has no business
playing there but at the same time telling him that
letting white get some points at the bottom is nothing
to worry about yet since the white stones are a bit
awkward.
The only way for white to put his low stones to good
use in attacking the black stones is to hope that black
will insist on playing at/ near the lower side of the
board. In other words, the white stones are not ideal
for making territory and, provided black won't lend him
a hand, are not very effective in attacking
|
Diagram 5 |
|
|
|
White's Shape II |
Now white has add two more moves and the shape of
his territory has changed a little. It has become
even clearer now that the marked white stones are
superfluous, they are not really necessary for making
white territory. Yes, yes, I know, white is making some
points with them because there are some black stones in
the neighborhood but the amount of points made is no way
near enough for justifying two whole moves there (at the
second line).
|
Diagram 5a |
|
|
|
What I'm saying is, black played inside the white sphere
of influence and he managed to make white defend with
every move. Sometimes this is just the way things are
but most of the time the moment your opponent gets it
in his head to go and play nearby your strong positions
attacking is the most positive thing to do (mind you, I
didn't say "the best thing" ;)
White's Shape III |
The exchange of black 1, white 2 etcetera is not
a complete disaster for white but it looks like a
submissive way of playing and missing a chance to
attack. Such a chance is exactly what white is hoping
for and by frustrating white's whishes black is doing fine.
|
Diagram 6 |
|
|
|
Black Let White Do His Thing |
By now I hope that black 93 does not come as a surprise
to you anymore. If it does, go over the above text
once more and let it soak through for a day or two.
Black correctly felt he had no business trying to do
something at the bottom and the knight's move of 93 is
just perfect. (no, I don't know if it's "the best move",
go away).
White is really trying very hard to get his teeth into
something, preferably a heavy eyeless black group, but
the harder white is trying to get a hold of something
the less he seems to be succeeding.
|
Game Diagram 44 |
|
|
|
I'm not trying to imitate Noriyuki (Pat) Morita here
and forgive me if I sound like him but the best way for
dealing with an attack is without a doubt to not be
there in the first place! If you were to just pick up
one single thing from the Daigo articles then please let
it be this Karate Kid wisdom: avoid being a target in
the opponent's sphere of influence, if you have to play
there keep it light, play attachments, forcing moves and
be ready to sacrifice your tail or even everything as it
might come to that.
Ko Or No Ko? |
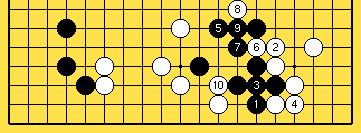
The stronger a player gets the more he'll learn to
appreciate the phenomenon of the ko fight. Coming to
like ko is inevitable if you want to get anywhere with
this game. Overdoing things is, however, a very real
danger. If black would play at 1, a move which does
look full of fighting spirit and guts, black just shows
how thick his skull actually is. First of all, white is
losing this game, any fight a ko fight or whatever is
to his advantage, nothing to lose, a win-win situation.
Second, the ko is a perfect means for white to finally
get something in his claws and try to kill it. White
does not need to take to ko right away, connecting it
will not do black much good. The dia shows that the
black stones really get heavy (no clear eye shape, too
many stones connected to let go of) because of the ko shape.
I have to admit that it still does not seem very likely
that black will die, the surrounding white stones are
not that strong, but all the same, white's spirits are
up again and who knows what might happen.
|
Diagram 7 |
|
|
|
the Solid Connection |
You weren't thinking about connecting at 1, were you?
Well, actually, you even might get away with it, - BUT
- this way of playing is something you should try to
avoid. Black cannot hope to make two eyes locally and
he'll have to move out and run.
|
Diagram 7a |
|
|
|
Flexible |

White captures at 94 and this gives him a very solid
shape, normally he'd be happy with it. In this game,
however, it might feel to white as if he has to put up
with some moldy crusts instead of the Tuna sandwich. To
make things even worse, all the extra points white might
gain at the bottom black gets back by attacking the weak
white stones at the right side! White did not gain much,
there still is no weak black group he can attack and he
also does not have any realistic prospects on making a
huge piece of territory somewhere, white is not happy.
|
Game Diagram 45 |
|
|
|
A Swap |
Suppose white would play at 1 and feel he has
accomplished quite something. Black will help him right
away to get a more realistic view of matters and play
at 2 (or A, although this is just a little thin). If
you now compare the points white made with his move at
1 and the points black made by playing at 2 you see for
yourself that there's almost no difference. Black is
doing fine.
|
Diagram 8 |
|
|
|
Black's Strategy Works: Proof |
To make clear once and for all that black didn't do bad
three stones are added for both sides, solidifying the
positions in a simple way. Now the extra points both
players scored are easy to calculate. By surrounding
three black stones white made about 15-16 points extra.
Black captured three white stones and made 16+ points
(the plus is for the huge endgame move black got at A)
In every game played anywhere in the world players will
get the chance of letting go a few stones just to get
back about the same value or even more elsewhere. It's
in the human nature, however, to hold on as long as you
possibly can to something you invested in even if it'll
mean your undoing (of course, I'm talking about the
stock market now)
|
Diagram 8a |
|
|
|
White's Tenuki |
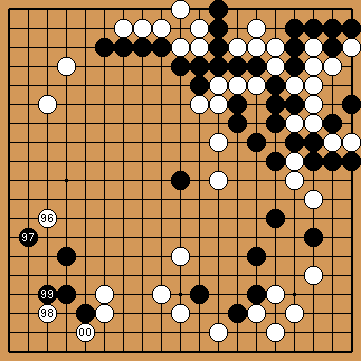
White played tenuki because the right side is not so
interesting anymore, there are still some points to
score there but that's almost endgame and never enough
for white to turn the tables and take the lead.
Black 97 and 99 are almost certainly not the best moves
possible, i.e. they're not very sharp and let white
get his way without even attempting to put up a fight.
Instead of black 97 playing at 100 looks more normal, it
secures two eyes in the corner and aims at the same time
at big endgame moves into white's territory.
For black 99 it's the same story, this move looks much
better at the place of 100. Black probably didn't choose
this line of playing because although white cannot
hope to make eyes in the corner there is some aji. In
other words, black is digging himself in, securing life
regardless of how many points he loses, black seems to
feel that white does not have a chance to do something
and get back in the game.
|
Game Diagram 46 |
|
|
|
Simple |
The follow up is the same story as in the previous
diagram, black uses a well known joseki to make eyes in
the corner and white got some stones on the outside.
|
Game Diagram 47 |
|
|
|
This seems a good place to stop and let you wonder a
little about what on earth white can do to make the game
his. Next episode of Daigo will bring the climax and
lots of stones will die. It will all be over with one
of the players resigning in 30 moves. Was it white who
realized that he might as well sign off and go home? Did
black forget to take care of his stones properly? And,
who were the players anyhow?
Be sure to come back next month for the final battle!
[Daigo 1]
[Daigo 2]
[Daigo 3]
[Daigo 4]
[Daigo 5]
[Daigo 6]
[Daigo 7]
Copyright by
Pieter Mioch, August 2001
| |