aclat, 6k* versus jansteen, 3d* (1994-04-16)
Figure 6:
B 12 -- B 16
In the real game: Index *
Backward * Forward
Variations: Parent * Previous * Next
From this diagram: Variation 1 (Hard to find) * Variation 2 (Hard to play)
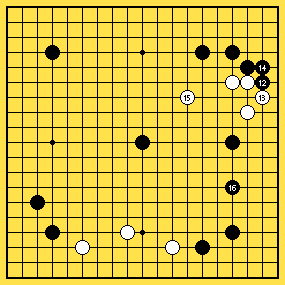
- B12
-
This move seems too concerned with the upper-right corner. The lower-right is bigger now. The black player shouldn't fear a white move at r17, this will loose some territory, but weaken the outside white group at the same time.
- W13
-
White gets one of his follow-up shapes (one of r12's follow-ups).
- W15
-
White plays very thick again. Actually white could switch somewhere else, since the group seems to be able to take care of itself. However, when it is "extra-thick" it can be used to attack or as back-up for invasions around r6 for example.
- B16
-
This move shows that black is worried about an invasion here. The shape made with q7 is slightly "nurui" though. "Nurui" is Japanese Go jargon for a move which is "flesh nor fish". It tries to do two things at the same time, but does both poorly/half. Better moves are shown in variation "Hard to find" and "Hard to play".