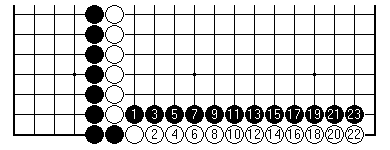

The last thing you want in a game of Go is to strive hard to build territory round the board - always a process requiring the co-ordinated effort of many stones - only to have your opponent break into it in the final stages. But such "last things" are a consistent feature of most people's early games. Let's look into one of the very common reasons.
Here is a simple tactic that accounts for much of the damage suffered by the unwary.

The road to ruin for the White stones here on the edge. It doesn't take much to understand this: you hardly even need to be able to think in two dimensions.
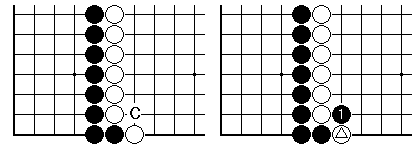
The fundamental problem lies back here, at the point marked C (for cutting point). The White stone on the edge is a singleton chain. When Black plays at C, it is on the very point that this triangle stone needs to join onto the larger white chain. White is cut in two, as well as threatened with immediate capture. White should prevent this, defending against the cut. The simple way to do this is with a play at C.
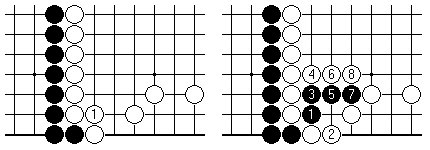
It is not always necessary to defend a cutting point. Here it would be the height of timidity for White to do so, wasting a play. Black has no chance of a successful break-in: the struggle in the right-hand diagram is pointless.

In this case there might seem to be no real reason for White to worry about the cutting point in the left-hand wall. But a superficial approach can prove costly. Black cannot gain by the direct chase in the middle diagram. But there is another chance, seen in the right-hand diagram. If Black varies the play 5 to jump ahead of White, it all depends on the white stone bearing the triangle. In its absence White would be captured. As it is White can creep out at 6 for safety.

A further tactical idea: use another exit. The way Black plays in the left-hand diagram has nothing to recommend it. Either of the other two ways to play is a plus (they are equivalent in points terms).

In case there are any endgame experts around the club tonight, I explain some more. Black could handle the position this way, also, to retain the initiative. White definitely needs a play inside, such as the triangle stone, to avoid the disaster in the middle diagram.
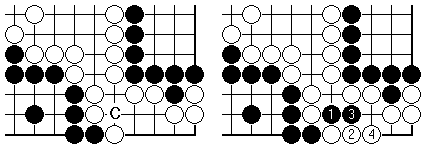
We look over more examples of these tactics. The evening ends on a high note as GOLD shows us one of his gems. This was culled from a real game here last week. The cutting point at C may look sinister to White, alluring to Black. But if Black cuts as shown, the attack turns into a cul-de-sac after White 4.
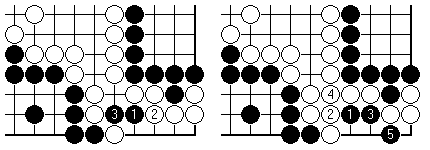
The secret here is a little lateral thinking. Don't start with the cut. Instead Black should place a stone as shown. This sets up a double threat, adding to the chance of using the cutting point to the left another possibility to the right. Now White is at a loss. Giving up the corner as in the right-hand diagram is too much to stomach, so Black will succeed in breaking in as shown on the left.
First published 2 March 2000 as On Your Side on MindZine,
Go Learning
© Charles Matthews 2000.