
We were talking about the slant towards science in Go players in the West. One way this shows itself is in the metaphors deployed to discuss the game. Beyond the usual range of military concepts, you can find some that are based in physics. "Pressure" seems to be a favourite with those coming from chess. There is something to it - Go has its kinetic aspect, as groups of stones rattle around in the centre of the board in search of two eyes. Fair enough to propose that you can intensify this middlegame melee by closing down your opponent's easy chances of expansion. "Temperature" is another term gaining ground. Parts of the board have hot (urgent) or cooler characteristics.
But no, I'm not after a Go interpretation of Newton's Third Law. I'm after the experience of someone standing too near at a party, making you take a quick step backwards. It's a flinch I'm talking about, rather than a perfectly elastic rebound.
The idea has a fundamental application in the opening stages, but it is certainly not limited to the kind of simple situation on offer here. Let's accept the clarity of basic examples as an asset.

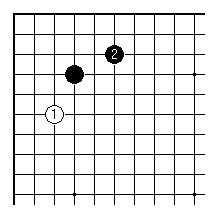
Since invading behind the 4-4 point at the 3-3 point isn't in general a good way to start off in a corner, the usual plan is to play at least one stone further away from the corner. Here White does that, and Black responds on the other side. Currently, though fashions do change over the years, this is the most common way to play out a corner with a 4-4 point in it. How can one explain the meaning of Black's play? It doesn't in any case secure the corner.
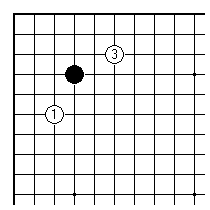
The point is that Black wants to get some benefit from having played first in this corner. "Make the most of home advantage" is a slogan that matters greatly in Go. The board is large, and each player will be stronger in some places, weaker in others. Just as in a card game you must exploit your good hands when they come along, you have to make your opponent sweat where you hold the upper hand. If White is allowed to follow up with play 3 as shown, at the same point, it is much harder for Black to get a good result round here. If you know and understand what should come next for Black, you are already quite strong.
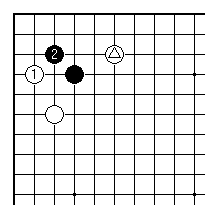
No, don't say "yes, yes" like that. Let's extract the juice from one more squeeze. When White approaches the corner, not only is the 3-3 point open to invasion (as ever was). White can slide down to the second line with the play 1. In the presence of the marked white stone that's it for the corner becoming Black's territory.
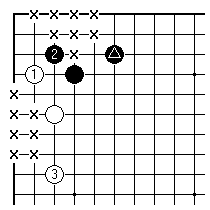
If however it's a black stone on that point, we get something quite different. This sequence is a normal one. Each player has made some territory in a secure group. The way it has been marked with 'x' suggests (with a quite conservative accounting regime) that Black has a little more. It is also the case that Black will find it easier to develop towards the centre, later in the game. Black has done a little better, on the basis of first play in the corner.
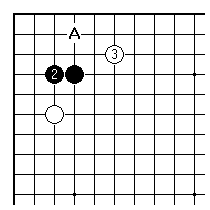
This explanation ought also to be enough to explain why Black doesn't rush to defend the corner in the way shown here. If White occupies the top side with 3, Black again faces a slide at the point A. Black can defend against it, no doubt. But that's the problem - why be forced to defend? A reaction is only defensive in that it respects the opponent's initiative, and avoids disadvantage. There is no need to look on it as being pushed around.
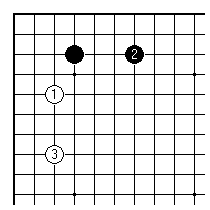
Let's broaden the discussion to include the 4-3 point. How about the exchange in this diagram? Well, Black 2 isn't a daft move. It is normally considered too defensive. However there are many worse ideas, especially for play on a small board.
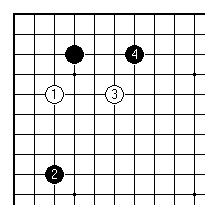
Here's the more usual idea. Black 2 deters White from extending along the left side. If White jumps out as shown as a defensive measure, then Black 4 is a thoroughly good move. The big difference is that White still has work to do, to settle the group.
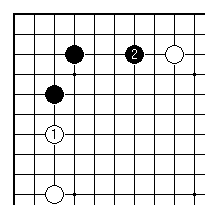
Finally, a typical play based on a corner enclosure. These formations are stable, relatively speaking. It is a common failing to assume therefore that they can be neglected once made. If White plays 1 as shown, Black 2 is indicated: it shores up the whole corner structure. I hope I don't need to run down a full list of variations to convince you of this. Black 2 is a perfectly good reaction move, and the logic of what was said above applies just as well to it.
First published 4 May 2000 as On Your Side on MindZine,
Go Learning
© Charles Matthews 2000.