
| Go Articles |
 | |
| Setpiece Kos |
Concept F: Gaps and Overlaps Model
The value of the ko, and of first capture
Topping and tailing the threats
Accounting and trimming for loss-making threats
Deep preparation
Horizon preparation
Immediate preparation
Amplification of threats
Trading for threats
Threat order and probing
Enlarging and diminishing the ko
Long threats and short intermissions
Climate and intermittency; indirect kos
Footnote on open-ended plays
There is a big difference between knowing what a ko fight is, and how to play one. There is another distinction that is worth making: between understanding how to fight a ko, and how ko fits into the overall structure and strategy of go. The point of this article is to argue that the second distinction may not be useful. The 'ko theory' given here is only a sketch, though it tries to include all important features. But it does indicate a rich relation between ko and the overall 'way of playing' one adopts.
Firstly a little abstract reasoning with the Tavernier model, which was introduced in a small way in part 6 of this series. The original article Analyzing Ko Struggles Theoretically by Karel Tavernier appeared in the Spring 1998 issue of the British Go Journal (BGJ 110). This gives a clear exposition of the main idea (which we call 'gaps and overlaps'), and then discusses limitations of the model and possible extensions; making a very useful treatment over three and a half pages. Similar ideas may have been discussed before, but I don't know of anything published about them.
To take the core idea further than was done in part 6, sections 6-8, we need to consider the entire course of the ko fight. We suppose as before that Black starts the ko - is the first to capture in it - so that White must find the initial threat.
Order the threats for White as p(1), p(2),... in decreasing order of size. Similarly order the threats for Black as q(1), q(2),... in decreasing order. We interleave these two threat sequences together as p(1), q(1), p(2), q(2), p(3), ..., which therefore represents a possible sequence of threats played in the fight - though we can't of course assume this order. When threats are played thus in decreasing order of size, both players will try to wait as long as possible before ignoring a threat, since the potential gain increases with each threat answered.
We use the notation s as before in part 6 for the 'stake' in the ko fight, assumed (to simplify notation a little) to be a+b where one of the players gains a points and the other b points by winning the fight.
Then we look at successive pairs from this sequence, like p, q or q, p. With respect to the definitely assigned number s for the stake in the ko fight (as discussed at length in part 6), we call this an overlap pair if p+q > s, and otherwise a gap pair. It doesn't much matter how we treat the case p+q = s.
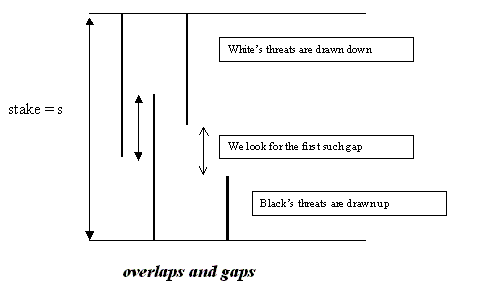
The crucial moment in the ko fight is the transition from overlap pairs to gap pairs. Suppose that there is indeed a first gap pair, say p, q, all threat pairs p(i), q(i) or q(i), p(i+1) up to that point from the sequence starting p(1), q(1),... having been overlap pairs. Then we have identified the moment at which a ko threat should be ignored. In fact:
If p, q is the first gap pair, the threat p should be ignored.
In this situation the payoff for the player ignoring p is (say) a, at a cost of p; if the threat is answered the other player can gain b, at a cost of q. We have the comparison a - p >= q - b, because s = a+b and that is another way of writing the gap condition s >= p+q. Therefore if the player who first encounters a gap pair p, q doesn't ignore the threat p, but answers it, the other player will profitably ignore q. On the other hand the previous pair q', p was an overlap pair, so that q'+p > s, giving b - q' < p - a. This reads that the other player cannot gain by ignoring the previous threat.
Therefore it is as claimed: since with this ordering of threats both players do better to wait if they can, the cross-over point from overlap pairs to gap pairs is also the cross-over from threats that shouldn't be ignored to threats that should. Of course there are two conceivable exceptional cases: no overlaps, when the first threat should be ignored, and no gaps (which is credible because of environmental threats, as in section 8 of part 6, and comment 2 below) which would be a sure sign that the ko is too small, isn't ripe to be fought at the current stage of the game.
All that convincingly solves the case when threats are played in decreasing order of value. We needn't make that assumption, but fortunately there is no further calculation to make. Say Black is the player who would win the ko, by ignoring the threat p out of the first gap pair p, q, in case the threats are played in decreasing order. Then Black has a clear strategy: ignore any threat of value at most p. Black can play threats of value at least q', in any convenient order. Black has enough of these threats to force White eventually to play some threat of value no bigger than q. Therefore Black can wait, through any confusing ordering of threats White chooses, and will still be able to gain just as much by ultimately ignoring one of White's threats.
The proper use of this elegant model seems to be as a peg on which to hang commentary. It cannot pass as a realistic, fully-fledged model of actual ko fights. On the other hand it captures something essential about ko. It does seem very useful as a way of compiling the agenda for ko theory, and so re-launching the project of understanding ko technique, on some sort of orderly basis.
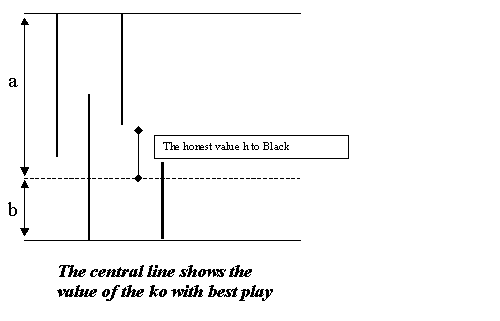
To extract from the model the honest value h of the ko, one simply needs to draw a further, central, horizontal line showing how the stake s is divided as a + b between the two players. The gain in the fight is a - p or b - q with p or q the value of a ko threat ignored and carried out. This formula for h is to be read off graphically as the (signed) distance from the end of the vertical line representing the threat to the central line.
It is almost always an advantage to capture first in a ko, rather second: one's opponent must find the first threat. In many cases, particularly in capturing races, there are techniques or tesuji for choosing between variations, in one of which you take the ko first and in the other of which you take second. It is skilful to arrange matters so that you take first.
With the aid of the model one can understand the impact of first capture: it is the difference between the threat sequence p(1), q(1), p(2), q(2), ... and the sequence q(1), p(1), q(2), p(2), ... . That may change the first gap pair p, q of the previous discussion to q, p: meaning that the other player gets the first good chance to ignore a threat. That would be a clear loss (in the signed honest value h, of magnitude the first gap) caused by taking second rather than first. There is another case, where the change is from q', p, q, p' to p, q', p', q which is somewhat more elaborate to discuss.
We have been assuming for clarity that the ko threats are given as an unordered list of numbers, representing the size. That's not realistic, in some serious ways.
One fundamental change to the model is to sort out the most and least important threats. Kos commonly have local threats: these 'threats' are more in the way of tactics that make the ko fight meaningless if they are ignored. Therefore one can be reasonably certain that it is correct to answer them. Local threats can be modelled by saying they are threats of value 1000. These will be at the top of any list of threats by value.
On the other hand it is not worth listing all small threats; the tail of the ko threat list should be removed. But simply applying a cut-off to make the list finite and quite short is less useful than the idea introduced in part 6, section 8 of considering environmental threats. If the value of a 'big point' in the game is e, taking two of those is worth 2e. We should cut off all threats p(i) or q(j) of size less than 2e, replacing the tail of each sequence with a 'graft' 2e, 2e, 2e, ... .
It would be even more realistic to assume that the grafted sequences declined gently in value from 2e, but that's becoming a fiddly refinement for present purposes.
Another fundamental point about ko threats is that they may be loss-making. In fact it is in the nature of ko threats to be forcing moves that one has good reasons not to play. In practical play it may be that aji keshi or the loss of crucial liberties is what one regrets, just as much as throwing away points (which is easily done). For modelling purposes all losses have to be numbers: a ko threat p may come with a cost c.
Therefore one may be reluctant to play some threats p which are certainly large enough to get an answer, because the associated costs c are too big. One may simply decide not to use them in that ko fight. It is usually a good idea to delay playing them.
At this point management of ko threats becomes complicated. If consideration of the basic model allows one to decide which threats are large enough, the actual order in which those are played should be: threats that lose nothing before threats that lose something. If the ko fight continues for a long time - is very seriously contested - some loss-making threats must be used. Even professionals, who teach a strong taboo against loss-making threats, do use them in the correct circumstances.
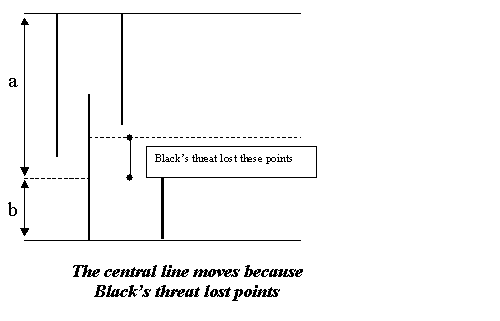
One can adapt the basic model in order to handle this concept of loss-making threats, initially by making the central line introduced in comment 1 jump up and down at such threats (the costs c are to be set directly against the honest value h: if a player loses C points in total on threats and finally gains h, that is really h-C gained). They don't have an impact directly on the stake s.
The general case is surely quite complex, but will be like a mixture of two simpler stories.
In one case, one of the two players is playing loss-making threats and the other not. The player taking the losses will end up with a total cost C, to set against the reduction in the current value of the opponent's threats. One should note that it isn't normally realistic to drive that value below 2e, the point at which the opponent is just playing big points.
In the other case both players are playing threats that cost n points if answered; we assume that if a threat is ignored it incurs no cost. Then this model can be studied by an adaptation of the 'marker' technique of part 6 section 7. The player who wins the ko will also be the last to play a loss-making threat, so that this is much like a ko with a marker of value m - n.
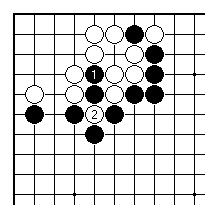
Black 1 here is an example of a crude threat. White will certainly answer with 2. Now Black has definitely lost points, and can also expect to be badly cut up here.
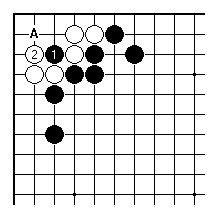
Something like this occurred in one of my games. Perhaps Black was happy with 1 as a threat. But in fact Black's aji of an attack starting at A has been lost (it can lead to a famous indirect ko for the life of the corner). White gained some points here.
What one sees in pro games often is that one player plays a loss-making threat and then the other feels able to do the same - a style of playing just for a small but definite advantage in the game.
Fighting a ko has something in common with acting, or public speaking, or decorating your house. The true secrets lie in preparation. There are a number of kinds of preparation plays.
The real way to fight profitable kos is to anticipate them through the whole game. Kos favour the player with the thicker position, who has not wasted threats for no reason. Many amateurs need to learn the lesson that a dead group should be abandoned and used as a source of ko threats, as soon as it clearly doesn't have two eyes.
There are some preparation manoeuvres that need to be undertaken when one reads out or suspects a ko fight is on the way. For example, in the endgame, threats for eventual small kos need to be amassed by some interesting techniques, but the correct timing for those tactics has to be worked out.
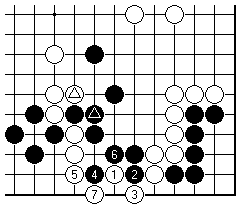
What not to do. The sequence is from an amateur game: White connects under with 7 but a ko fight can now start here. What is important is the exchange of marked stones, played immediately beforehand. It should be clear that this has wasted some local ko threats: White should have foreseen this, and not forced Black to connect here.
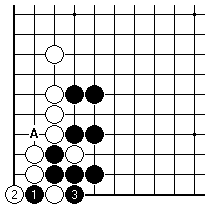
In this case it is attractive for Black to give White a stone at 1, before playing 3, in order to set up future ko threats starting at A. This way of playing has to be held back until the small endgame plays, though. Black wants White to connect at once in reply to 3, rather than fight a ko here.
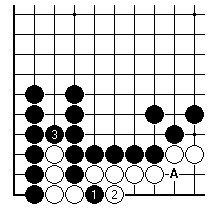
This case is similar: Black wants to throw in at 1 before playing 3, so that there will be good threats starting at A. Since Black 1 reduces the value of capturing four white stones after 3, Black should wait until endgame plays have dropped in size to below about 5 points in size (deiri).
If there is a large, urgent ko on the board it may be too late to improve your stock of ko threats - doing that requires a little foresight. There is one important idea that ought generally to be used to lay the groundwork in ko fights. In all positions where both sides can generate a ko threat, large enough to be relevant to the ko, the first player to capture should play out the threat before starting the ko. Otherwise the second player will gain a threat for the ko (playing all remaining such threats out as a package) - this amounts to losing the first-player advantage for the fight that was mentioned in comment 1.
One piece of horizon preparation that strikes quite deep at the roots of the basic model is ko threat amplification. In any one part of the board Black may have a succession of ko threats of values w, x, y, z. There is no reason to assume that these decrease steadily in value, or increase, for that matter. One way in which the Tavernier model breaks down (as the original article mentioned) is that when w < x we may be faced with wanting to play the threat of value x in the ko, because it is large enough, while w is too small a value.
In that case the initial threat in this part of the board should be played as a kikashi (forcing play) some time before the ko fight occurs. That amplifies the first threat here, to value x. One shouldn't wait until the ko fight is imminent, because that play may fail to be kikashi just because it is too small considered as a ko threat. Obviously this is a delicate technique, but it is one that really occurs in games.
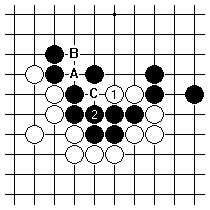
This example shows the phenomenon. If White plays 1 as a kikashi, getting the answer 2, the next threat here at A is clearly larger. Supposing White answers it at B, the third threat here C is a little smaller. There would be no point in White answering A at C, leaving two more threats here.
It is useful to distinguish management of threats during a ko fight, from those preparation techniques ahead of it.
There are further difficulties in seeing how the management of the supply of threats is to be handled. One is the possibility of playing threats in more than one fashion. By sacrifice tactics you can often create further threats in a position. You are effectively buying one or more threats. Where there is that kind of option, it is close in the theory to the idea of using a second threat that is loss-making.
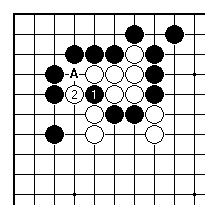
This is a simple example using a throw-in. By playing at 1 rather than at A, Black finds two threats here, not just one. There is a cost (about two points).
In what order should one play a given supply of threats? In terms of the basic model it makes sense to recommend increasing order: start with the smallest threat that one's opponent shouldn't ignore, and then play the threat next up in size, and so on.
That advice has some logic to it, but is certainly not the complete practical answer. There are quite a number of points to add.
It seems that the best general advice combines the increasing order theory with the probing theory: start playing some threats that aren't too small, and cause no apparent loss; and wait for indications on how much the opponent is prepared to lose in order to win the ko before taking loss-making decisions. One wants to be ahead on information and behind on aji keshi and prices paid for threats. And one ought to be prepared to wait in a favourable ko fight, to take maximum profit.
What is at stake in the ko may indeed change during the fight. We have seen examples where this happens with a tally change. One can envisage other reasons. For example, a weak group, the eye space of which is dependent on a ko. Threats by the defender to run out or make eyes elsewhere are effectively local to the fight if the aim is to kill the group; but not if the aim is simply a profitable attack. One's assessment of the size of the ko will change in quite a fluid way as the global position develops.
Simon Goss has introduced the name long threat for a sequence of 4, 6 or more plays that acts just as one ko threat. Say Black plays A as a threat, White answers at B, Black finds it best to play the sente move C in the same part of the board, and White duly answers at D. This is like two ko threats played as one, except that (for example) White B puts black stones into atari and Black C is simply sensible.
There is a fine line here, between a short sequence played in this manner as a concatenated threat, and a small fight breaking out that requires instant attention while the ko is briefly on hold.
When driving a car, it is easy to carry on past the correct exit. That's quite true with a ko, also.
An easy step from comment 11 takes one into the territory of ko fights that are not fought to a conclusion. One player intermits on the chance to retake, preferring to devote attention to some other fight, or perhaps to take a big endgame point.
There is a possible puzzle about why a good player should consider a ko worth fighting, and then lose interest in it. The explanations in terms of urgency are two:
Therefore two major explanations can be that the ko has been diminished, or that some (perhaps unexpected) fight has come to the point of priority, which can easily be imagined if it is sharp and between growing groups.
If one thinks in terms of miai counting and environments, though, one gets a different, perhaps less dramatic style of explanation. The value e of plays in the environment - conventional good and big moves, you could say - represents a normal level of reward for a play at current values. If the miai value of a play in the ko falls below e, there is no reason to fight it.
One can usefully think of any ko fight that isn't all-dominating as embedded in some sort of 'climate', which can be reduced to what is normally described as the temperature of the game, together with a summary of the balance of aji and influence. Provided one is careful about one's conventions, temperature is represented by the number e we have used as its stalking horse, the value of a play in the ambient environment.
According to comment 2, the first idea of climate we can derive is whether the pairs 2e, 2e of environmental ko threats are overlap pairs or gap pairs. The reasoning of part 6, sections 7 and 8 is that we should take here s = a + b + e, so that the criterion compares a + b + e with 4e (see the second graphic in part 6). As expected, we have an overlap pair with a + b < 3e: one cannot justify by miai counting ignoring a threat in this ko when the miai value (a+b)/3 of a play in it is less than the value e of a play in the ordinary business of the game. One should ignore a threat in the other case, finishing the ko. There is of course not much point fighting the ko in the first case. Either the ko will be one in which the first threat of value 2e is correctly ignored, or neither player should bother with the ko, the transition being at e = (a + b)/3.
All this goes for the simplest type of direct ko. There are many types of indirect ko - unfortunately terminology in this area isn't settled or satisfactory. Two kinds are of constant practical importance:
In either of these types of ko it can make very good sense to intermit fighting the ko, rather than try to press the fight in the hope of advantage.
The theory for these is under development: see for example Bill Spight's latest words.
The following recipe applies to the evaluation of miai counts of sequences of follow-ups. One would need such a thing in order to express in numbers examples such as the Ma Xiaochun game in part 7: where after one ko, a gote endgame play led on to a possible further ko fight in the corner. Strong go players delight in playing in an open-ended way (it's part of their strength, of course) - but to do the theoretical work one must assume that losses are calculated or at least capped. There is effectively just one simple-minded way to calculate a number from a possible ongoing sequence of losses.
If in a situation S we need to evaluate as a single numerical figure the possibility of later changes to S', then S", then S(3), S(4) etc. until we get a played-out position in which one player can suffer no further damage, we can go to the far end, S(n) and calculate the loss L(n) from S(n-1). This should be multiplied by the usual factor in miai counting (so, 1/2 for gote plays, 1/3 for ko, and 1 for sente plays) and added to L(n-1). Calling that M(n-1), we multiply by the corresponding factor for the transition S(n-2) to S(n-1) and add to L(n-2). Proceeding in this way we ultimately calculate a figure for loss from S.
This is exactly the same calculation as can be applied to the expected loss, if we assume sente losses are certain, gote losses have probability 0.5, and ko losses probability 0.333... . This forms the basis of a typical decision tree technique applied to complex situations in business school case studies.
The evidence is that this is a handy co-incidence, in
that it doesn't stretch further, to indirect kos. If
there is a remote but real possibility of an indirect
ko at the end of the line - S(4) say - one may not be
able to do more than note its possible effect, and
approximate. And try to find a way to win the game
anyway, which is almost certainly the professional
reaction. In the last resort one can always evaluate
exchanges on the board directly.
| Posted 1 October 2002. Copyright (c) 2002 Charles Matthews | ||
| Previous edition | Index | Next edition |