
Welcome to the second edition of "Gentle Joseki". Thank you very much for visiting here the first time and coming back for more. Thanks to a couple of very positive reactions it has become much easier for me to estimate what most people want to read about, and along what lines I should be thinking doing this. By all means, do continue sending me feedback! I'll try to incorporate all your questions in the next "Gentle Joseki".
For everybody who has not read the first edition here's what you missed in a nutshell. The nowadays extremely popular opening move at the 4-4 point (hoshi) was this century first used by Go Seigen and Kitani Minoru. Of course, the play at hoshi had been around for hundreds of years, if not longer, but these founding fathers of the so-called Shinfuseki made it into a standard opening move. Go Seigen's idea was to stress a rapid development of ones stones whereas Kitani was less concerned with speed but thought that paying more importance to the center than usual at that time (1930's~) was the key to a sure win.
However, a play at hoshi does not guarantee any territory in the corner!
If your opponent feels like playing under the hoshi stone at the 3-3 point there's nothing much you can do to stop him. Memorizing three standard patterns in case of an invasion at 3-3 is therefore not a bad idea. Once your opponent has successfully invaded you automatically will get a thick group facing the side and the center. However, to regard such a formation as being territory is often not correct.
In many cases the proper usage of thickness is trying to avoid turning it into profit right away! I used about 20 diagrams to illustrate and help explaining this. The target level was about 3-5 kyu but judging from the email I got players from anywhere between 20 kyu and dan level enjoyed reading it.
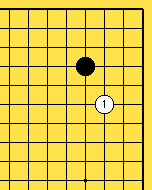
This time I again decided to visit the Ki-In in Nagoya to see if I could find my inspiration for the first episode, Mr. Ikezaki, 4 dan pro. As it turned out he was too busy teaching to satisfy my thirst for professional insights. It was a Wednesday so the professionals up to 5 dan were playing their weekly games. Among them also was Kobayashi Izumi, daughter of the world famous top pro Kobayashi Koichi. Her game didn't finish until late so unfortunately I couldn't ask her about my quest for information (not readily found in Joseki dictionaries) about the 4-4 move. Luckily my pool buddy, Nakane Naoyuki, young 7 dan was available and willing to help me a hand. Me: "This time I want to try to help people make up their mind how to answer a kakari like white 1 in dia 1." Nakane: "Is that all?"
It is safe to say that the most common and popular approach move (kakari) to the 4-4 corner stone is the knight's move (keima) at 1 in dia 1.

For black there are legion ways of answering white 1,
as a matter of fact there are so many possible moves
that I cannot hope to even cover half of them in one
episode. There are, however, only two basic lines of
thought necessary, whether -
A: to answer with an extension, or
B: to answer with a pincer.
Yes, yes, I know, there are plenty moves which do not
seem to fit either description but please bear with me,
I'll get there in time, I hope. (next edition, red.)
Diagram 1
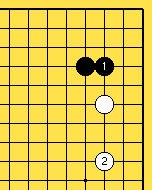
In dia 2 black played the tightest move possible, the
sagari (extension towards the side) at 1. This black
shape is called "Iron Pillar". Next time you want to
impress your friends you can say something like:" My
Iron Pillar felt a little heavy, a keima extension
perhaps, might have been better".
Anyway, the point of dia 2 is that even if black plays
the tight move at 1 white only needs to extend to 2 in
order to settle himself.
Diagram 2
If black answers at 1 (keima extension) white often
slides at 2 first, enlarging his eye space, before
jumping to 4. The point of dia 3 is that white, again,
has no difficulty in settling his stones. Although
white 2 is a basic joseki move it is very hard to
say when this move is appropriate to play. Although
white gets a little extra profit when sliding at 2,
once he makes the exchange 2-3 he lets go the option of
invading at the 3-3 point. But then again, who can tell
if white by omitting this exchange actually will have
the opportunity of invading at 3-3 in the future at all!
This is one of the decisions you'll be forced to make in
your own games, good luck!
Diagram 3
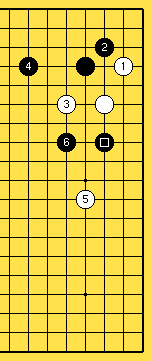
In dia 3.1, a situation is given where it is not interesting for white to slide into the corner first. Because of the position of black "[]" white cannot make the follow up extension necessary to fix up his (eye) shape. In general it is not good to slide when you cannot extend (= settling your stones). White tries to launch some kind of attack with 5. Black, however, got the chance of making delicious territory at the upper side already and now is not at all being worried about being under attack. As a matter of fact, the white stones 1-3 might end up making small life in defense first. Here, omitting white 1 and directly playing the one space jump (ikken-tobi) at 3 is much better.
To make a simple situation (dia 3) even more complex, these days black never seems to answer white 2 at 3 right away anymore. Professionals feel that playing the exchange black 3-white 4 sometimes may favor white. Instead of black 3 later on in the game black might want to play a pincer somewhere around white 4 judging from the whole board position. (next edition, red.)
Diagram 3.1
In dia 4 white gets a nice result. He takes at least 10 points worth of territory and even manages to poke his head out at 10. Although this is a basic joseki I think that the old Japanese master Honinbo Shusaku (1829-62) and the like would have thought twice before giving away the corner in this fashion. The joseki in dia 4 is typical for go of the 1990's and not seen much earlier.
It came as a bit of a surprise to me that when I spoke
with Nakane and the other pros present at the ki-in
about how Honinbo Shusaku would evaluate dia 4 most of
them were reluctant to give a straight answer. As Nakane
put it: "Well, Shusaku likely never saw dia 4 in his
whole life. Old game records tell us that instead of
building influence the focus seemed to be more on making
territory. Shusaku might very well recognize the pattern
in dia 4, when laying eyes on it, as equal, as is the
opinion of most modern professionals.
Diagram 4
The block at 3 in dia 4 is correct, but, if black has a
stone in the neighborhood of A than it can be attractive
to play as in dia 4.1 and making the upper part of the
board into a black moyo (large framework, not yet sure
territory) Without any black stone at the left side,
however, this way of playing is not feasible for black.
If white would play somewhere around A next instead
of having created thickness black might find himself
hurrying to make eyes with potentially weak stones.
Diagram 4.1
To summarize the dias 2-4, after white plays a keima kakari (knight approach move) whatever black does, white can handle it. White's kakari is the perfect balanced approach move, flexible and easy to use regardless of what black may come up with.
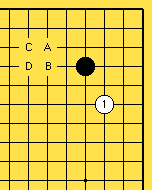
Now, to get back to how to answer this knight approach
move, when black answers white 1 with an extension to
the left the most commonly used moves are A-C in dia 5.
The move at D is also possible but often regarded as
being a little thin. The main difference between A, B
and C is that in case of a black response at A or B
for white entering at the 3-3 point is, although still
possible, not as attractive as compared to when black
plays at C.
Diagram 5
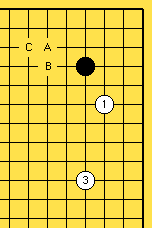
Suppose that black answers white 1 with 2 at any of
the moves A-C in dia 6. White makes an extension along
the right side (3) and black plays elsewhere. The next
variations (dia 6~6.8) show what happens as white
chooses to enter at the 3-3 point for each of the black
extensions.
Diagram 6
Here black has played the knight extension at A. The result obviously favors black, he has no defects in his shape and, besides a few points in the corner, white did not gain anything. The "[]" marked stone plastered against a solid black position has weakened a lot and is not in an interesting place for white.
Looking at dia 6.1 it seems as if invading the corner
when black has played the keima extension is out of the
question? Not so, invading is still an option and, under
given circumstances, called for. White, however, should
not immediately secure life with 11 in dia 6.1.
Diagram 6.1
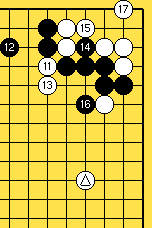
Especially because of the presence of the triangle
marked white stone white should cut first and then make
eyes. This result is playable for white. If white has
a stone at the right like the triangle-marked stone
black's move 8 in dia 6.1 maybe was too thin. So,
instead of 8 black can play at 1 in dia 6.3 and keep
things simple.
Diagram 6.2
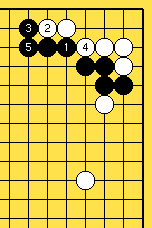
In dia 6.3 there is nothing white can do to create some
thinness in black's shape. White lives in the corner but
under normal circumstances this results is not bad for
black.
Diagram 6.3
In dia 6.4 black has played the ikken-tobi at B. It is
much like dia 6.2 with the difference that black can
capture white 13 in a ladder. If the ladder favors him
this sequence might again be worth thinking about for
white. Provided he has some stones to back him up in the
vicinity when he sets his stone 13 in motion. Of course,
however, if the ladder with 18 does not work for black
he'll probably omit the atari and instead play a short
extension to the left side.
Diagram 6.4
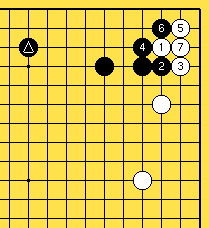
When black has a stone at the left side like the triangle
marked stone he might very well play at 4 instead of
preventing white to cross underneath as in the previous
dia. This is a very nice result for black and he has
sente, too. The move at 4 should not be played if the
left side is not interesting for black. This is also
applicable in case of the black keima extension (A) in
dia 6. Further, playing immediately at 4 with black 2 is
not an option; this gives white too big a part of the
corner.
Diagram 6.5
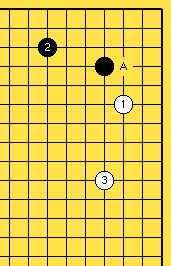
The last of the extensions possible for black in answer
to the white approach move is also the most popular. The
oogeima (large knight jump) of black 1 has been around
for quite some time. It was the most common answer to
a white approach move for centuries in handicap games
played before the 20th century. The oogeima is also the
most greedy move since its aim is to play sagari at A at
the earliest opportunity and make the whole corner,
about 18 points, into black territory. To make close to
20 points of solid territory using 3 moves is a good
deal for black. It is for this reason that white is
most likely to invade the corner; again playing at the
3-3 point, before black gets the chance to play here.
It is also very possible for white to, instead of the
extension at 3, jump immediately in the corner. The size
of the potential black territory in the corner, however,
is not the only criteria why white feels like playing at
3-3 soon.
Diagram 6.6
Contrary to the situation when black has played the
ikken-tobi extension or the (small) keima extension
it is white who can play at the outside first (white
11) after having invaded at the 3-3 point. This is of
course an enormous difference and explains that when
playing the oogeima extension with black it is actually
less likely that the corner will turn out to be his
territory. Before jumping to 11 white is tempted to peep
at A. If he plays at A, however, black won't answer
there but instead play the thick hane at B. This black
hane is, by the way, a kind of a key point in all the
diagrams from 6~6.8.
Although this result seems to favor white it must be
kept in mind that black got a move elsewhere. Besides,
black can fix up his shape like in dia 6.8
Diagram 6.7
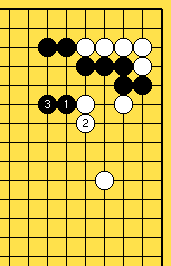
Although black has nothing to brag about he is
not complaining either, the shape with black 3 is
unexpectedly resourceful and his stones are by no means
weak.
Diagram 6.8

I don't think it actually was Takemiya "Cosmic Style"
Masaki, 9 dan who started playing the ikken-tobi but he
certainly seems to be fond of it.
42nd Honinbo title match, game 1
White: Yamashiro Hiroshi, 9 dan
Black: Takemiya Masaki, 9 dan
Moves: 1-14 (Black wins by 5.5 point).
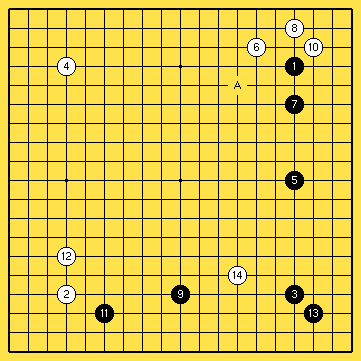
Here black 7 is played in, what I think, a very positive way of using hoshi stones, in this case the san-ren-sei formation of black 1-5-3. As I discussed in the first edition of Gentle Joseki, a stone on the 4-4 point is not ideal if you are thinking about securing territory fast, white can play at the 3-3 point and there is not much black can do about it. Therefor, to give up on the idea of making territory in the corner for the time being only seems to be natural. Former Honinbo Takemiya was a master at this. He knew precisely when to let go of the corner and when it was important to solidify. In his top days his skill at using stones at 4-4 to create large frame works is perhaps unequaled. The play at 7 is undoubtedly proper if you are thinking about making a moyo. If black 7 were at the third line (keima) than it already feels if the moyo is falling short. To repeat the key point here: the black ikken-tobi response is ideal for moyo making and fighting, exactly what the hoshi move stands for in the first place! Playing at 13 black is saying "well, the moyo is going as far as it goes, now I want to see what white is going to do about it". The answer is the cautious reducing move at 14.
In the post game analyses of this game both players agreed that before playing at 9 black actually first should have played at A or at 10, in both cases white will probably answer and black will still be first to play at the bottom.
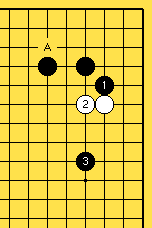
The second reason I mentioned (attacking) for playing
the ikken-tobi response is shown in dia 9. When white
feels like playing elsewhere after black's response
black will attack at the earliest convenient time with
the kosumi-tsuke (diagonal clamp) at 1. Usually white
will stretch at 2 after which black plays the severe
looking pincer at 3. If the game were to continue like
this the black ikken-tobi response is in a much better
position to put pressure on white compared to the keima
response at A.
Diagram 9
Often when Nakane and I come to talk about go, while shooting some pool, the conversation leads to the correct usage of a stone at hoshi. My point is that the keima response is not really in the spirit of the hoshi stone being a territory-oriented move. I prefer the oogeima or ikken-tobi response since these moves seem to ignore making territory for the time being. Nakane refuses to agree with me and shaking his head he says something like: "if the game of go were as straight forward as you would like to believe we'd all be 9 dan in no-time! We are not dealing with mathematical problems here, this is go, there are just too many ways of how you can put stones to use. It often limits a persons growth when he or she starts thinking along straight lines like "if A than B and never C". Instead of rationalizing or simplifying things in such a fashion it is advisable to try to keep your mind flexible". Although thankful for this kind of honest advice I find it sometimes difficult to sell to people. Let's put it like this; I guess that it is no good to have a chess like attitude towards go.
I hope that with the above you might find it easier to make up your mind what extension you want to play in your next game in answer to a white approach move. Although there is of course much more to tell about extensions I will leave that for another future episode of Gentle Joseki. From here I'll discuss the idea behind making a pincer play instead of an extension. In dia 10 the black moves from A to F are regarded as pincers. Or, in other words, these are the points you play to prevent your opponent from making a two-space extension along the side and settling himself.
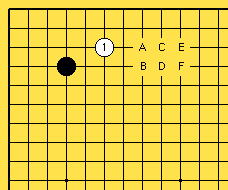
The pincer at C is not seen often but that does not
mean it is a bad move, in recent years the pincer at A
and D have become extremely popular. The idea behind
all the pincers is basically the same; to invite the
opponent to enter the corner at the 3-3 point after
which black blocks white at the side were he has played
the pincer. You already could see an example of a (now)
common pincer joseki in dia 4. It is seldom bad for
white to accept the invitation although at times it can
be too straightforward.
Diagram 10
Instead of showing you tens of variation of pincer joseki and double kakari joseki I'd like to think about when and when not to play a pincer.
First rule: play a pincer which is an extension at the same time
Black 2 in dia 11 is a nice example of an extension and
a pincer at the same time, although the joseki which
follows is a kind of out of fashion now there is nothing
wrong with playing like this. White might try to confuse
the situation by playing a double approach move at 11
instead of 3 but if black will keep his issues straight
and his head cool he should be able to build thickness
facing black 2.
Diagram 11
Second rule: play a pincer which is an extension at the same time
Dia 12 shows a pretty high-tech joseki, if you know it
and you're not at least 3 dan you are reading too much.
It is not necessary to memorize this joseki, but try to
see that no matter what white tries he won't succeed in
making black 2 a wasted move. If after 16 black gets the
chance of playing at B his shimari-moyo looks excellent
so the joseki like move for white around A seems out of
the question. To play around B with white, however, is
not to his liking either, black's shimari still looks
good but the white stones 3-11-13 aren't too happy.
Diagram 12
In dia 13 white has tried a simple joseki, also refusing
to enter the corner because he is worried that in that
case black's upper side will combine perfectly (and he's
right of course).
So, sliding at 5 and 7 looks like the way to avoid
complications and since it is a joseki white might be
thinking he's doing well here. It is true that black 2
has lost a big part of its original extension-pincer
meaning, but still this game is good for black, to get
the chance of playing at 8 is wonderful, black is doing
good.
Diagram 13
The third rule: when you can launch a double attack, play a pincer
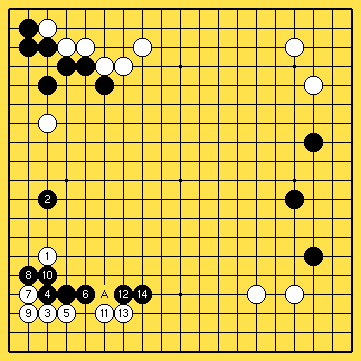
Although sometimes, as a pincer, black 2 has its
shortcomings it is right on the spot in dia 14 (if
one to the right white might settle himself sliding
underneath). Black 12 and 14 are all-out moves which are
just a little thin because of the defect at A. White,
however, will have a hard time if he starts a fight at
the left side because of his own weak stones. The game
looks very promising for black.
Diagram 14
Fourth and last rule: do not play a pincer where your opponent is strong
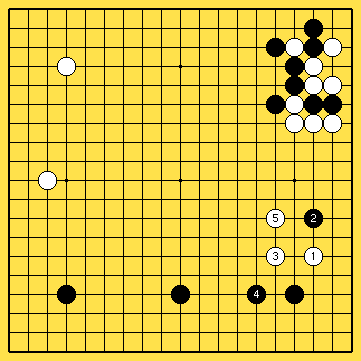
Black had hoped white would enter at the 3-3 point as
shown in dia 4.1. Although this actually might be not
so bad I will use this game example to show that you
cannot expect your opponent to follow your script and
sit by. Of course white wants to move out and eat the
black stone whole with 3 and 5.
Diagram 15
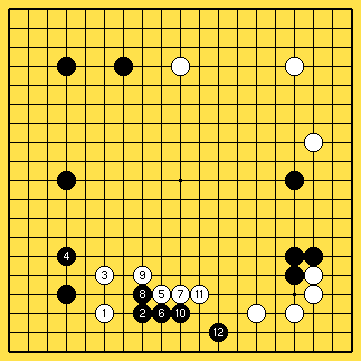
In dia 16 the black pincer is maybe not as
obviously wrong compared to the pincer in dia
15. Here white's position in the lower right corner,
however, is strong, too. Black should stay away from
the lower part of the board. Instead of the pincer the
extension at 4 looks much better. If black does want
to try something different he can play 2 at white 3.
This cap play (boshi) is a typical center oriented moyo
making move, it looks good together with the black hoshi
stones at the left side. The result up to black 12 is,
by the way, not to black's liking, to have to make eyes
so early in the game in a cramped position is in general
bad.
Diagram 16
Well, that's almost it for this time. I sincerely hope you are not too confused by all this. Next episode (Gentle Joseki III) I will get back on dia 3 briefly to handle exactly why black often plays elsewhere after white slides into the corner. Further more I'll continue about how to answer a keima-kakari. There are still very interesting moves left which seem to be neither, an extension or a pincer.
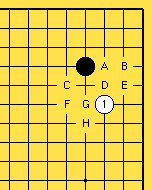
The possible black answers (A-H) in dia 17 are what you
can look forward to. All the moves, from A to H are possible
although D and H are rare but at times interesting.
Diagram 17

To finish this episode of Gentle Joseki here is a little
extra, part of the game Izumi played the 18th October 2000
at the Ki-In of Nagoya.
Oteai grading tournament,
Black: Kobayashi Izumi, 4 dan
White: Miyagawa Fumihiko, 6 dan
Moves: 1-19 (Black wins by 15 points).
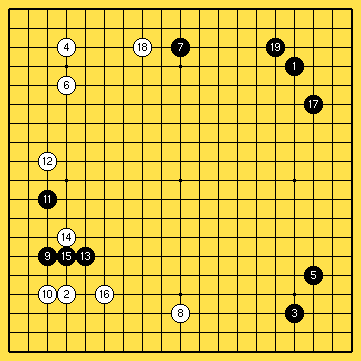
There is nothing terribly wrong with the fuseki, in the
middle game white made a bad mistake and on top of that
there is no komi in games played for the Oteai. This
explains the unusual big difference for professionals of
15 points.
Look at how white played the tightest moves possible
when playing at 10. Because of the presence of white 8
white judged that it would be too sweet to let black
get a part of the corner. It shows how difficult it is
to make solid territory with a hoshi stone when you
look at the upper right corner. White refuses to play
an approach move there so black has no choice then to
make territory but this takes 2 extra moves. The white
shimari 4-6 as well as the black shimari 3-5 show that 2
moves is enough to ensure the corner territory.
Be sure to come back next month for the next episode of "Gentle Joseki"
Index of joseki's mentioned in this episode:
Japanese words and their English equivalents used in this article:
| NAMES | |
|---|---|
| Go Seigen | (1914-)
Japanese reading of his Chinese name
Wu Qing-yuan.
The unrivaled go genius of the 20th century. Although he is
approaching 90 now professionals like
O Rissei
and (until she moved to Korea)
Rui Naiwei
still recognize his genius and attend study sessions at Go's
house in Tokyo. Korean hopes are high that 25-year-old
Lee Changho
will turn out to be the Go Seigen of the 21st century.
For more about Go Seigen read
Mindzine.
Go is, by the way, a family name. This, very appropriately, makes people address him as "Mr. Go", or "Go Sensei" (lit. "Go Master") in Japanese. |
| Kitani | Family name, Kitani Minoru (1909-1975) was, together with Go Seigen the founder of the "Shinfuseki". For more about Kitani read Mindzine. |
| Kobayashi | Family name, Kobayashi Izumi (1977~ ) Professional 4 dan, she is one of the stronger female players in Japan. She is also the grand-daughter of Kitani. |
| Miyagawa | Family name, Miyagawa Fumihiko (1972~ ) Professional 6 dan, very fond of Mah-Yong |
| Nakane | Family name, Nakane Naoyuki (1972~ ) Professional 7 dan and an excellent 9-ball pool player |
| Shusaku | Adopted name, Honinbo Shusaku (1829-1862) Go genius of the 19th century |
| Yamashiro | Family name, Yamashiro Hiroshi (1958~ ) Professional 9 dan, for a long time the star player of central Japan. A record 11 times holder of the Okan title and several times challenger for the big titles. After his clashes with Takemiya for the Honinbo title he seems to have changed a little. He is still a strong 9 dan but he seems not as ambitious and full of energy as before. |
| TERMS | |
|---|---|
| atari | "check" on at least 1 stone |
| boshi | literally "hat", cap play to prevent your opponent from jumping towards the center |
| dan | ranking system for stronger players |
| fuseki | opening |
| hoshi | star; any of the 9 dots one the go board, the middle one is called "Tengen" (=center/origin of heaven). Hoshi is often used when talking about an opening move on the 4-4 point. |
| ikken-tobi | jump (straight) of one space between also; one-space jump |
| joseki | a sequence of moves (in the corner) giving both players a locally equal results |
| kakari | approach move to the corner |
| keima | jump of one space between and one diagonal, also; (small) knight's move |
| keima-kakari | approach move to the corner at the distance of one space between and one diagonal |
| ki-in | officially: Nihon Ki-In, Japanese go association located in Tokyo, Nagoya and Osaka |
| komi | compensation for white (usually 5-7 points) since black gets to play the first move. (often there is a half point komi, as in 5.5 stones komi, to prevent a game from ending in a draw) |
| kosumi-tsuke | a move combining a kosumi (=diagonal move) and a tsuke (clamp move) |
| kyu | rating system used for intermediate players |
| moyo | large framework often forcing the opponent to (try to) reduce it drastically in order to stay in the game |
| oogeima | jump of two spaces between and one diagonal, also; large knight's move |
| Oteai | year around tournament only accessible for Nihon Ki-In professionals, only by playing well in the Oteai can a promotion be earned also; pro ranking/ grading tournament |
| sagari | literally "descending (move)" stretching towards the side of the board from the second, third or fourth line |
| san-ren-sei | 3 hoshi of the same color at the same side of the board |
| sente | having the opportunity to play elsewhere first leaving the current situation. (example: He had sente so he decided to play tenuki) |
| shimari | "closing" (the corner) formation, any 2 moves which effectively seal the corner, also "enclosure". |
| shinfuseki | "New Opening" a way of playing starting in the 1930's which does not accept the go-theory of the 19 century as being without its weak points. |