
Gentle Joseki, part VII
by Pieter Mioch
An introduction to corner patterns, especially but not only
meant for kyu players.
Introduction
Hello, it's good to see you here again, how's life? I'm
afraid that this is going to be the shortest introduction
so far. We've been busy transferring the jungle outside
our window in to a herb-and-vegetable garden and I have
to post this now if I'm to make it inside March. So, for
this time you'll have to make due with just the straight
stuff. Here goes!
The Patterns
Non- Standard Moves |
 |
 |
 |
|
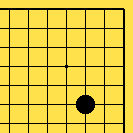
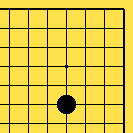
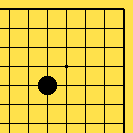
The corner plays in dia 1, 2 and 3 have at least two
things in common. One you guessed already I presume;
they are not standard opening moves. The second
similarity may come as a bit of a surprise though: these
moves are all recognized as playable and sometimes
appear in pro games. Like a first move on tengen (10-10
point) the plays at the 6-3 point, the 6-4 point and the
5-5 point, however, are difficult to understand. I for
one have not really a clue what they're all about. This
does not, however, stop me from freely using them in my
games. They are, unfortunately, quite hard to put to
good use. In the future I might come back at the moves
in dia 1 and 2. In this episode of Gentle Joseki I would
like to focus on the move in dia 3, the 5-5 point.
|
Diagram 1, 2 & 3 |
|
|
|
67 Years Ago |
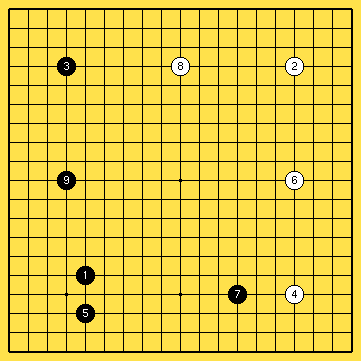 |
Black: Onoda Chiyotaro 5d
White: Kitani Minoru 5d
January, 1934, black wins by resign.
Recently the young (22) Japanese talent
Yamashita Keigo, 7 dan, has gained
popularity because of his unorthodox opening moves.
He did this in such a splendid way that he conquered
Kobayashi Koichi in 2000 for the Gosei title and won
the best of five, three games to two. It is not true,
however that young Yamashita is making these things up
all by himself.
Dia 4 shows that the 5-5 point was already played, in a
serious fashion, well over 60 years ago. By the look of
this game it might well have been played yesterday.
|
Diagram 4 |
|
|
|
Let's first answer the question, which surely must be
on your mind: "Why on earth would anybody feel like
playing the 5-5 move"? My joseki dictionary, the "Joseki
Daijiten" I occasionally glance in has an excellent, if
not completely satisfactory, answer.
"Playing a move at the 5-5 point has the advantage
of having a big psychological effect on your
opponent"
If this were the whole story then everybody and his
brother would be playing at the 5-5 point but, as of
today, that is certainly not the case.
Usually when doing Gentle Joseki I avoid opening my
joseki dictionary and instead try to explain things in
my own words. As an exception I'll give you the rest of
the text, it seems to be only fair to let you share in
the Daijiten's infinite wisdom...
"It is however, undeniably the 5-5 play does
not help much in terms of territory. It is a move which
naturally goes for influence..."
...Well, since there does not seem to be any logical
reason for choosing to play at 5-5 let's switch to a
different strategy in our crusade for wisdom, knowledge
and blood.
A very good reason for not playing at
the 5-5 point is because of the lack of proper follow-up
moves. As a matter of fact, this is one of the major
drawbacks of all the symmetrical opening moves, the 3-3
point, the 4-4 point as well as the 5-5 point, not to
mention tengen... Symmetrical corner moves do not make it
easy to decide where to play a second move if the chance
arises.
(The most effective way of guarding the corner and
getting profit is the ordinary "shimari", the shape you
get with a move at the 4-3 point and the 5-3 point. I've
been over this a couple of times before and will skip
a detailed explanation. If you're interested please go
through earlier episodes of Gentle Joseki.)
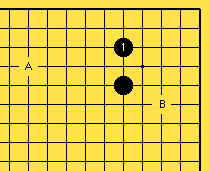
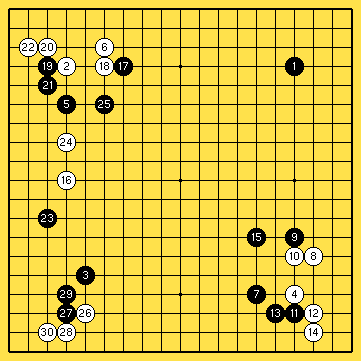
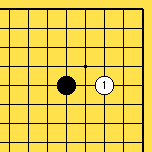
The 5-5 Formation |
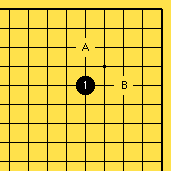 |
The best thing black can do seems to be to reinforce the
corner with a move at A or B as shown in dia 5. Even
with this additional move, however, it is still in the
dark exactly how many points black can expect in the
corner. To put it in a different way, playing 2 moves
black still didn't make one point of territory!
|
Diagram 5 |
|
|
|
Not Very Sensible |
 |
 |
 |
|
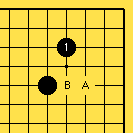
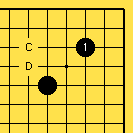
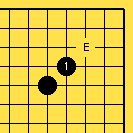
As is shown in dia 6, 7 and 8 black's other follow-up
moves do not make a whole lot of sense. Black can try
going for territory with 1 in dia 6. In that case,
however, black would very much like the 5-5 stone to be
at either A or B. Black 1 in dia 7 is also an unnatural
move, now the 5-5 stone would be more useful at C or D.
Black 1 in dia 8 is really funny looking, it would be
something if it would be a good formation. Actually, I
am not sure how to rate this shape, it might be worth
trying. What I do know, however, is that there is a
terrible defect at E, when white plays here black's
corner is gone for sure.
|
Diagram 6, 7 & 8 |
|
|
|
By the way, just because in dias 6-8 black one results
in giving black a less optimal shape does not mean that
you will never see these kind of formations appear in
your own game or pro games. If, for example, in dia 8
white would have a stone at the 6-3 point the position
reverts to a perfectly normal joseki.
It is wishful thinking, however, to expect white to be
as nice as to approach the black formation in a way
which makes black's stones come out excellent. Playing
white you might feel the urge to restore the situation
to a more common one. A pattern you have seen before and
know. This is not what the game is about, however, and
if your opponent played a strange move it's up to him to
make it work, there is no reason for helping him
along.
(white 12 in dia 10 is an excellent move with this in
mind, white does not make it any easier for black by
keeping distance and playing solid)
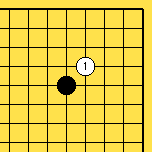
Common Follow-Up |
 |
Which brings me back to black 1 in dia 9. This follow-up
move is most often seen in pro games and is a standard
continuation. Which is to say that black is persistent
in his far-out strategy, playing close to the corner
but not claiming it as yet. Next black can try to put
his formation to good use in moyo making (or fighting)
in the direction of A. Or black can aim at playing B,
making a thin 20 points of territory. ("thin" meaning
that depending on white stones in the neighborhood black
will be hard put to keep his corner territory unharmed)
|
Diagram 9 |
|
|
|
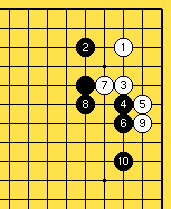
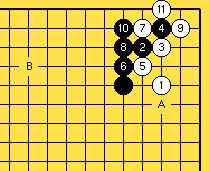
No Territory |
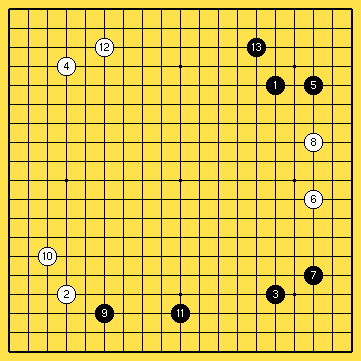 |
Black: Kato Atsushi 6d
White: Yoda Norimoto 9d
White wins by resign, October 1996.
In this game black choose to ensure the corner playing
13. A little later, however, white successfully invaded
at the 3-3 point and black's territory vanished. This
would have been all right if black had some weak white
stones as a target to attack and possibly capture.
Unfortunately this was not the case, thus failing to put
his stones to good use black had to resign. Formation
like 3-7 and 1-5-13 are possible but not at all easy to
handle skillfully.
|
Diagram 10 |
|
|
|
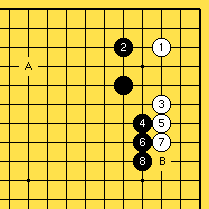
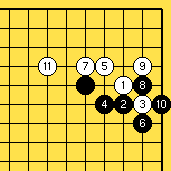
White Can Invade at Will |
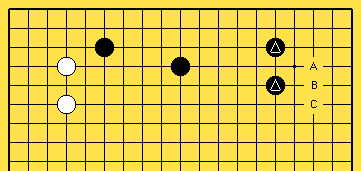 |
To be perfectly honest, I do not feel comfortable with
the triangle marked formation in dia 11. To play two
moves in the corner and still be completely open and not
able to stop white from invading at A, B or C is not to
my liking. If, for example, black made a framework as in
dia 11 I feel this must compensate for the open-skirted
corner. As it is, however, black cannot count on more
than 12-20 points, not counting the corner.
|
Diagram 11 |
|
|
|
Now we have a bunch of plausible sounding reasons why
you should never play at 5-5. And, perhaps, the best
thing to do is to stop reading right here get on with
your life, forgetting about the existence of this weird
move completely and be happy.
Thank you for staying with me, coming this far shows
courage. By still being here however, you admit that
you're interested in the 5-5 move. So, I think it is
time for you to try the 5-5 move in your own games a
couple of times to see how you like it. Play it a couple
of times in one or two corners and than go over the rest
of Gentle Joseki 7. You will appreciate the rest even
more after having faced similar situations in your own
games.
Let's have a look at another aspect of the 5-5 move.
What happens if white does not keep his distance
and chooses to play an approach move?
How to Enter
How to Enter the Corner |
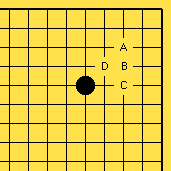 |
Trust me on this, only few players can resist the
temptation and usually within a couple of moves your
opponent will play at A, B, C or D. For all of you
who were expecting fabulous hamete (trick) moves or
aggressive counter measures for black when white enters
the corner I have to disappoint you. There are no tricks
worth mentioning involved with the 5-5 corner. The only
"trickery" thing about it is that white most of the time
does think that the strange looking 5-5 move cannot
possibly be any good no way, no how. In this he his
wrong, this misperception can be exploited.
|
Diagram 12 |
|
|
|
Entering at the 3-3 Point |
 |
When white enters at the 3-3 point in dia 13 black does
not need to do anything special. By playing steady moves
black seals white in most effectively and the result is
not to white's liking. Although playable under certain
circumstances white should not volunteer to be locked up
like this.
|
Diagram 13 |
|
|
|
Variation |
 |
In dia 14 white jumped two spaces, disliking the idea
of being locked up. Black, again, plays very calmly and
pushes white along the third line. The result is nice
for black and either extending towards A or blocking at
B next is extremely big.
|
Diagram 14 |
|
|
|
Conclusion, white should not hurry entering at the 3-3 point.
Entering at the 4-3 Point |
 |
Entering at the 4-3 point is often a better move
compared to entering at 3-3. The territory white can
make is a little bigger and while white is solid the
black stones feel a little thin. After black 4 white
often slides at A. This, however, is not necessary as
black cannot expect to kill the white stones if white
were to omit playing at A. The result after white A is
unclear. Black has more or less sealed his opponent but
his stones are by no means thick. Very much depends on
the black player's ability to create an impressive moyo
(oversized territory) or his fighting skills. It is,
however, a very, very thin line between black stones
(2-4) which are skillfully keeping a weak white group
from linking up with the corner stones or the same black
stones which get gobbled-up after being sandwiched
between two white positions.
|
Diagram 15 |
|
|
|
Joseki Like But... |
 |
The result in dia 16 is not good for black. By trying
to play what feels like a "normal" joseki line black
ignores the purpose of the 5-5 point. Black always
should first be concerned with getting stones at the
outside, preferably locking white up in the corner.
After white 7 black has gained neither territory nor
influence.
|
Diagram 16 |
|
|
|
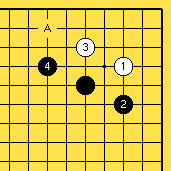
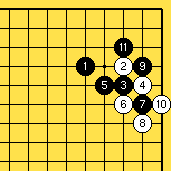
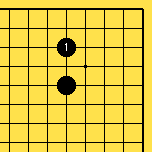
Entering at the 5-3 Point |
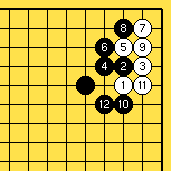 |
From my own experience I can tell you that white 1 is
by far the most popular way of entering the corner,
at igs 3d* level that is. The contact play of black 2
is a resourceful reply to white 1. A natural way of
playing out the situation is shown in dia 17. On an
empty board this result favors black and this sequence
is consequently not a joseki. Black 6, by the way, is
perfectly timed. Although white would like to extend to
8 this is not an option.
|
Diagram 17 |
|
|
|
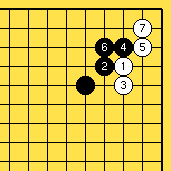
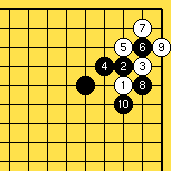
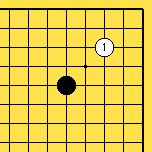
Do Not Stretch |
 |
After black 1 white 2 is a bad move. If, for example,
black cuts at 3 white will get an inferior position.
Also note that the exchange white 2-black 7 is terrible
for white.
|
Diagram 17a |
|
|
|
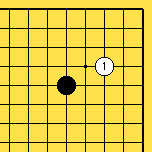
All About Shape |
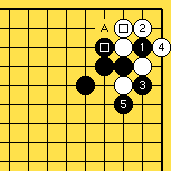 |
Black can also cut at 1 and get a good result, although
I prefer to play as in dia 17a. The result in dia 17b
can also be judged by looking if in the final position
any strange exchanges have been made. What I mean is:
suppose black "[]" and white "[]" were the last moves
played here. Now why in the name of all Go-Saints would
white answer black "[]" with any other move than the play
(hane) at A?
|
Diagram 17b |
|
|
|
This kind of thinking may seem trivial and not to the
point. If you think so then I only can beg you to take
the following advice to heart since this is exactly what
all that "Good Shape" - "Bad Shape" talk is all about.
Judging a sequence by looking for and determining if
any questionable exchanges are made is the
most powerful tool you have to judge a result
correctly. And the beautiful thing is, you do not need
to be a high-leveled dan player in order to apply it to
your own games! When thinking like this, however, do not
forget that two strange exchanges, one played by you and
one played by your opponent, cancel each other out. It
is also true that given enough compensation for having
played a bad-shape move can justify it. On the other
hand, it is next to impossible to obtain a good result
by having played 2-3 questionable exchanges more than
your opponent.
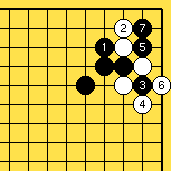
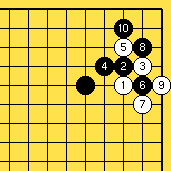
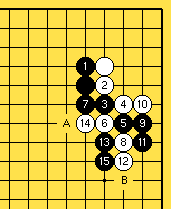
Another Variation |
 |
Dia 18 shows a variation for white. After white 5 black
still attaches at 6, white 7 follows and black pulls
back at 8. Black 10 is a very sharp move but the best
white can do is reinforcing at 11. To make most of
black's shape 12 is an exquisite play. The result again
favors black, but remember, the board is *never* empty.
|
Diagram 18 |
|
|
|
A 5-4 Joseki |
 |
I should have called dia 19 reference diagram 1 because
it is not about the 5-5 move, or is it?
The shape after 1-6 is similar as with the 5-5 variation
shown in dia 17. Dia 19 shows a common 5-4 joseki, if
white with 8 captures black 9 black captures white 6 in
a ladder.
|
Diagram 19 |
|
|
|
Not So Good for Black |
 |
To apply the joseki shown in dia 19 to the 5-5 move,
however, is not correct. The sequence shown in dia 20 is
not a joseki; the result is judged inferior for black.
|
Diagram 20 |
|
|
|
Not So Good Either |
 |
Even if black 6 is played at the inside white
immediately goes after the cutting stone and captures it
with 9. Again this result is not satisfactory for black.
|
Diagram 21 |
|
|
|
Note, however, that if the game is well underway and
the opening stage is more or less finished then black
might be glad with the results in dia 20, 21. Especially
dia 20 seems to be not too bad at all.
Attaching at the Outside |
 |
To attach at the outside right away does not give black
a convincing result either. In dia 22 you can see that
white makes a lot of profit and that black's outside
position does not make up for the points lost in the
corner. If black plays 6 at 7 white extends at 6 and
gets a good result too.
|
Diagram 22 |
|
|
|
A 4-3 Joseki |
 |
It is possible to revert this situation to a ko-moku
(4-3 point) joseki when switching the order of black 2
and the move at the 5-5 point. After white 11 black can
chose to play A or B. The result as shown in dia 23 is
good enough for black and he is not complaining.
|
Diagram 23 |
|
|
|
Entering at 4-4 |
 |
The remaining possible move for white to enter the
corner under the 5-5 point is the play at hoshi (4-4
point) as shown in dia 24
|
Diagram 24 |
|
|
|
Influence Again |
 |
For black it is very important to judge the surrounding
situation correctly before deciding how to use his 5-5
stone. In dia 25 a straightforward variation is shown.
The result may look good for white (it certainly is not
bad for white) but is playable for black, too. He has
sente and black can continue with is influence oriented
playing style somewhere else.
|
Diagram 25 |
|
|
|
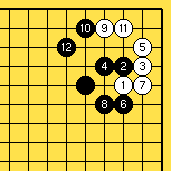
White Travels a Dark Path |
 |
White might try the unhealthy looking moves of 4 and 6.
If the ladder is good for black he can play like dia 26.
After black 15 black can capture two white stones at
either A or B. If the ladder is not favorable for black
there are other ways of getting a satisfactory result.
That is again, unfortunately, a bunch of diagrams not
given this time.
|
Diagram 26 |
|
|
|
And for the main feature (ahum, ahum) of Gentle Joseki 7
the opening of a game I played at igs. Both players are
level 34*.
Who Let the Dogs Out? |
 |
Black: me
White: m***y
I do not pretend that you'll learn from going through
this game. To be honest, you might very well play two
stones weaker because of it.
I usually combine high approach moves like black 5 and
7 with a 5-5 opening. The shoulder hits at 9 and 17
are also played with the idea of making "something"
(anything) towards the center. When black, till white's
surprise, did not go under in a fierce fight white asked
for adjournment and the game was suspended at move 136
with mutual consent. Black 15 is not a very good move,
I'm afraid, it is very thin. You, of course, now know
what black's next move should be, don't you?
|
Diagram 27 |
|
|
|
Be sure to come back next month for the next episode of "Gentle Joseki"
P.S. Not all Yamashita's games include plays at the
5-5 point but some of them do and if you'd like to go
through his games download them through
Yamashita
Keigo's biography page.
Appendix 01
Index of joseki's mentioned in this episode:
Appendix 02
Some Japanese words and their English equivalents:
| TERMS |
|---|
| aji |
taste; remaining possibilities, however distant they may be |
| atari |
"check" on at least 1 stone |
| dan |
ranking system for stronger players |
| fuseki |
opening |
| gote |
not being able to leave the current situation first,
allowing your opponent to be able the play elsewhere first |
| hoshi |
star; any of the 9 dots one the go board,
the middle one is called "Tengen" (=center/origin of heaven).
Hoshi is often used when talking about an opening move
on the 4-4 point. |
| joseki |
a sequence of moves (in the corner) giving both players
a locally equal results |
| kakari |
approach move to the corner |
| kikashi |
a move which is almost impossible to ignore,
also "forcing move" |
| ko |
situation which occurs when it is possible to immediately re-capture
the stone your opponent played in the previous move to
capture 1 of your stones.
Since there is no end to this there is the ko-rule,
which prohibits a player to exactly recreate a previous
board position. |
| komi |
compensation for white (usually 5-7 points) since black
gets to play the first move. (often there is a half point komi,
as in 5.5 stones komi, to prevent a game from ending
in a draw) |
| komoku |
the 4-3 point |
| kori-gatachi |
inefficient shape, uneconomical, using to many stones
to make only few points (hollow wall) |
| kyu |
rating system used for intermediate players |
| miai |
of equal value |
| moyo |
large framework often forcing the opponent to (try to)
reduce it drastically in order to stay in the game |
| ni-ren-sei |
two 4-4 moves one the same side of the board |
| ponnuki |
the name of the shape when 4 stones capture one enemy stone |
| san-ren-sei |
3 hoshi of the same color at the same side of the board |
| sente |
having the opportunity to play elsewhere first
leaving the current situation.
(example: He had sente so he decided to play tenuki) |
| shimari |
"closing" (the corner) formation, any 2 moves which effectively
seal the corner, also "enclosure". |
| shin-fuseki |
"New Opening" a way of playing starting in the 1930's which
does not accept the go-theory of the 19 century as being
without its weak points. |
| tatami |
thick mats of woven rush stuffed with straw,
traditional flooring |
| tenuki |
playing else first when judging the current situation
does not require an immediate follow up |
| warui |
bad |
Copyright by
Pieter Mioch, March 2001