An Effective Fuseki Strategy

Neither Attachment nor Detachment

by
Miyamoto Naoki
9 dan professional

First published in the Otsuka Igo Diary 1994

The Basic Strategy

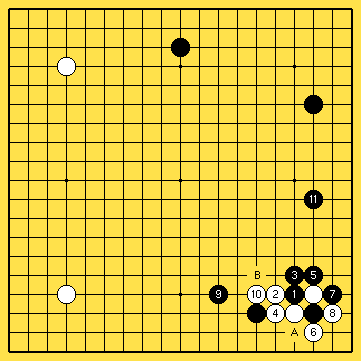
Figure 1 It is no fun to always play a common fuseki. Sometimes you should try to devise an elaborate plan and play a free and bold fuseki. This might help you to enlarge your Go perception. Black 1 and 3 are called o-moku-hazushi, trying to confuse the white player. Next, black 5 finishes blacks opening strategy. This fuseki invites white to enter at "A" or "B". In this case white just played 2 and 4, but actually these moves will not be important to judge blacks position on the right side.

Figure 1

Territory versus influence

Diagram 1 In this diagram four different kind of corner moves are shown. We will discuss the influence of these moves, both on the corner and on the edge of the Go board. The [] stone (o-moku-hazushi) gives about 60% corner influence and 40% edge. So o-moku-hazushi gives attention to both the corner and the edge, neither attachement nor detachement (flexibility). The [] stone (komoku) gives about 80% corner, and 20% edge influence. The [] stone (hoshi), and [] stone (moku-hazushi) give about 70% corner and 30% edge influence. For the sake of completeness, a (3,3) stone (san-san) would be 80% corner influence, so no effect on the edge at all.

Diagram 1

What is white's next move in this fuseki (see The Basic Strategy diagram)?

Diagram 2 Probably more than 50% of the players would answer "1" or "A". Let us discuss both moves and teach you some tactics on how to deal with them. This will give you guidance on how to reach a favorable opening.

White 1 seems the most likely move. Black's answer at 2 is the only move.

Diagram 2

Likely continuation

Diagram 3 White will probably play 3 and under normal circumstances, the sequence up to 11 can be expected. Black 12 is the finishing touch of black's opening strategy. It seems a modest move. However it not only makes profit, but also keeps a nice balance with the [] stone. Above that, black has a follow-up move as well.

Diagram 3

What is black's next target?

Diagram 4 For example, if white would play 1, black would strike at 2. This move was black's aim when playing 12 in the previous diagram. White 3 and 5 can't be helped, but are extremely painful to play. Black just connects solidly at 6. Later, still some attacking aji (possibilities) is left for black in this position.

In the beginning you should not create a weak group. Therefore, white should play 4 instead of 1 in this diagram. In this case black will play at "A" or "B". Anyway black will feel comfortable by having settled the lower-right corner.

Diagram 4

Alternative

Diagram 5 Instead of white 11 in diagram 3, white might play 1. In this case black will play 2, and the 6/8 attacking moves will be the follow up. How about this? Black's shape looks quite comfortable, doesn't it? White has to worry about his own life and the game is expected to be a hard fight for white.

Diagram 5

Why this game will be in black's favor

Diagram 6
Diagram 7
These two diagrams show why this game will be in black's favor. Diagram 5 looks like black plays 1 kakari against white's [] stone. Up to move 17 in diagram 7 is joseki (an established pattern). But there is a definite difference between diagram 5 and diagram 7. It's the move white 2 in diagram 6. There is no white ally around 2 in diagram 5, that's why that diagram is good for black.

Diagram 6 & 7

An alternative for white?

Diagram 8 If white plays 2 and 4, what should black do? Black should just make a pon-nuki in the corner with 5 and 7, and play hasami (pincer) at 9 to attack white's position from that side. Next, a black stone at 11 makes the right side nicely balanced. Besides, there is still attacking aji left for black. This is also a success for black.

If instead of 4, white plays 6, then black 4, white 8, black "A", white connects, and black "B". This is positively better for black.

Diagram 8

In the winning mood

Diagram 9 This diagram shows what happens when white plays 2 after black 1. Up to 10 black should be happy to let white play on the third line while black gains thickness. Black 11 next, will give clear prospects and a winning mood as well.

Diagram 9

Big satisfaction

Diagram 10 Diagram 11 If white 1 (instead of 2 in diagram 9) then black simply plays 2 and 4 with big satisfaction. After white 5, black 6 becomes a tremendous move. Why does black have such big satisfaction? (see diagram 11).

This is the same situation as when black invades san-san after white's [] move in diagram 11. White 2 would be a complete mistake in direction. Of course white should separate with "A" instead.

Diagram 10 & 11

How to deal with white 1?

Diagram 12 Diagram 13 Next, how to answer white 1 in this diagram? In this case black plays 2, ryo-gakari (double kakari). As you might notice, this is the same as when white wouldn't answer a black kakari on a hoshi stone as in diagram 13.

Diagram 12 & 13

Cooperating influence

Diagram 14 Black can expect this variation. Up to black 14 is joseki. Black's influence in the upper-right is increasing and cooperating nicely with the [] stone. Normally this result is even, but in this case clearly favorable for black. After white 15, black plays 16 to strengthen black's lower-edge group. White 15 (or "A") is necessary, otherwise...

Diagram 14

An immediately opportunity

Diagram 15 It often happens that white forgets to play 15 (or "A"). This gives black an immediately opportunity: black should play 1. White 2 aims to cut at "A" but black simply ignores this and connects with 3 and 5, demolishing white's territory.

Diagram 15

Sacrifice

Diagram 16 Of course, white cuts, but when black responds calmly by sacrificing three stones in the sequence up to 13, black will become very thick. Besides, the white group is not yet 100% alive.

Diagram 16

A huge moyo

Diagram 17 If white plays 1 (instead of 3 in diagram 14) black encloses the white corner with 2 and 4. After black plays 8 the game will focus around black's huge moyo (territorial framework). If white omits 7 black can play the perfect shibori (squeeze) with black 7, white "A", black "B".

Diagram 17

Waiting for a chance to attack

Diagram 18 If white plays 2 black will just take the corner by invading san-san. Usually, white has a stone around "A" or "B" in this joseki. In this case there is no such stone, which implies black can't be bad in this position. White 4 and 6 are to be expected. Black just takes profit up to move 7. Afterwards, black can wait for a chance to attack the whole white group. If white 5 instead of 4, black can follow the same variation.

Diagram 18

Black's attacking attitude

Diagram 19 When white doesn't invade the lower-right corner, but for example plays 1 instead, black should play 2 to increase black's influence. If white answers at 3 then the sequence up to 8 might follow. This flow shows black's attacking attitude. In this case black's [] stone turns out to be in a perfect position. If white plays 5 instead of 3, then black will play at 3 happily. Sooner or later white will have to invade at "A" or "B". When white waits too long black should play "A" at the first opportunity.

Diagram 19

Legend

Translation Kishiko Shimizu
Typography Jan van der Steen
Go diagrams Liberty
Go images sgf2misc


Copyright © 1994 Otsuka Printing Co.,ltd