 |

Daigo, episode 3
A monthly column by Pieter Mioch featuring a thorough
game commentary tastefully seasoned with go-related
stories and clues to the meaning of life.
"If you never question anything, you won't get very far"
Introduction
To fight or not to fight, and, if to fight where to
fight? Assessing the value of a fight and predicting
the outcome. Establishing the necessity to fight which
leads to determining the cause, or is this the other way
around?
I feel that go is not a fighting game. Contrary to a
lot of other, excellent, games go is more of a building
game. Finding a way to do something constructive while
avoiding everything-or-nothing clashes is a better
attitude than trying to capture each and every stone of
your opponent. Besides, the former is also a lot easier
to accomplish.
It is funny, however, that in order to get a good game
on the board, even a peaceful one, the ability to
fight, fighting skill, has to be of a very high level.
Just dividing the board along approximately straight
lines, copying a joseki from memory and refusing to
get involved in any hairy situations is not what go is
about. Although a game like this can at times be nice
the contestants are not pushing themselves to find the
best move, the best continuation. Exploring one's limits
and traveling into the realms of your hidden capacity,
playing the sharpest moves without really understanding
completely how you found them, that is the real face of
this ancient game.
Going to the limits is what professional players are
doing every day for a living. Every move again never
choosing the easy way out and only giving in to playing
a simple sequence of moves after having read out that
the other more complicated moves are inferior. The
average amateur can only hope to play like this a
handful moves per game. This number might be higher
during top games where more time is allowed, but not
that much I suspect.
Of course, pro's are not robots either and often without
realizing it they play a sequence of moves which is
not the best possible but looks completely natural.
For pro games goes, however, that the exact nature of
the mistake often takes a long time to understand, 30
minutes of back-analyzing or some such. Going with the
flow is very important but it's not a guide which should
be followed blindly. Even realizing this and agreeing
with it one hundred percent does not provide full-prove
protection against playing moves that your opponent is
glad to see.
Speaking of which, for some time now I seriously have
the feeling that sometimes when playing a game you can
actually "feel" that your opponent wants you to play a
certain move. I will get back to you about this when
there's some prove available to show you, don't go
holding your breath now.
What was I talking about? Ah, yes, fighting. Well, I'm
going to wrap this up now and get on with it. As a rule
of thumb here are a number of situations I can think of
in which fighting might very well be a good idea:
- Start a fight when you are certain about the outcome and
are equally sure that the outcome actually favors you.
- Fight back when your opponent is pushing too much
and leaves plenty of vulnerable and weak points in his
stones at which you can strike (this is an extension of
the first rule)
- Create complications and fight when you are behind, if
you have to lose, go out in flames.
- Fight for fun and attempt to "bully" you opponent in
such a way that he does not feel comfortable with the
game at all and make him feel he's losing in spite of
the fact that the opposite is the case.
When I was playing in Europe I very much felt that 4) is
the most common reason to start a fight and that 1) is
rarely seen. It goes without saying that in pro games
situation 4) is as rare as an egg laying elephant.
Among the above-mentioned rules of thumb 3) is rather
interesting. "Fight when you are behind" it says, and
this may sound obvious. The remarkable thing, however,
is that the lions' share of people playing go *always*
feel they are behind. Unless a given player is able to
waste a group of enemy stones early on in the game he
will not be able to feel he's doing well. Privately
I never feel at ease when I don't have a lead of at
least 20 points. Some time ago I mentioned this to Nakao
Jungo 7p: "I really feel I could get better at go, if I
only could get rid of the need to have an enormous lead
before feeling comfortable with the game." Jungo gave a
surprising reply: "Wow, did you really think you are the
only one who feels like that, each and every game I play
is like that."
Talking about fighting this and fighting that I realize
that I do not have a crisp and clear definition of what
fighting exactly comes to in the game of go. A struggle
for liberties, fighting for eyes, splitting attack,
these are all good enough terms and cover a part of
"fighting" but what is the comprehensive way to describe
this phenomenon? I'll be sure to get back to this in a
future episode of Daigo. In the mean time, if you have
any suggestions don't hesitate to let me hear them.
pmioch@ma.ccnw.ne.jp
The Game
Daigo 3 has turned out rather technical and goes over
33 diagrams. If you're in a hurry I recommend jumping to
the very last diagram given which shows all game moves
(25-46) handled in this episode in one diagram and also
a brief summary.
The diagrams below are printed in two colors, one for the actual
game and one for the explanatory diagrams and side-tracks, as follows:
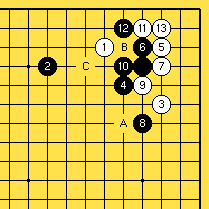
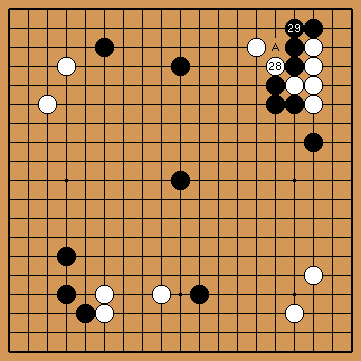
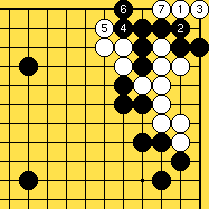
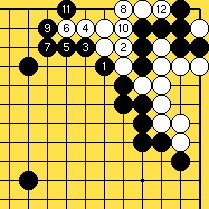
Peaceful But? |
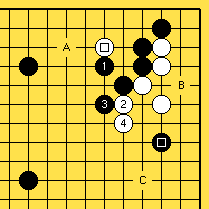
Black 1 is the "safety-first" approach. Although it
looks as if black is making efficient shape this way of
playing is wrong for a number of reasons. Even after
black 1 and 3 the marked white stone is not completely
dead.
Later on in the game white can start with a move at A
and it seems unlikely that black will be able to capture
the white stones unconditionally.
Furthermore, after the exchange black
3, white 4 it is clear that the marked black stone
cannot hope to link up with the black stones at the top.
Black 3 is effectively pushing white between two black
positions. It is too much to expect that black will be
able to get a good result at both, the top and the right
side.
The only reason black could have to play as in dia 1
is that after white 4 he can play a peep at B. After
the black peep white might have to worry about making
two eyes sooner or later. Unfortunately this way of
attacking for black is asking too much of the single
marked black stone at the right. If there would be an
additional black stone (for example at C) then
black might be doing o.k.
|
Diagram 1 |
|
|
|
The Solid Connection |
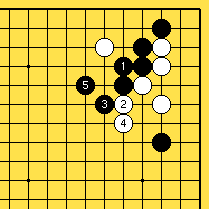
The tight connection at black 1 is much in the same
spirit as the previous diagram. Now, however, black has to
add another move to fix up his shape and play at 5.
Locally speaking black has made excellent shape, the
white stone has not much room for action anymore.
|
Diagram 2 |
|
|
|
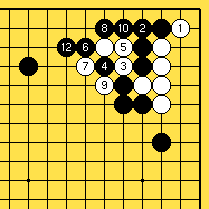
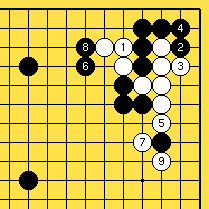
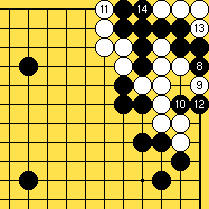
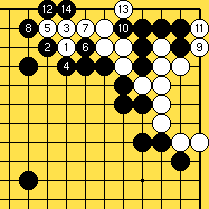
White tries something |
Let's see what happens if white plays at 1 and tries to
make eyes. The combination of black 2 and 4 works very
well here and white is nicely sealed in. White attempts
to make the most of it but to no avail. Black skillfully
avoids that the situation turns into a ko fight and
after two placements black kills white at 16.
(Although this situation may look like a seki white
eventually will have to fill in between 5 and 9,
no seki, no eyes, white dies.)
|
Diagram 2a |
|
|
|
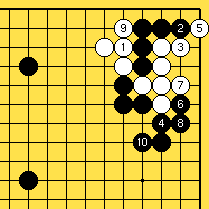
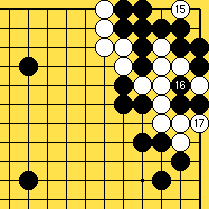
White's not Quite Dead |
After white 1 there are a number of sidetracks but I'll
only show the one where black is insisting on killing
white, whatever the cost. The white move of 7 is very
interesting. Black captures a stone and white plays
atari at 9. Now black should only consider filling in
at 3 if he can capture the white stones without any
trouble. Here this is not the case. White will continue
with A, black B, white C and the white stones will
become ko. For white creating a group at the top which
lives in ko is a big success, if white is able to win
the ko the black stones at the right do not look very
healthy.
In dia 2b black had the better cards at the topside of
the board but things started to get tricky after black
6. Although this line of playing is not necessarily
impossible black could avoid complications by playing
black 2 at 8 which'll let white make eyes.
Well, whatever the bad aji there's left at the upper
part of the board, it is all the more reason for black
to try and come up with something else. Before showing
you what black did in the game, however, it is useful
to go back a little and have a closer look at the white
shape.
|
Diagram 2b |
|
|
|
a Joseki |
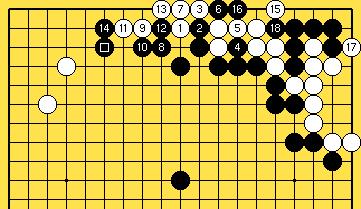
This is more or less a repetition of Daigo 2. It shows
the origin of the white tesuji at 9. Professionals
often advice their pupils (people who do not have pro
aspirations themselves) to keep things simple and play
the diagonal move of black 4. "Let go of territory,
move out to the middle and build thickness" is what
most teachers in Japan keep telling amateurs. With good
reason, of course, moving out to the middle and building
thickness is one good way of using handicap stones while
staying away from complicated situations.
Black 4 is not the sharpest possible move however,
and I only use it when a continuation at 8 is possible.
Black 8 is cutable and black must be careful to not
play here when white has stones nearby. Black 8 at A is
possible too, but this combination, black 4 and A
really lets go a chunk of territory and normally you
should not want to play like this in an even game.
After black 8 white has the innocent looking move of 9
which initiates the sequence to white 13. Instead of
connecting at B black normally plays at C or elsewhere.
|
Diagram 3 |
|
|
|
Not the Same |

The left side diagram is from the game. Notice that although dia 4
(the right side diagram) is similar to the reference diagram they
are not quite the same, black should try to find out if the
presence of a black stone at A makes white B a questionable move or
not. Black's dream is to connect all his stones and even
hook up
with ![[]](../img/m/bs.gif) . .
| Reference Diagram 3a & Diagram 4 |
|
|
|
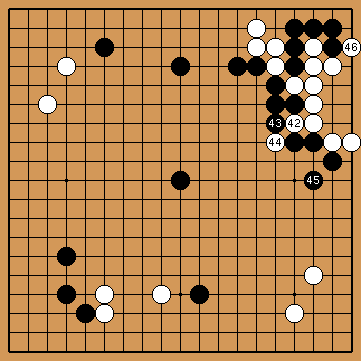
Black doesn't Buy It |
Black played a somewhat vulgar move, the atari of 25.
If you can help it you generally try to play as few
atari as possible. Playing an atari often strengthens
your opponent more than it does you. Instead of black
25 playing directly at 27 is proper style. In this case
this is easy to understand if you take two things for
granted:
- White most likely will always defend when black will
play the atari of 25 in the future. There's no reason
to settle the issue right now. It seems highly unlikely
that white can get a good result without the marked
stone (if he were to let it go when black plays the
atari later on).
- Black might in the future forget about the atari
altogether and play the previously mentioned peep at
A. As long as it is not absolutely clear which way of
playing is called for black should leave his options open.
Anyway, black chooses to settle the issue of the atari
and seemingly is trying to prevent white from breaking
through to the middle. White will counter attack
fiercely because black blatantly refused to defend
against a nasty looking cut.
|
Game Diagram 16 |
|
|
|
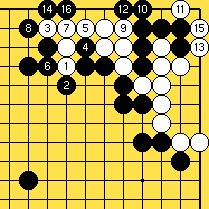
Not good Fighting |
White 11 fills in at 4
Exchanging white 1 for black 2 does not do white
much good. Cutting next at 3 is bad timing and
over-optimistic, black plays the nice squeeze and after
12 the white stones are to heavy to settle easily but
too big to sacrifice, an all too common but terrible
situation.
|
Diagram 5 |
|
|
|
Black in Trouble? |
 If white wants to do something white 28 is the only
move. Of course, this only means that if white is
dead-set on showing black that he did not previously
play any strange or questionable moves he has no other
choice than to cut.
If white wants to do something white 28 is the only
move. Of course, this only means that if white is
dead-set on showing black that he did not previously
play any strange or questionable moves he has no other
choice than to cut.
Instead of black 29 playing atari at A is probably a
bad idea. The white stones will get a bit stronger and
black still has to come back and add a move or two if
his intentions are to stay alive.
To correctly decide where to play next with white you
only need to start reading out possible variations,
read, read, drink a little coffee and continue to read
some more. I guess that these kinds of positions bare
resemblance to chess, the better you can concentrate and
the more moves you can read ahead the better the move is
you will finally come up with.
|
Game Diagram 17 |
|
|
|
White Fills in a Liberty |
When white starts at 1 it he shows a lot of confidence
and says that his surrounding stones are strong enough
to enable him to set up a capturing race. If things were
to develop as in dia 6 white is doing not too bad and
although black can capture three white stones white can
live with that because he too got a rock-solid shape.
Strictly speaking the result is not equal and favors
black but looking at this game it is playable
|
Diagram 6 |
|
|
|
Black loses the Capturing Race |
Black 2 might be playable but black 4 next makes things
easy for white, after the white 7, black 8 exchange
there's nothing black can do to avoid being captured.
|
Diagram 7 |
|
|
|
Black's Alive Unconditionally? |
Black 4 often helps black to make two eyes in the
corner, and black certainly seems to be alive in this
dia. If things would turn out like this white will have
a difficult game from here. His outside stones need
to get away and make eyes fast. Black's surrounding
positions will become even thicker because of the
weakness of the white stones, black has a good game.
|
Diagram 8 |
|
|
|
Bent Four in the Corner is Dead, But... |
Unfortunately for black white has the tenacious counter
measure of white 1. After 7 the corner is ko but since
black cannot start it himself and white could wait
until the end of the game and eliminate each and every
possible ko-threat this shape is dead according to the
rules. Here, however, white cannot wait until the end of
the game because his own surrounding positions are not
alive yet, white has to start the ko right away, never
mind the rules.
|
Diagram 8a |
|
|
|
Bent Four Played Out I |
After white 9 if black instead of 10 would immediately
play the atari at 12 white can get ko when he plays at
10. Although this ko is pretty desperate for white it is
much better than dying without any compensation.
|
Diagram 8b |
|
|
|
Bent Four Played Out II |
Here you can see a rare case of a bent-four shape
actually played out to the last move. White comes back
at 15 after which black can throw in a stone at the
1-1 point and force a ko on white. To do this in this
situation where the only matter of concern is the amount
of liberties the stones have is a bad idea.
|
Diagram 8c |
|
|
|
A Ko White Can't Win |
After white 19 the corner is ko but black can take first
at 20 and there is simply no ko-threat which comes close
to the value of the ko in the upper right corner. About
the best white can do is to play at 21 and 23 which at
least saves half his stones while ruining one black
position. If this were my own game while playing the
white stones I would not yet resign and continue playing
for a while. I would, however, not have high hopes of
turning the game around and getting a chance to win.
|
Diagram 8d |
|
|
|
The above diagrams showed only one possible way of
playing out the situation. There are some interesting
side-tracks, for example, instead of white 13 white
could connect to the left of 9. Instead of capturing
with black 16 black could throw in at 1-1 first and use
16 as a ko-threat. If black uses 16 as a ko-threat white
can play 17 as a ko-threat next, black cannot answer
this threat and has to solve the ko situation in the
corner. White's right side stones will make eyes and
black will be alive too. The top white stones are all
but captured. The variations have one thing in common,
they all favor black.
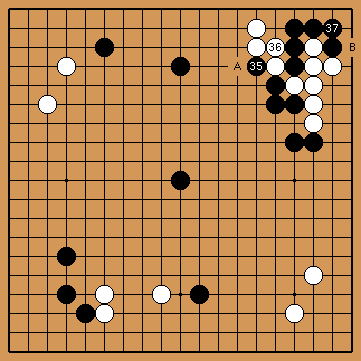
The Last Word about White 1 |
After white 1 the sequence up to white 9 is likely. Now,
however, it's black's turn to read, read and than read
some more. If black feels his stones are not up to it he
has to defend at B and make the corner alive. As we saw
in the previous dias white can get a ko if black plays
at A. The result after this is good for black.
Even if the ko is not a prospect to look forward to for
white, black can go for his final option and defend at C
which also fills in a white liberty. Because the reduced
amount of white liberties now he has no choice but to
play at D and let black make eyes at B. After black B
white has to add another move to ensure his own eyes at
the right side and we're back again at a result similar
to dia 8, which was better for black.
For everybody who just cannot get enough of all the
technical details I'll explain about black C some more.
Black C looks like a situation saving move, and it is,
but it has the drawback of leaving some bad aji at E.
If black does not defend at
A but instead plays at C white has the cool clamp at
E. This may look like a silly move and in answer to it
black might block at F without thinking but now white G
has become a sente move (black will need to come back to
defend against the cut of H). A white move at G helps a
great deal when making eyes but unfortunately for white
in this particular situation it does not help white.
Either with or without a move at G he has to add another
move to make two eyes. Notice that if black were to
answer the clamp white E at H white can cross underneath
at F and make it more difficult for black to capture
him. White even might escape crawling along the second
line, although this is hardly a way of saving stones to
look forward to.
|
Diagram 9 |
|
|
|
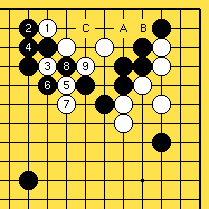
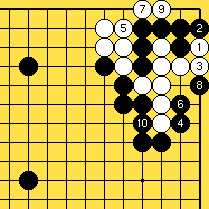
A Troublesome Move? |
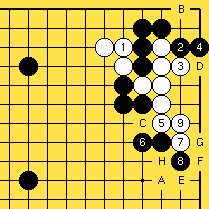
The exchange white 30, black 31 is not much of a
surprise. Of course white makes his eye space bigger and
at the same time makes sure he has plenty of liberties
in case things get down to a race for liberties.
White 32, however, feels a bit strange. One's first
instinct in a situation like this should be to fill in
the opponent's liberties. White 32 seems to be concerned
with making eyes at the top later. It also does limit
the potential black eye space and black has to watch his
step.
|
Game Diagram 18 |
|
|
|
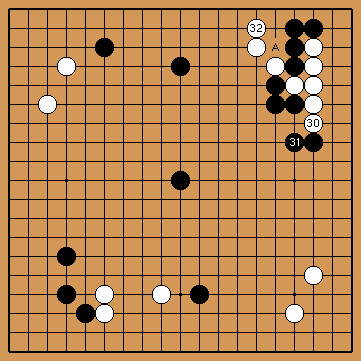
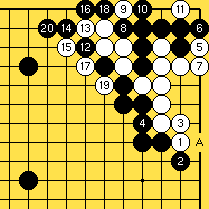
How Many Eyes in the Corner? |
Black is going for eyes in the corner, the move from the
previous diagram, white 32, is now in a good position
to prevent black from making life easily, although the
white stones at the right side are seriously worried
about making eyes since white might lose a possible
capturing race.
|
Game Diagram 19 |
|
|
|
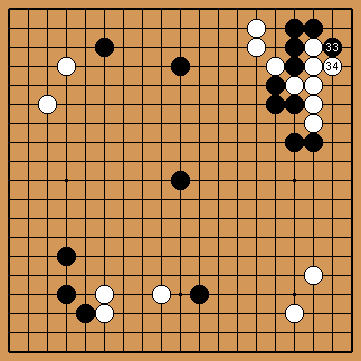
Black Collapses |

Even though black seems to have the edge in the fight
because of his solid connection at 5 he is in trouble
once white plays at 10. From black 11 on it's a one way
street but unfortunately for black after white 20 white
has 3 liberties against black only 2.
|
Diagram 10 |
|
|
|
White is Taken in |
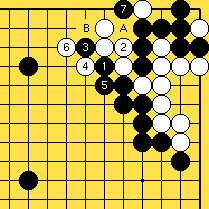
Black can try the fancy tesuji of black 1-3-7 to make
eyes. After black 7 white cannot prevent black from
making an eye at A. If white plays at A black will play
B and white is neatly taken in.
|
Diagram 10a |
|
|
|
White Doesn't take the Bait |
White, however, wasn't born yesterday and refuses to
let him self get tricked. White does not play any atari
at all but just calmly extends on the second row with
4. Black cannot block him in time to win the semeai and
white again can capture the whole corner.
|
Diagram 10b |
|
|
|
Black is Not Alive |
Black seemed to think that if he didn't hurry to play
the 35-36 exchange white might answer in a different
fashion if he plays it later on. If the white stones
at the left are completely alive, for example, white
might play at A after the atari at 35 in order to escape
towards the center. In view of the previous analyses,
however, black 35 seems to be a questionable move since
black cannot make eyes unconditionally and he will need
every liberty his corner stones can get.
Black 37 is correct, if he descends at B he will have less liberties.
|
Game Diagram 20 |
|
|
|
Too Eager |
If white would be so kind as to play out the situation
in a straight fashion you can see that black is able to
win the fight with one liberty. White has to come up
with a little more advanced plan.
|
Diagram 11 |
|
|
|
Black Wriggles Out |
White has to create some extra liberties playing like 1
and 3. As we saw earlier black 4 is the sharpest move in
the struggle for liberties, after this white just starts
filling in liberties and if black were to be only half
awake and would start filling in white liberties at A
(after white 7) than black will loose the semeai by one
move.
In other words, now it's black's turn to come up with
something ingenious to create a liberty or two, or
escape to the outside. If white wants to kill he'll
have to play at 11, after this move, however, black can
sacrifice two stone and connect underneath. Black saved
himself in a very humble fashion. With his next move
white makes the stones at the right alive and although
black is save white has create two healthy looking
groups himself and this variation can hardly be called a
success.
Black should end with a favorable result since it was
white who approached a black corner stone in the first
place and not the other way around. Black has to read
out some more and find a more attractive way of playing
things out.
|
Diagram 12 |
|
|
|
Outcome Still Unclear |
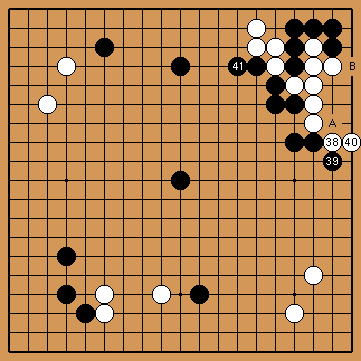
By now white 38 and black 39 will not come as a surprise
for you, for both players these are the sharpest moves,
any other move will mean serious damage.
White 40 is a safer move compared to move at A in that
white now only needs one move to ensure live. White
cannot be killed once he adds a move at B. Instead of 40
playing at A means fireworks, the game move is perhaps a
settlement of some kind.
Black's corner stones take at least 6 moves before they
can be captured and perhaps that is why black extends at
41 instead of trying to make eyes. The white stones at
the top have 4 liberties so as it is now white cannot
immediately go for the corner.
|
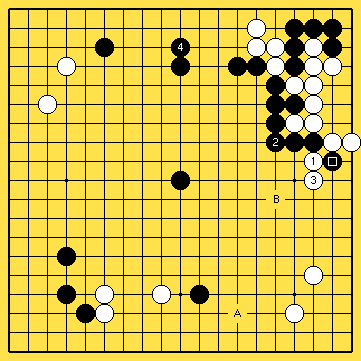
Game Diagram 21 |
|
|
|
Semeai |
White 1 looks as a fair enough move, the question here
is whether it works or not. White 3 and 5 are played
with the idea of creating liberties instead of trying to
escape. Unfortunately for white he comes up one liberty
short.
|
Diagram 13 |
|
|
|
No Connection |
White one smells of bad weather, only if there would
be a white stone within reachable distance to the left
of it can you consider to play like this. Even if
white could escape like this he has to get a lot of
compensation for all the crawling he's doing. Crawling
doesn't necessarily mean you're doing something bad but
because you do it on the first and second line you are
not exactly making a lot of territory. So no points for
white but black is getting thicker and thicker on the
outside, black's happy.
And, you guessed it already, white escape plan starting
with 1 was doomed to fail because of the presence of black
.
I showed you what is most likely to
happen if white will not give up. It is very important
to notice that white did almost not create any extra
liberties here. After black 18 there's nothing white can
do anymore. If white, for example, would capture the two
black stones black will come back at the 6 right away.
|
Diagram 13a |
|
|
|
White to Meet His Maker |
White 1 in dia 13b is what white can think of next.
There is some room for variation here but if white
insists on killing black the result in the dia is pretty
much what is to be expected. White again does not
survive this fight by one liberty.
|
Diagram 13b |
|
|
|
White Strikes Back |
The white stones at the top have not much room for
action right now as we've seen in the previous dias.
White now follows a brilliant and at the same time
simple strategy:
"If you can't expect a good result with certain stones
at a given moment then play elsewhere."
In this over-technical episode of Daigo this is a much
needed low-tech easy to understand advice, so why is
it that plenty players do just *have* to play every
situation out until every trace of aji has completely
evaporated?
|
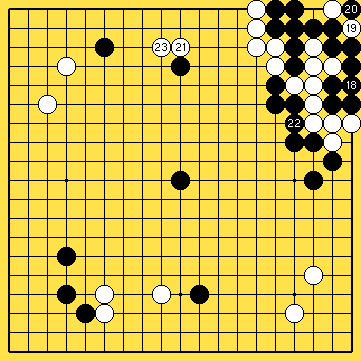
Game Diagram 22 |
|
|
|
Black is Doing Better |
Of course white could have cut at 1, there's nothing
black can reasonably do to help the marked stone. Which
brings me back to the intro about fighting: Don't fight
if you don't have to. All black's positions are solid
and when black plays the super solid reinforcement at 4
(or even one space to the right of 4) black has a good
game. Dia 14 shows why white did cut at 44 in the game
diagram. In game diagram 22 white is trying to start
fighting at a bigger scale in such a fashion that black
cannot simply let go of one stone to get a good result
as is shown in dia 14
After black 4 white would very much like to play two
moves in a row A and B. To rephrase that, white needs to
play two moves in a row to keep in the game.
|
Diagram 14 |
|
|
|
Next Move Problem |
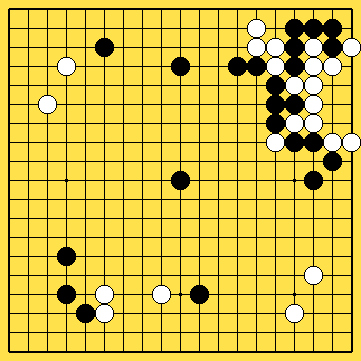
Well, the game has advanced over twenty moves, all
played in one corner, but it certainly has not gotten
any easier. How the situation in the upper right corner
is going to be settled is still in the dark. For the
moment it looks as if black has no choice but to go
after the four white stones at the top because he cannot
make two eyes in the corner. Where did black play his
next move?
|
Diagram 15 |
|
|
|
Find out the answer in the next episode of DAIGO.
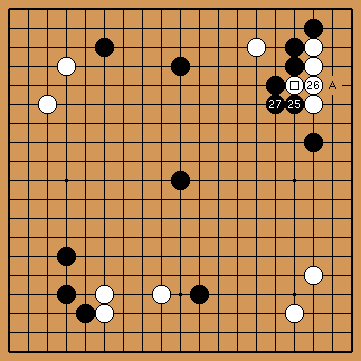
Summary
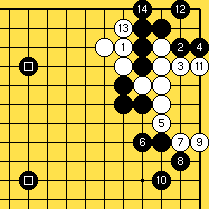
Daigo 3, All In One Diagram (25-46) |
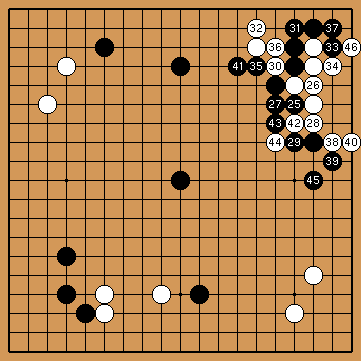
Black 25 would be better style if played at 27 directly.
However, black is not doing badly because of 25. White
28 is a natural move, white needs to gain liberties
and eye-space. White 32, if this move would be play at
36 the situation would probably turn into a ko which
black can take first giving white a bad result. Black
35, there might be a reason for the exchange black 35,
white 36 but whatever the benefit does not outweigh the
loss of a liberty, black 35 directly at 37 is better.
When playing at 40 white opts for making eyes instead
of forcing a struggle for liberties on black which
would most likely result if white were to play 40 one
space to the right of 28. After black 41 the stones at
the top cannot hope to win a direct fight against the
black right corner. For the moment white has not a good
move at the top so he plays elsewhere, leaving a lot
of troublesome aji. White 42 is only played if white
intends to cut at 44 next. Playing 42 one space to
the left of 39 is a safe way of playing but also will
mean that white accepts a loss. Cutting at 44 shows
good fighting spirit and tries to activate the near
dead white stones at the top again. Defending at 45 is
necessary for black, playing at the top and making sure
that the white stones are captured instead of 45 is not
good enough for black.
|
Game Diagram 23 |
|
|
|
Credits
Many thanks go to:
Dieter Verhofstadt for sending in corrections.
Jan van der Steen, for typesetting and hosting.
[Daigo 1]
[Daigo 2]
[Daigo 3]
[Daigo 4]
[Daigo 5]
[Daigo 6]
[Daigo 7]
Copyright by
Pieter Mioch, October 2001
| |