 |

Daigo, episode 4
A monthly column by Pieter Mioch featuring a thorough
game commentary tastefully seasoned with go-related
stories and clues to the meaning of life.
"If you never question anything, you won't get very far"
Introduction
I'll take a break from myself this time; here's a low-key intro.
An entry from the diary I don't have of October 14, 2001.
Although this was a Sunday I had to work at the Nihon
Ki-In, helping the 8-dan prof Ito with the pre-insei
class. The day coincided with the Central Japan youth
tournament at which I normally like to help out but
couldn't this time.
'Got up 8:20, a bit late but too early I felt. After
pastry and a banana with a glass of water I left home
9:00.
When arriving at the Ki-in I immediately got pinned on
a name tag with the words "come help after you finish
children class" from youth tournament assistant Mr.
Urano.
Because there was still some time to spare I sat myself
behind a computer at the office section of the Ki-In,
away from the crowd.
The wives of Nakano 9p and Yamashiro 9p were there too
and busy discussing the cost of life in general and
kindergarten fees in Japan in particular. Hane Shigeko
1p joined them a little later. Shigeko-chan married Hane
Naoki 8p, and less than a year ago they had a daughter,
Ranka. She writes for the same newspaper I do and she
complimented me on the articles. I envy her very much
because I often have trouble coming up with a worthwhile
but technical correct thing to write. Shigeko-chan
admitted that she too was sometimes at a loss covering
technical details from the pro-ama games and she always
makes Naoki check her work before posting. Hane Naoki
is one of the strongest young Japanese born players.
A live-in world class go player can come in handy at
times.
Before starting class I went upstairs to the 8th floor
to say hello to several mothers and kids I knew from my
go-classes at the Ki-in and elementary school. Next back
to the 2nd floor for the Sunday's children go class.
Only two kids had shown up. Their level was way apart
and the stronger one was left waiting for an opponent
who had called in he'd be late and I started a game on
13x13 with an 8-year-old boy.
The head-sensei, 8p Ito, blamed the children's mothers
(not present) for not letting them play in the
tournament upstairs and suggested to participate instead
of 2 hours children's class with 3 children. This was
not really a suggestion as the children's parents were
not around and the boys would not decide on their own
accord.
It was clear that Ito hadn't expected that anybody would
show up. He did not feel like teaching too much and went
upstairs to see who of the children's class were playing
in the tournament already. Ito didn't come back soon and
I was left with the 2 children, one playing, and one
watching. After 5 minutes a mother dropped by: "Is it
still possible for my boy to participate upstairs in the
tournament?"
So, forgetting about class we went all upstairs and
the two boys joined the tournament although the first
round had already started as it was about 10:15. They
were both glad to play. Because I couldn't find the
other boys' mother I paid his 1000-yen entrance fee.
Ito had said something about the tournament being free
for class' students but that turned out to be wrong.
Since I had decided to let one of the boys play without
consulting his parents first I couldn't ask for the
entrance money but fortunately the mother paid me back
the moment she spotted me and thanked me for taking care
of her boy. I was grateful because simple situations
like this can easily turn complicated and at times get
sticky.
The 8th floor of the Ki-In in Nagoya can not reasonably
hold over 220 kids with parents but somehow it did which
didn't make it a comfortable place to be.
I went back downstairs again because Ito was not moving
from the 8th floor although there still was a chance
that somebody would show up for class.
Checking at the front desk I was told that the belated
boy who had called earlier had gone directly to the
tournament and skip go-class. It turned out that the
original call was about being late for the tournament,
not for the children's class, sigh.
All the same, it was a good thing I checked because one
boy who got close to a nervous breakdown had dropped out
the tournament and decided to come for class after all.
I played two games with him and invited the mother to
play too. So, playing a game and at the same time giving
mom a beginner crash-course, the three of us had a nice
time. The normally very shy boy helping out his mother
and at times making good-natured fun of her.
Unfortunately Ito dropped by later to give some abuse
(a way of communicating he seems to feel comfortable
with) to the kid as well as the mother. "Connect those
three stones, can't you see that they're about to get
captured!?" and stuff like that, remarks which kind of
spoiled the atmosphere.
Eight dan pro Ito is a wonderful teacher but he should
be kept away from anybody below 5-kyu. (If somebody from
Nagoya reads this: I did not write this Ito paragraph)
He also could learn another thing or two from his former
teacher, Kitani Minoru. This teacher among teachers
didn't say a word about the games his pupils were
playing but only looked on with a faint smile on his
face, probably feeling happy being among young talent.
Later, after class, I decided to use my lunch ticket
instead of going straight home which would have been
smarter since my headache was having the better of me.
All the same, lunch was nice because pro daddies had
come to watch their offspring sweating it out in the
tournament. I sat at a table together with Nishimoto
2p, Baba 9p and Yamashiro 9p directly on my right.
Yamashiro was in a mellow mood and we talked a bit about
our children, school and English education. I asked
him rather bluntly about the challenger games for the
Honinbo title ('86-87 and '93). He said that although he
had lost all the three times he had enjoyed the occasion
and the special tension of the event. "It should not
matter one bit and this special feeling, the tension
typical of two-day games could be present at any game, a
2-hour fast game as well as titles games. But we're only
human and we need the top-title games and the atmosphere
which always comes with it to get in that "special"
mood."
Yamashiro detail: he plays at IGS on a weekly basis,
only fast games and most of the time is 6d*.
After lunch I did one more guru-walk (kind of moonwalk
moving forward) over the 8th floor and had a closer look
at the 6-year old daughter of Yamashiro. She's not so
strong yet, about 10-kyu, but plays every move within 2
seconds and has unbelievably good go-manners, perhaps
promising a bright go-future. The 13-year old daughter
of Baba sensei is stronger but breaks down if she loses
a game.
Making some excuses to the proper people I left the
Ki-In to drive back home. I used what was left of the
Sunday to do some reading, as far as my kids would let
me, that is.
All in all, a worthwhile day could have done without the
headache, though.
The Game
The diagrams below are printed in two colors, one for the actual
game and one for the explanatory diagrams and side-tracks, as follows:
White 1 is better than "A" |
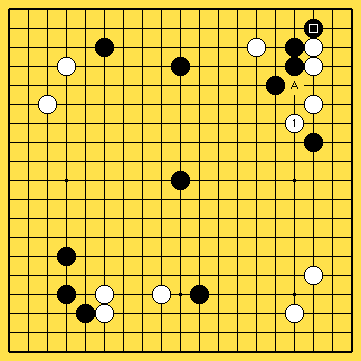
Sorry, sorry and once more, sorry. I forgot to show you
this important diagram somewhere at the end of Daigo 2
or at least at the beginning of Daigo 3.
The game move of white A (move 24) is not good. "A"
looks like a correct shape move but because of the
presence of the marked black stone it does not work
well. (Reasons for this are given in Daigo 2-3). White
should have played A at 1 and now it is black's turn to
scratch his head and come up with a way of playing which
will let all his stones come out nicely. Pool friend
Nakane 7p had this to say: "It's not gonna happen,
black's marked move is not proper here, if
white moves out black has to accept a loss of some kind.
The white shimari in the bottom right corner is in an
excellent position."
|
Extra Diagram |
|
|
|
Answering Last Episode's Next Move Problem:
A Common Move |
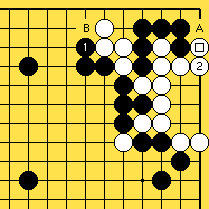
Black 1 is the second best move. If black plays at 1 the
situation becomes a straightforward race for liberties,
a semeai. White has only got three liberties left which
leaves him two moves short from capturing the black
corner stones. White can try to get some extra liberties
with a move at B but this will not help him (black'll
block and that's it). After black 1 white has to come
back to make a living shape with 2, if black would play
here white would die.
Instead of black 1 he might have played at A first after
which white plays 2 and lives. Now black still has to
add an extra move to capture the four white stones.
Black effectively lost sente but got a stone at A. In
the early stage of the game this kind of endgame looking
moves are almost never worth losing the initiative. A
black play at "A" would be a mistake.
By the way, after black 1 white should not play A
because black does not need to answer at B but instead
kill the white stones with a play at 2.
|
Diagram 1 |
|
|
|
It is important to notice that if things were to go as
in diagram 1 the marked white stone was not a
correct move. White still needs to play another move in
order to avoid being captured. Playing directly at 2
would have been much better, exactly how much better you
can see for your self in the game diagram.
No Mercy |
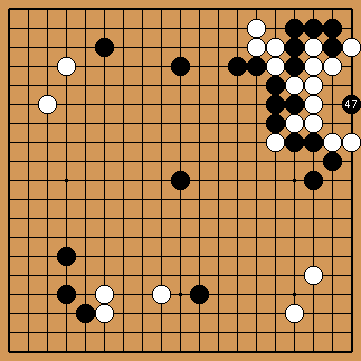
Black goes for the big fish, after black 47 white cannot
make eyes anymore. From here on white has no choice but
to go for the surrounding black stones and try to kill
some of them and resurrect his stones at the right or,
if that proofs impossible, capture a sufficient amount
of black stones.
|
Game Diagram 24 |
|
|
|
The result in dia 1 is certainly not bad for black and
perhaps he should've been satisfied with it but if you
feel that your opponent played a bad move it is often
worthwhile to keep your calm and try to figure out
exactly how bad a move it was.
Of course this takes a lot of reading and counting
liberties but why should you land a left jab if you can
deliver an uppercut?
This is, unfortunately, a kind of twilight-zone talk;
it could easily be misinterpreted as greed. Greed is
bad and often dangerous (Would it still be bad if there
would be no risk attached?). If black fails he was too
greedy and people will label him a no-good loser. If
black can pull it off it's the red carpet and a laurel
wreath. Only a razor thin line seperates exquisitely
sharp moves from overplays.
Black Captures in 3 Moves |
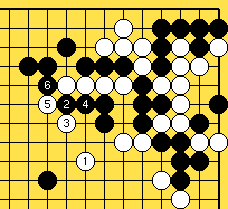
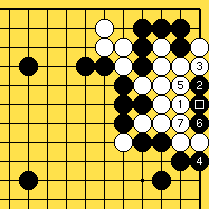 black 8 to the right of 1
If white wants to have a chance of attacking the
surrounding black stones it is important to keep his
stones together. Instead of white 1 filling in at 3
immediately gives white an extra liberty but has the
drawback of giving black the chance of cutting at 7.
Black is grateful for this because once he plays at 7
two white stones are captured which means that part
of the surrounding black stones do not have to worry
anymore about white attacking later on.
The sequence in dia 2 is a one way street and leads
naturally to black taking the vital point with move 8
after which white has only got three liberties left.
White has not got much scoop for action, so
|
Diagram 2 |
|
|
|
Ko Fight? |
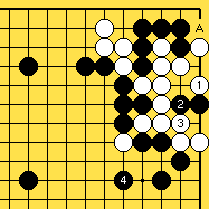
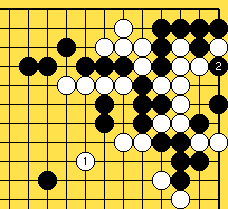
White can try to give his stones one solid eye and set
up a ko at the same time. He of course does not do so
in a half-baked attempt to make life. White's only aim
is to attack one of the surrounding black groups and
if he would be able to encircle one which does not
have two eyes the situation will turn into a ko fight.
This without a doubt is much better than just dying
unconditionally.
Unfortunately black does not need to block at A but has
time to reinforce his outside position with black 4. Now
it does not seem likely at all that white ever will get
his ko-fight.
|
Diagram 3 |
|
|
|
Leaving some Aji |
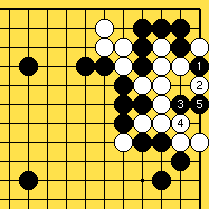
Black 1 in dia 4 also kills the white group. All the
same this result is some kind of a success for white
compared to this dias 2 and 3. It will take black at
least 5 moves to capture the white stones. White also
managed to get a ko-shape in sente, black has to come
back at 5 and white can play outside first.
Black 1 is a mistake and gives white more chance to try something.
|
Diagram 4 |
|
|
|
When going for the kill be very keen about 1) finding
the killing move which leaves you opponent with the
fewest liberties, and 2) avoiding the situation turns
into a ko-fight. Even a 3-step ko is better for you
opponent than no ko at all.
White Starts Something |
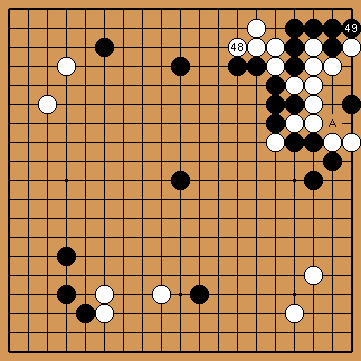
After white 48 black needs to go after the right side
white group. Instead of 49, cutting at A would capture
two white stones but is dangerous. After black A white
will play at 49 and win the semeai.
|
Game Diagram 25 |
|
|
|
We now enter an interesting phase of the game, white
has seemingly taken a bad hit but at the same time
this makes the game easier. Now white simply has to do
something and black has to be cautious, playing tight
moves without giving in to the silly but understandable
temptation to every move play "honte", regardless of
whether it is actually necessary or not.
In a lopsided game all the pressure falls on the leading
player. It is often difficult to find the right path
between playing solid and playing overly defensive which
sometimes can lose so many points that your opponent is
back in the game before you'll notice it.
In my opinion many players purposefully seek to deliver
a forceful blow or even invite being kicked hard, right
from the start. After one of the parties has taken a
loss and it is clear how matters stand a lot of tension
and pressure evaporates. At the same time it simplifies
strategy a lot and will give the players the feeling
they are not just stumbling around in the dark anymore.
The tension can build up again to extreme levels
later, of course, but once the balance on the board is
thoroughly distorted it is just not the same. This kind
of automatically fail-safety tension relieve valve will
often stand directly in the way of progress to a higher
level, 2-3 stones ahead.
To put this in terms the bench-pressing, wrestlemania
watching majority of go players can understand: The more
pain you can take the better your chances are of seeing
your opponent self-destruct.
Am I telling you to never fiercely attack anymore? Am I
suggesting that you always should defend and try to keep
the game close? Am I telling you to wash your hair at
least 3 times a week?
No, not at all. I guess that I'm saying that your
state of mind when getting in a difficult situation
deserves analyzing check yourself. Are you playing that
overplay-looking move because you honestly think it will
do you good and because you read out that it actually
works? Or do you play that everything-or-nothing move
just to get it over with and simplify matters, any which
way?
The most taxing games I ever played were with the top
insei. Can you imagine what it is to play against people
who never blow a fuse? Mistakes? Sure, anybody can make
a mistake but throwing away a game because of mental
fatigue, inability to handle a loss or extreme difficult
situation, never.
The pressure start building from move one and does only
increase as the game progresses. The only way out of
this self-inflicted hell is to play it through and stand
it to the very end.
Shape |
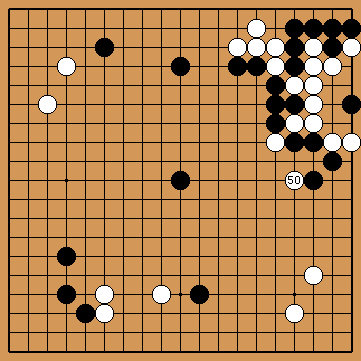
White has two groups with problems, the big one on the
right side is dead for the time being and the group at
the top is still weak. White 50 is a fancy probe, it
is also a shape move, a move which aims at making the
opponent's stones come out inefficient
|
Game Diagram 26 |
|
|
|
A bit Vulgar |
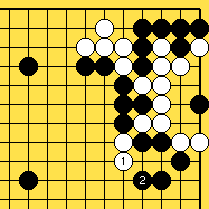
In dia 5 after the exchange white 1, black 2 there is
no fun left for white at the right side. Black's stones
at the right are very solid and white can forget about
attacking them. But then again, if white 1 would make
excellent fighting moves possible involving the black
stones above 1 it would be hard to call white 1 a bad
move, even though it looks a bit vulgar.
So, vulgar moves do not need to be bad by definition. If
a vulgar move works, it works, end of story. The problem
with vulgar moves, moves that do not look thought out,
is that they tend to make things easier to decide for
your opponent. Unless the opponent will be overcome by
emotions like anger, fear or a sick feeling, it is often
the case that a vulgar move throws away opportunities.
|
Diagram 5 |
|
|
|
Brass Balled |
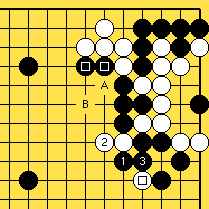
The boldest thing for black to do would be to play atari
at 1 and connect at 3. Now the white marked
"shape-move" looks ridiculous, instead of spoiling the
black shape it only helped solidify black.
However, white got an extra stone at 2 and this looks
a little dangerous. Unfortunately for white he cannot
capture the all-important four black stones. After
cutting at A black will have to let go of the square
marked stones but that is not a big deal if you realize
what he got in return. White can strike at the vital
point of B but black can, barely, escape. Can you find
the move and read out the following sequence, which
allows black to get away?
All said, black 1 might be dangerous but it is perhaps
the sharpest move (even though it's a bit vulgar looking :-)
|
Diagram 6 |
|
|
|
Not Good for White |
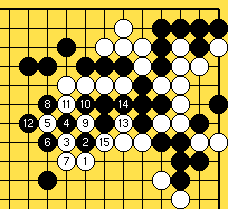
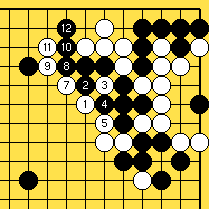 black 6 fills in at 3
Black 2 is the only move which will enable black to get
away. White might get his hopes up when he starts with
throwing in at 3 and next plays a lot of atari but in
the end he will run out of steam. After black 12 there
is no move for white which will even begin to make up
for the enormous loss he took.
|
Diagram 6a |
|
|
|
Too Tight? |
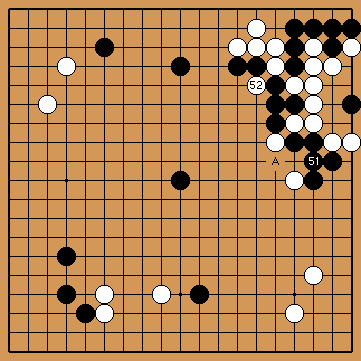
Black 51 looks like good style, it is not an atari,
which always looks smart. However, it also looks pretty
submissive and I can't help but feel that black started
to read out what would happen if he'd play 51 at A but
got tired along the line and decided that 51 was safest.
The white probe (50 last diagram) was perhaps a small
success for white, let's see what he can accomplish by
the game move, the cut at 52.
|
Game Diagram 27 |
|
|
|
Good Timing? |

Black 53 is the vital point of the shape if there
ever was one. Whatever will follow it seems extremely
unlikely that white will be able to capture the central
four black stones. White 54 looks like good timing, if
he would play here later black might be able to move out
instead of answering at 55. All the same, it's a pity
that the right white stones have so few liberties left
and that the situation won't even turn into a one-eye-ko
group.
|
Game Diagram 28 |
|
|
|
No Forcing Moves |
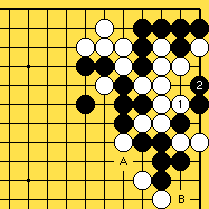
Neither white move A nor B is sente. Even if white would
have both, A and B, white 1 still does not work. White
1 is the only move worth a try but if black watches
himself and quietly stretches at 2 there is no way on
earth white can get a good result.
Realizing this game move white 54 might have been good
timing but than again it might have been "throwing in
his own windows" (this is Dutch for aji-keshi).
|
Diagram 7 |
|
|
|
Black Won't Let Go Any Stones |
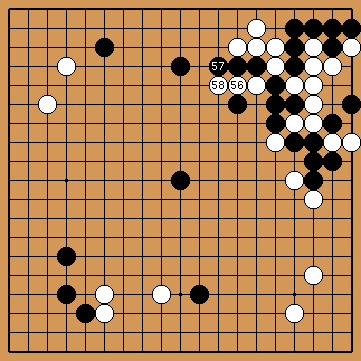
After white 56 black might have chosen to sacrifice
two of his stones and let some white stones escape.
When black plays at 57 he declares that he's not even
considering letting white out, black is going for the
jackpot.
Of course white could have made his top group alive
instead of playing 54-58. This, however, will not
bring him back in the game and is therefor not really
interesting. White tries with all his might to unsettle
the black positions in order to launch an all-out
attack. At present white does not seem to be getting
anywhere but to be sure the black outside stones are not
settled yet.
|
Game Diagram 29 |
|
|
|
Natural Flow |
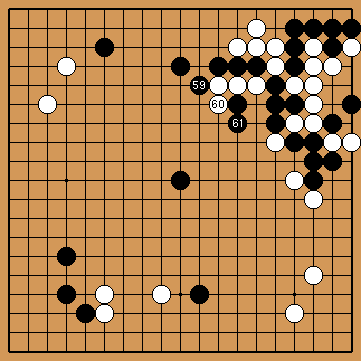
Black 59 is inducing white 60 forcing black to play 61,
a move black wanted to play anyhow. This sequence has
this kind of "natural flow" idea about it. Black 59 does
seem to leave an awful lot of room for the white top
group, and to be sure white should be able to make eyes
here, if he wants to.
|
Game Diagram 30 |
|
|
|
More Solid? |
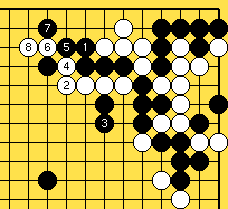
Black 1 looks much more solid compared to game move 59.
It does leave some aji, however, which white might try
to use as shown. Unfortunately for white, the black
positions are so solid that even cutting like this will
not have much impact, black is not worried at all. All
the same, aji is aji.
|
Diagram 8 |
|
|
|
White Attack Runs Out Of Steam |
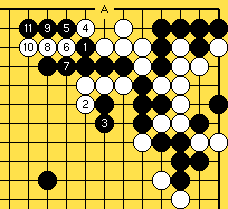
Another drawback of black 1 is the aji left after white
4, black 5. Black cannot stop white from cutting at 6
and it looks as if white has found a way to continue his
"unsettle" strategy. After black 11 white unfortunately
does not have a way to hurt black, if black starts
at A (against which white has to defend if he wants
something) it only will take black three additional
moves to capture the white group.
|
Diagram 9 |
|
|
|
Is There A Tesuji? |
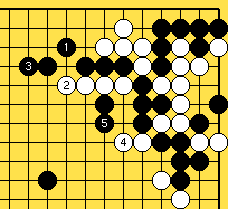
What black most would like to do is play the extremely
profitable combination of 1 and 3. There's almost no bad
potential left at the top for white to exploit. At the
same time black has made *a lot* of points. Black's top
stones might be without worries but the same can not be
said for the six black stones attached to black 5.
White to play, can he accomplish anything here? (Answer at the end)
|
Diagram 10 |
|
|
|
White Sacrifices Big |
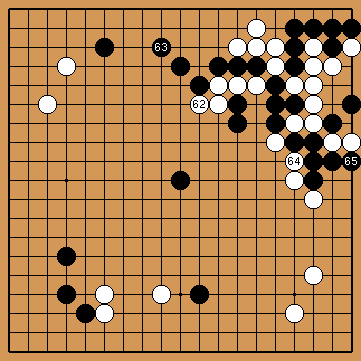
White is preparing himself for what could very well be
the last battle of the game, if all the white guys in
the upper right quadrant are POW the game is all but
over. One cannot help, however, but feel that white's
chance to pull some stunt are rapidly diminishing. By
the way, after black 63 there is still some aji left in
the top white stones, only not enough to make two eyes.
|
Game Diagram 31 |
|
|
|
What Next? |
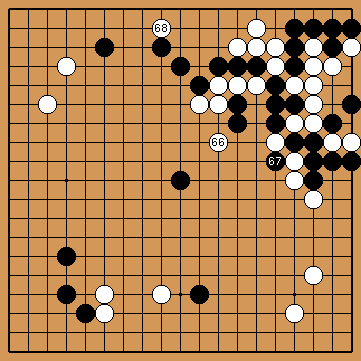
The last game diagram of Daigo 4. Black 67 is nice,
white could run away with his single stone but in that
case there's no way to stop black from moving out to the
center. White is getting a little desperate by now and
plays 68.
|
Game Diagram 32 |
|
|
|
Is white 68 a troublesome move or can it be eaten alive?
Can white get alive and how? Find out in the next
episode of Daigo!
Answer to the problem from dia 10: there is nothing
white can do but black should be careful.
Excelent Squeeze |
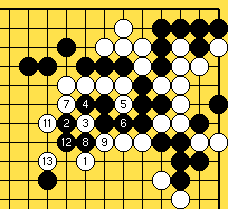 (black 10 fills in at 3)
White 1 is the only move which can hope to capture
at least four black stones. This on its own is would
be enough to decide the game in white's favor. If the
sequence upto white 13 will get on the board black can
go home.
|
Diagram 10a |
|
|
|
Brilliant Dametsumari |

Black 2 is a skilful counter measure, and white does
seem to be at a loss. It is rather unbelievable,
however, but black cannot escape with all his stones
intact! Whatever atari sequence black comes up with to
wriggle out of the encirclement, white can bring about a
masterful dametsumari, shortage of liberties-trap.
|
Diagram 10b |
|
|
|
Black Escapes |

Black 2 is the only tesuji enabling black to get out.
After black 2 white 3 is the proper move, but when black
fills in at 4 there's nothing white can do anymore, his
four stones will get captured and white should start
thinking about resigning.
How much time does a pro need to answer if white can
capture black? Well, fair enough, I can tell you with
great confidence that a pro will not use over 2 seconds:
|
Diagram 10c |
|
|
|
White Has Nothing To Sell |

I hope you took the trouble to go through the above
diagrams, there's really a lot of basic fighting stuff
in them! There was, however, no need to do so. The
probes white played earlier on have reduced the amount
of liberties to three, that's not enough. When white
plays 1, black can make plenty of mistakes if he doesn't
find black 2 from dia 10c. Black 2 in dia 10d, however,
is quite sufficient too to silence troublemaker white.
|
Diagram 10 |
|
|
|
[Daigo 1]
[Daigo 2]
[Daigo 3]
[Daigo 4]
[Daigo 5]
[Daigo 6]
[Daigo 7]
Copyright by
Pieter Mioch, August 2001
| |


 black 8 to the right of 1


 black 6 fills in at 3


 (black 10 fills in at 3)
