 |

Daigo, episode 5
A monthly column by Pieter Mioch featuring a thorough
game commentary tastefully seasoned with go-related
stories and clues to the meaning of life.
"If you never question anything, you won't get very far"
Introduction
Sunday the 25th of November was a beautiful day with
clear skies and a nice temperature in Nagoya.
Catalin
Taranu
had to play a game for the Chubu Keizai newspaper
pro-ama match for which games are played at least once
a month. The 28 year old Rumanian was chosen (not
completely at random) to defend the honor of the pros in
Central Japan. His opponent was a university of Nagoya
graduate from China whose name in Japanese reads Ri
Inri, I doubt if this is read the same in China. Allow
me the liberty of adjusting the Japanese reading to "Li"
which seems a more likely spelling.
Mr. Li works for Denso Information Technology
Corporation (Denso Aitekku) and is a doctor of
engineering, developing and working with a virtual
environment in order to design and make car parts
for Toyota. If you're interested and read Japanese
you can find more about CAD/CAM/CAE and PDM at
http://www.i-tech.co.jp/
He recently beat the strongest go player of the Toyota
go-team, a Mr. Koike, which made him the celebrity of
the denso go-team.
At the beginning of the game the usual ritual of
quibbling and dibbling about how many handicap stones
Mr. Li should (may) take against Catalin was shorter
than usual. If the players would both be Japanese
this can take some time and only after one of the
participants managed to convince the other of his
worthlessness and absolute zero skill at go can the game
start. To be sure, Mr. Li did attempt to take 4 stones
but after Catalin's "Well, it's all the same to me, your
choice" the issue was quickly settled at 3 stones.
Japan may or may not be among the strongest go countries
in the world but one thing is sure, when looking at
the Rumanian pro playing against a Chinese amateur and
with a Dutchman for the Japanese newspaper coverage
nobody can deny that they did a good job in spreading
the game of go during the last century. If it weren't
for Saijo 8p Catalin would probably not have found his
way to Japan. If it weren't for the China-Japan Super
matches Mr. Li would most likely not have picked up go.
During the pre-game interview Mr. Li mentioned that he
got interested in go because of the China-Japan Super
matches and because of the first Chinese top pro since
Go Seigen who could hold his own and stood his ground
against the Japanese top contenders:
Nie
Weiping.
Usually at these pro-ama matches the pro has a hard
time controlling the damage to the amateurs positions.
Although you will not ever find a letter on paper about
it, it seems good manners to keep the outcome of the
game between 1-6 points in either way. A month ago
a pro beat the amateur by 11 points and was visibly
embarrassed by the big lead. The game between Catalin
and Mr. Li was not quite the same story, though.
In the post game comment Catalin confessed, "well this
nobi loses so many points for black, I felt that it
didn't really matter how I would play but that I just
couldn't lose."
Never count the game before the stones are back in their
bowl is but all too true a proverb. Mr. Li came back
with a vengeance and when Catalin played one move just a
bit too quickly black was leading by about 8 points.
Just at that moment a friend of Mr. Li,
Ito
Youji, 9p
came to have a look why it took so long. Normally these
games are over inside an hour but thanks to slow play
by both contestants they were playing for close to
two hours. Catalin grunted at the sight of Ito, the
difference on the board was not enough to resign right
out but since there were no places left where white
could hope to turn things around Catalin seemingly was
forced to play out a lost game in front of a senior pro.
You can imagine he didn't really feel like that and
played 3 rash moves in a row, black kept his cool and
didn't fumble the ball but skillfully connected all his
stones after which resignation was the only option left
for Catalin.
| Game 1 |
|---|
| White | Catalin Taranu, 5p |
| Black | Li Inri, 6d |
| Handicap | 3 stones |
| Event | Chubu Keizai newspaper pro-ama matches |
| Date | November 25, 2001 |
| Place | Nagoya, Japan |
| Result | Black wins by resignation |
| Game record | ![[download]](/.images/text.gif) |
|
White resigns |

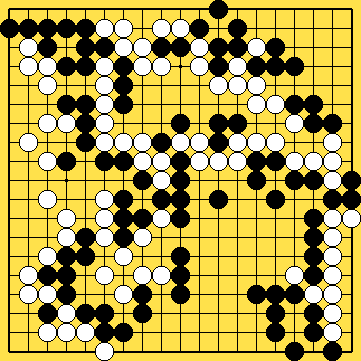
This is the game the moment Catalin decide to call it a
day, black has a comfortable lead and even though it's
white's turn there's nothing to be done about it.
At first sight it might look as if white can cut off 6
black stones in the lower left quadrant. As a matter of
fact white -can- capture the stones and he very much
would like to do so.
Problem: why doesn't white cut the black stones? If you
could find the answer inside 10 seconds you're at least
1st kyu, for every additional second it takes you your
rank goes down by one. If you can't find the answer
this means that you're probably not a dan-level player
and also that you are too concentrated on the local
position.
|
Extra Diagram |
|
|
|
The Game
The diagrams below are printed in two colors, one for the actual
game and one for the explanatory diagrams and side-tracks, as follows:
Back to reality, I'm not Catalin and this Daigo game is
not of the kind of level you might expect from amateur
high dan-level players. I'm not at all satisfied with
my own game, but then again, who is. If you once in
a while *are* rather glum with your own game this is
often but a misinterpretation of the facts, such is
live. Is ignorance bliss? Well, that's a hard one but to
sidetrack the issue and dismiss the question, I'm pretty
sure ignorance will stand in the way of any significant
progress.
Black Makes 42 Points in the Corner |

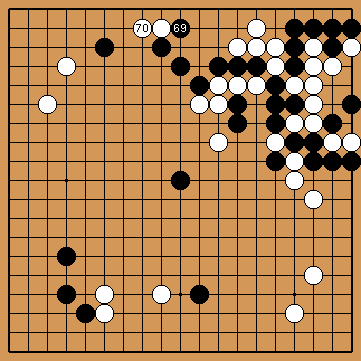
Give or take a point the black corner territory is huge.
All the same, if white would be able to build something
of a wall around the black corner and in doing so create
some thickness he might actually not be doing that
badly. White's outside stones are, however, far from
secure and can not be called thick or influence.
Unless white comes up with something very dramatic he
will not be able to get back in the game. White 70 is
not a very good start, although it does create some
possibilities (double peep diagonal right under stone
69). Instead of white 70 playing elsewhere is probably
better, black 69 was played at the inside of black's
territory so for the time being white did not lose
points here. After white 70, however, it seems highly
unlikely that white will be able to settle his stones
in sente (while holding the initiative) and the future
white group around white 70 already seems too heavy to
let go off.
|
Game Diagram 33 |
|
|
|
Whatever happens, especially when being behind by more
than a small margin, it is unwise to let go of the
initiative when you don't get compensation, preferably
weak points in the enemy positions you can strike at
with intention to kill.
White Lives |

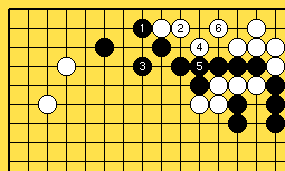
Instead of game move black 69 blocking at 1 as in dia 1
is possible too. It's true that white can prevent black
from getting a nice piece of territory by making two
eyes, but this is gote, white will play the last move
and black can decided what to do next. Usually gaining
sente is worth -very- much, exactly how much depends on
the position, of course.
|
Diagram 1 |
|
|
|
Peeping Right Away |

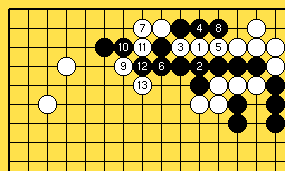
Another variation instead of game move white 70. After
black 69 playing the double peep of white 1 feels like
the right spirit, i.e. striking at your enemies vital
point without first solidifying each and every one of
your own stones (usually this results in your opponent's
stones getting equally solid).
After white 3 probably the best thing black can do is to
play atari twice at the place of stones 5 and 8. White
can make a mini-group and gets two eyes but this does
not close the gap of black's lead.
Black 4 and 8 are possible but spell bad aji, black
seems to be able to get away with it but it is a bit
unsafe and what's more, unnecessary. After white 13
black can escape but this way of playing is not to be
recommended.
|
Diagram 2 |
|
|
|
The Double Peep |

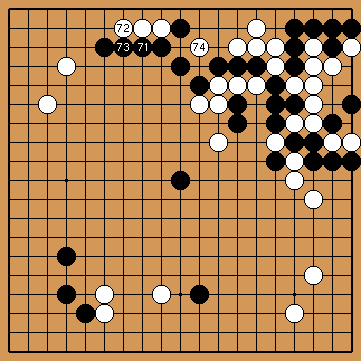
White got around to the double peep but it is almost
certain that this move would have been better if played
immediately after black 69. There seems to be only one
way to answer white 74, try to read out things a bit
before moving on to diagram 3.
|
Game Diagram 34 |
|
|
|
Just to fill some space to give you the chance to work
up a sweat before scrolling down, here's a bit more
about an idea I half mentioned in an earlier episode of
Daigo.
Except for unambiguous words as "atari, eyes, ko and
a couple more, paying great importance to terminology
and putting advanced go concepts in words works exactly
as trying to get somewhere by first traveling half the
distance and then half of half the distance and so
on: It looks as if you're doing the right thing and
that you are indeed getting somewhere but eventually
you'll realize that you are not getting quite at your
destination.
There is nobody on this planet who knows or can put
in words (even the go-wonder himself) how exactly Lee
Changho managed to become what he is today, one of the
very few candidates for the title of world's strongest
player, in such a very short time. There are no lists of
problems and games a player needs to memorize before he
will get somewhere. The process of turning raw talent
and eager energy into a successful go player is a
complete mystery, you can do this, you can do that but
it is not possible to put your finger on what exactly
did it and made the difference. One thing is sure,
however, improving has little to do with trying to hunt
for the exact meaning of a go term.
Sorry to bother you with a sci-fi novel I enjoyed
reading very much, it is by Robert A Heinlein and called
something like "Tunnel in the Sky". It's about these
cadets who have to spend some time on a planet and
survive there as the last part of their education before
graduation. The instructor warns each cadet to be alert
and to especially watch out for the "Stober" (writing
this from memory, please correct me Heinlein fans). It
turns out that this Stober warning is standard for the
test (although there are a number of different planets
used for the test) and that there is not actually an
animal called Stober. The warning is purposely without
details and is meant to make the cadets watch out for
that being which is highest in the food chain and
deserves being afraid of.
Still with me? So all the cadets are pretty scared for
this Stober thing without knowing what it is or what it
is supposed to look like. All the participants in the
test make up a mental image of the Stober and, small
wonder, they all come up with different pictures or try
to apply it to the wild life they meet. And, second
small wonder, they all have it wrong.
I very much feel that a lot of go terms are treated
precisely the same way as Heinlein's "Stober" i.e. there
is something what deserves a special term and everybody
knows and understand the general idea but there's nobody
among term-studying go players who has the perfect
description.
Go terms are things you slap, at best, on a *real* mess
of thoughts and confused ideas going around and around
but it's not the term which defines the concept, the
term is a big wooden crate full of, sometimes usable,
junk.
At worst people learn first a term, than the general
idea and a broad descriptions and than try to find
situations in every day play where the term might be
applicable. This is opposite from "ideal" learning which
comprises playing, wondering a bit and one day coming up
with a framework of ideas just begging for a particular
name.
The go prodigy will first have a whole string of often
pretty complicated and seemingly unrelated thoughts on
matters which for him all are connected to each other by
one powerful and obvious idea, a feeling if you like.
Improving for the average go player -you and me - too
has everything to do with seeing the obvious and making
ideas interlock in a new, and smart, fashion. Starting
to name (groups of) ideas and concepts and applying
a term to it is an after thought, it even can help
others becoming aware of the necessity of thinking into
a given direction, it also can help abbreviate long
explanations when analyzing among players of very high
level.
For us amateurs go-terms are something we can play with,
show off a little every now and then. At times extremely
useful to help others along but always lacking "that"
most important ingredient for which you'll have to go
digging around inside your skull and not outside of it.
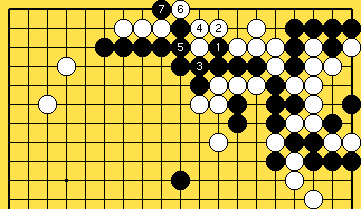
White Does not Survive |

What about pushing through at black 1? White might
get his hopes up when getting the chance to play the
atari of white 2. Next white can connect his stones
crossing underneath with white 6. Unfortunately for
white, however, there's no way he can save all his
stones after black 7.
|
Diagram 3 |
|
|
|
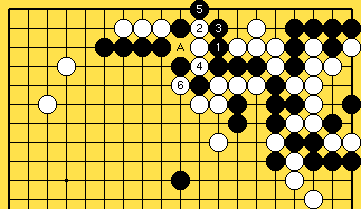
Variation |

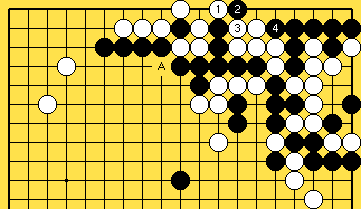
White 2 seems a more interesting move compared with the
previous dia, dia 3. After white 4 black might panic
a bit but there's no reason to do so, after black 5
the white stones at the side are dead as before and
capturing one outside black stone did not do white much
good.
If white would struggle back and instead of cutting
at 4 would play 'A' black will immediately play at 5,
stealing an eye while at the same time preventing white
from cutting at 4.
|
Diagram 4 |
|
|
|
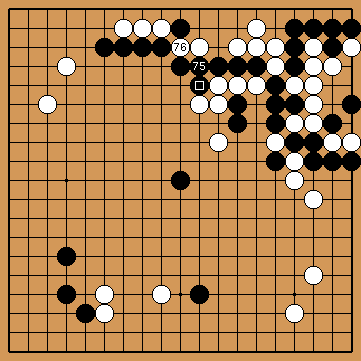
Black Connects |

Playing at 75 black is telling white to go ahead, cut of
one stone and make an eye or two. Black doesn't mind,
***as long as his stones remain strong and he gets the
initiative.
It is worthwhile noticing that now the triangle marked
black stone creates an ugly shape. Does this matter?
Well, yes and no.
There is no such a thing as dead stones making beautiful
shape, so this one black empty triangle is more than
compensated for by the captured white stones. All the
same, bad shape has got this name for a reason, it is
inefficient and potentially more dangerous. When putting
a shape on the board which is less than pure art check
whether or not you got any compensation and/or if there
lies some hidden (future) danger around the corner to
wreck havoc among your stones.
|
Game Diagram 35 |
|
|
|
About Shape, Again
"Bad shape, uh? Bad shape, what's wrong with it?! If it
works it works!" And more strong language much in the
same spirit as what I used to advocate while still in
Europe.
And it's true, however, it is only *part* of the truth.
Bad shape it due to its nature a less efficient way
of accomplishing a certain task, it often causes a
premature lack of liberties for one thing. It also
will leave more vulnerable points and weaknesses which
somewhere in the future might be exploited by your
opponent. "If it works it works!" is also my motto but
poor shape will limit your future scoop of action. The
more less-efficient shapes you have on the board the
harder you have to think and continue to be aware of the
vulnerability of your positions. The better a shape, the
less you need to worry about the future and the more
freedom of choice you can enjoy.
Not worrying about bad shape is only skin deep, after
20-30 moves your shapes will come back to haunt you and
suddenly you discover that there is almost no room for
action left and that you need to reinforce right away in
order to keep your stones together, in order to survive.
Nightmare |

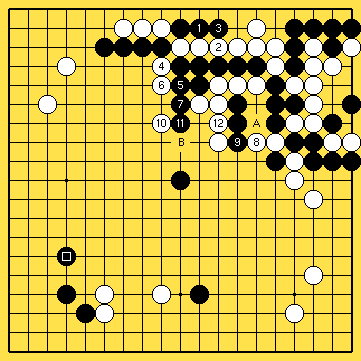
One option black does positively *not* have because
of the shape of his stone-chains is to play atari and
stretch with black 1 and 3 in the dia. Although there is
no ladder for white to aim at (the marked black stone
is in the way, thank god), white can combine a geta
with exploiting the shortage of liberties of another
(pivotal) black position. Up to white 12 is a one way
street but now black finds out that he needs to defend
against 'A' as well as 'B' next. This is black's worst
nightmare come true, the presumably captured white
stones suddenly come back to life again and white takes
the lead.
|
Diagram 5 |
|
|
|
Simple |

White more or less used all the aji at the top and it
gave him a group with two eyes right inside black's
stronghold. Putting it like this it might sound as if
white should be happy here but by now you understand
that he isn't, shouldn't.
Well, that's exaggerating matters a bit, especially when
realizing that it is not clear yet if black can play
elsewhere next or if he needs to add another move. What
do you think?
|
Game Diagram 36 |
|
|
|
No Ko |

Suppose that black has played tenuki and that white
has the opportunity to start with the hane of white 1
as shown in the dia. Blocking with black 2 feels a bit
scary and not a few players probably will let their
emotions get in the way in deciding on what to do next.
This is often a bad idea and can easily cost you a game.
When having a closer look it becomes clear that a rather
simple (but ingenious) squeeze is enough to silence
white at the top. White cannot connect because of a lack
of liberties and he's effectively captured. If there's
some aji left in the black stones it is more likely
the cut at 'A' which will become a (future) target.
If, under now difficult to imagine circumstances white
would get a stone at 'A' this would change the whole story
dramatically. For one thing, the squeeze of dia 6 would
no longer work properly.
|
Diagram 6 |
|
|
|
Too Solid? |

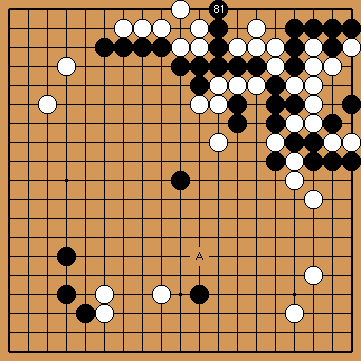
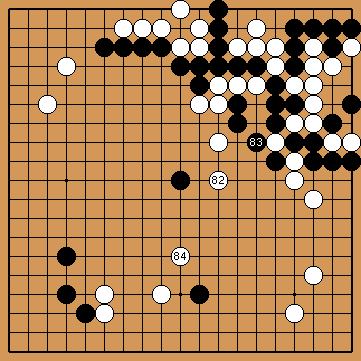
Black 81 is strictly speaking not necessary, and if it
weren't for the fact that black 81 also threatens to
kill some white stones (details, details) than black 81
would be much better at 'A'. Black, however, seemed to
be convinced that white would answer to black 81 and
that next a move around 'A' would still be a good idea.
|
Game Diagram 37 |
|
|
|
White has Bigger Fish to Fry |

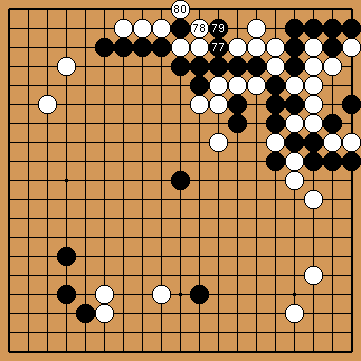
White plays justifiably elsewhere. Which is to say that
white is losing the game and he is not going to change
that by answering to black 81 and make his top stones
alive.
White has to do something. Although nobody can say white
didn't try the result to white 80 or thereabouts is not
good enough, by a long shot. When that happens and you
are behind in the game you're playing, just play tenuki
regardless of how many stones exactly are in danger of
passing away.
|
Game Diagram 38 |
|
|
|
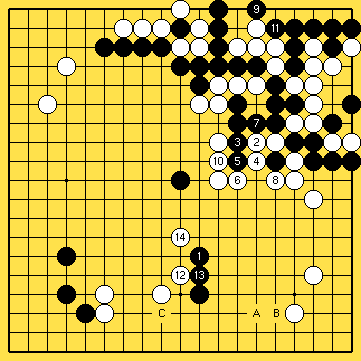
Forcing Moves |

Black 1 in the dia is very, very big. All the same the
game move of black 83 is proper I think. It is not that
black really must capture one white stone but all the
same, being forced to actually take the captured white
stones of the board is not to black's liking.
White can get a little stronger which means just a
little more chance of staging an upset somewhere. To be
honest, if black keeps his cool and plays things out
correctly his bottom stones ought to be able to create
eyes and getting alive, white 12 and 14 are just too
thin and black has too much space to maneuver left. For
example black A-C are all moves black may consider in
order to settle his stones.
That said, however, in average every day games white
suddenly has a very good chance of turning things around
and black should try to avoid that white even might
start feeling that way, i.e. hopeful and regaining
confidence.
|
Diagram 7 |
|
|
|
In every game you have to just sit back one or two times
to let the dust settle and to see how things actually
are going. This also is a good opportunity to try and
find answers for all the moves you know your opponent is
going to hit you with.
Evaluating the whole board position, however, does not
necessarily mean that you're supposed to count the score
in some detail. Getting the rough picture is enough.
Especially when there are many situations left on the
board which are not decided yet one way or another it is
a good strategy to try to determine about how much you
territory you can permit your opponent to make.
It may be not all that interesting or much fun, but to
actually let your opponent make quite some territory is
a perfect way to lull him a bit and to prevent him from
starting wild and unpredictable fighting. I remember
that when I first came to Japan and played with amateur
5-6 dans at local go clubs I very much felt frustrated
because my opponents were not prepared to get involved
in big time fighting. And, what's worse, when trying to
provoke a fight and in doing so attempting to create
an atmosphere I felt comfortable with, I lost (even
faster).
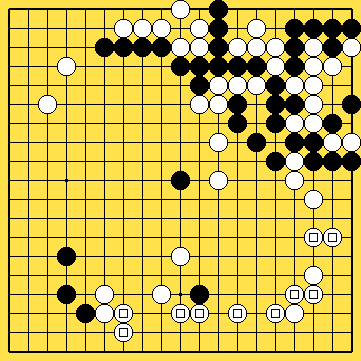
Evaluating the Whole Board |

Black has made a lot of points in the upper right
corner, well over 40 points. This means that black can
let white make all the space marked into territory and
still be in the lead. (because black gained some points
elsewhere while white was busy securing the lower part
of the board)
Further more, the situation at the left part of the
board looks favorable for black too. For black when
thinking like this you come to realize that the game
might be close to over if black manages to make a living
group at the bottom. Or, it is also possible to just
let white do his worst and while checking that white
bottom's territory will not exceed 50 points play a
tight game.
|
Diagram 8 |
|
|
|
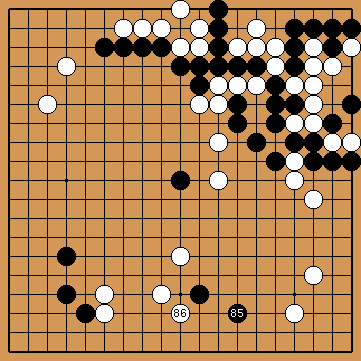
Next Move Problem |

Black played the slightly odd-looking tight move of 85.
It is as if black is feeling the pressure of being in
the lead and let it influence his play. White 86 is a
natural move, no need to read a lot, no need to think
very hard. If white wants something it starts with a
play at 86, no matter what it exactly is what white
wants :).
Although black has a comfortable lead he cannot afford
to let the whole lower right quadrant turn into a huge
white territory, so what is black going to do now?
|
Game Diagram 39 |
|
|
|
Will white find a way to destroy black after all?
Is black so confident that he doesn't realize white is
aiming at a quarter of the board?
Find out in the next episode of Daigo!
[Daigo 1]
[Daigo 2]
[Daigo 3]
[Daigo 4]
[Daigo 5]
[Daigo 6]
[Daigo 7]
Copyright by
Pieter Mioch, August 2001
| |


![[download]](/.images/text.gif)
