 |

Daigo, episode 2
A monthly column by Pieter Mioch featuring a thorough
game commentary tastefully seasoned with go-related
stories and clues to the meaning of life.
"If you never question anything, you won't get very far"
Introduction
Imamura,
8 dan professional is a 33-year old rather
handsome pro belonging to the Nihon Ki-In of Nagoya.
Although we're only a month or two apart in age and in
spite of the fact that we both play go I don't know him
very well. As a matter of fact, we never got to talk at
all, even though we ran into each other regularly at the
Ki-In.
This is why I welcomed the pro-ama game I had to cover
for the Nagoya Keizai shinbun last month, July 2001.
Every month one or more strong amateurs of some standing
get the chance to show what they're worth against a pro.
The July game I attended to was between Mr. Tsuboi,
section chief from "Nihon-Gashi" and Imamura Yoshiaki.
Imamura suggested the handicap used to be 3 stones but
Mr. Tsuboi wouldn't have any of it and quickly placed a
fourth stone on the board. It was a nice and worthwhile
game which Mr. Tsuboi unfortunately lost by 4 points,
a post-game analyses followed after which I got at my
computer to try and evenly spread the game out over 10
episodes. One of the things I touched a couple of times
through the articles was that even among pro's there can
be quite a difference in strength. I felt justified in
making this point since a while ago when Cho Chikun and
O Rissei were fighting it out over the 24th Kisei title
one of the attending professionals mentioned that he
perhaps could not expect to win against Cho, even if he
were to receive a two-stone handicap. A fellow pro dryly
added to this: "Well, are you positive you'll win with
three stones then?".
Remarks like this say, of course, quite a bit about
Cho's strength, or maybe it says even more about the 9
(!) dans who made the comment. It certainly says a lot
about the inflation present in the rating system, maybe
in the future pro's will be demoted the moment their
results get bad.
So, in the Nagoya newspaper I wrote something like
"The color of Imamura's 8-dan rank is by no means
thinning as is sometimes the case with pro rankings". I
half-and-half expected it to be edited out but they let
it stand as I wrote it, they sure know how to please
their collaborators. During the same game comment a few
days later I again talked about Imamura's strength and
that a win against him on 4 stones would be of the same
value as winning against a 9 dan player. The next day
I got a telephone call from the Nihon Ki-In. I braced
myself for some severe criticism and somebody asking me
who the h-ll I thought I was.
Luckily I was worrying too much, a habit which'll kill
me some day, and the call from the Ki-In was only to
provide me with some inside information! As it turned
out I was closer to the truth than I had imagined with
my remarks about Imamura being such a strong pro --
I really meant it though and was not just turning up
the flattery to make a good impression -- the fact is,
Imamura is *strong*.
The Oteai is the official rating tournament in which
you have to get x wins over an y period before you can
get promoted. The higher the rank the more wins you
need. The unexpected touch to this system is that once a
player scores enough wins to bring about a promotion the
candidate himself has to make the application for his
next rank. In other words, if a player were to forget to
apply although he has a sufficient score, he will have
to start from zero again and once more needs to win x
games over an y period.
The call from the Ki-In informed me that Imamura
sensei has consciously passed (!!) on at least two
opportunities to be promoted to 9 dan! So here we have
a pro 8 dan with a heavily positive score, i.e., he's
walking over the better part of his opponents, who
refuses to be promoted because he thinks he does not
deserve the highest rank yet. You'll have to decide for
yourself whether Imamura sensei is just forgetful or if
he has this rare and often troublesome gift, character.
The Oteai system, by the way, will not survive next
year in its present shape, I'm not sure about the
definite changes but there was a lot of talking about
hooking up the ranking system to the other, newspaper
sponsored tournaments like the Kisei, the Meijin and the
Honinbo title. So maybe Imamura is just waiting for the
Oteai system to change and then win the Kisei title or
something, that would be a very impressive way to get a
9 dan promotion!
When I asked to Romanian 5 dan pro Catalin Taranu when
he thinks he'll make 6 dan he shook his head. "Even if I
would win all my games for the Oteai straight, it won't
be in time before the change to the new system is made.
So, I have no idea when and if I can say goodbye to my
5-dan rating, sigh.
The Game
The diagrams below are printed in two colors, one for the actual
game and one for the explanatory diagrams and side-tracks, as follows:
Keeping Your Stones Together |

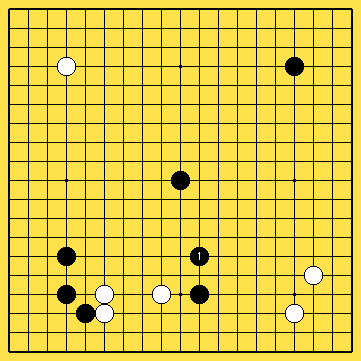
This may come as a surprise but the pro's took black
1 to be the most natural move in this situation. The
reason given was surprisingly simple too, "Black does
not like to let the Tengen stone get separated".
This "Keep stones together" concept is very important
but unfortunately rather difficult to implement. If
you'd take it literally you would be playing every
move next to the previous one which is, of course, the
only way to be 100% sure your opponent won't cut you
somewhere in the future!
A narrowed down version of the same concept is perhaps
more workable and goes like this:
"After the opening stage of the game, which usually
takes 4~12 moves, if you have stones separated from
each other by 4 or more spaces (preferably on the same
longitude/ latitude or only 1 board line apart) consider
adding a move, especially when this gap is between
single stones. If your stones are 4 or more spaces apart
but one side (or both sides) is a strong position, for
example a shimari, then you might consider leaving the
gap as it is."
|
Diagram 1 |
|
|
|
Well, now you know why short and good sounding proverbs
are *much* more popular, if you make an attempt to write
out what is exactly meant it does not sound so good
anymore and the stronger player will miss a chance to
impress the novice (lucky novice).
It is, of course, best to cut back on words as much as
possible and just, quietly, show some situations which
help making things clear.
Meijin Title 1968/Sep/21,22 |

Black: Rin Kaiho defending Meijin
White: Takagawa Kaku challenger
Komi: 5.0 points
Result: white wins by jigo
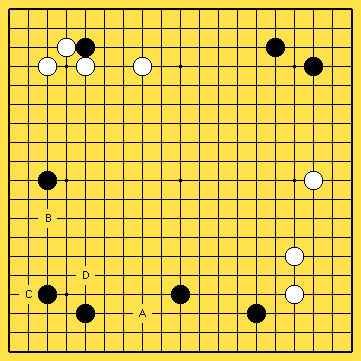
White has no big gaps between his stones, the biggest
distance his stones are from each other is three spaces.
If black decides to invade here white ought to be able
to put enough pressure on black to make a very solid
position. White might even kill black although this
usually is not as easy as it might look.
Black, trying to make most of his advantage of the
first move, is racing around the board, he skillfully
sacrificed one stone (left upper corner) and in return
he got to make two shimari and an impressive looking
framework. If white wants to invade somewhere (the
potential black territory is much bigger than white's
potential territory so it is not really a matter of
wanting/ not wanting) he can start with counting the
spaces between the black stones.
Judging like this black has two "defects" in his
position, he has a four-space extension at the bottom
and a five-point extension at the left. White does not
want to get in trouble to close to black's shimari in
the lower left corner and therefore his normal invasions
would be at A or B. Also possible are white C, which
is a skilful probing move, or white D. This last move
says it is all-right for black to make his potential
territory into real territory as long as it is not above
the 3rd line (= not enough to win). By the way, there
are even more ways for white to deal with the black
territory, the four mentioned above, however, are all
well-known and considered standard, add them to your
repertoire while trying moves you thought up yourself.
|
Diagram 2 |
|
|
|
The game ended in a draw but white won anyway according
to the rules. Later they changed this rather inelegant
rule by making the komi 5.5 points, this is also not
really a subtle way of avoiding a deadlock but the need
to decide games fast is something you have to thank the
newspapers for who want a crisp and clear tournament to
sell to their readers, not some match which just keeps
going on and on because of all the jigo's.
The Continuation |

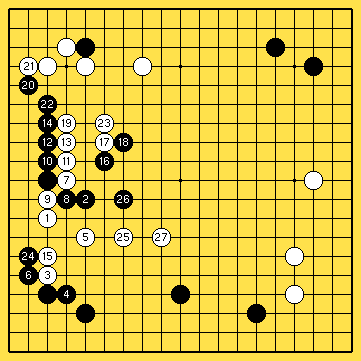
Replay this game between two "Dinosaurs" of the Japanese
go scene from white 1 and try to get a feel for exactly
how strong each stone on the board is. By the way, would
you have dug in your stones as fast and solid as black
did with move 10-14, 20 and 22, too?
|
Diagram 2a |
|
|
|
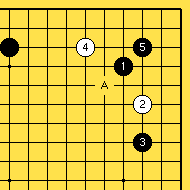
Not to White's liking |

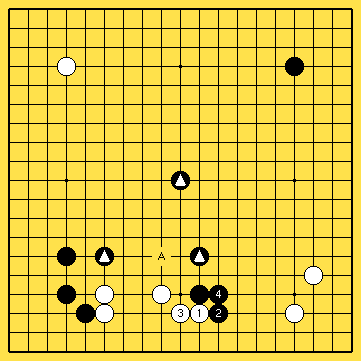
Another reason why the one-space jump shown in dia 1
is a nice move is shown in dia 3. Suppose that black
got the chance of playing an extra move, somewhere
in the future, for example the
 stone
at the left. Now white is starting to feel a little
claustrophobic. Normally white would want to run away
to the center but, for example, a white jump to A does
not look very promising. If white would play at A it
seems as if the
three stone
at the left. Now white is starting to feel a little
claustrophobic. Normally white would want to run away
to the center but, for example, a white jump to A does
not look very promising. If white would play at A it
seems as if the
three
 stones
are forming
a kind of a far-away net which might very well prove
tight enough (with the addition of a move or two) to
keep white from breaking free. This would mean that
white'll have to make eyes locally, something which is
not considered very attractive in the early stage of the
game. stones
are forming
a kind of a far-away net which might very well prove
tight enough (with the addition of a move or two) to
keep white from breaking free. This would mean that
white'll have to make eyes locally, something which is
not considered very attractive in the early stage of the
game.
|
Diagram 3 |
|
|
|
Digging yourself in and making a secure living group
in the opening is sometimes inevitable but in 99% of
the cases it will result in your opponent's stones
becoming stronger too, and *his* stones will end up on
the outside, surrounding you and still actively taking
part in the game. Your stones, alive but on the inside,
are more or less played out already. Even if you could
get some points in return for being locked up it's
seldom enough.
What I'm trying to get trough here is that you should
not play moves like white 1 and 3 in the dia and think
"Well, maybe black got stronger, so what?" The exchange
of white 1-3 and black 2-4 is good for black, when
playing white you should be reluctant to play this way
and that goes double (make that triple) for handicap
games where the reverse situation is only too often
seen, thin white stones are somehow managing to isolate
black stones.
In handicap games, more often than not, black finds
himself suddenly surrounded by white stones and deems it
necessary to play some moves on the inside to make eyes,
thus strengthening the white stones which automatically
will reduce the effectiveness of the handicap stones
by anything from 10 to 90%. If the inside black stones
die, it's a major disaster, if the black stones manage
to make eyes but strengthen white it's maybe not "major"
but it's still a disaster.
Important: If the same white 1-3 sequence would be
played much later on, close to or already in the
endgame, than it is a different story altogether and the
white moves might be excellent plays and the biggest
points on the board.
The Other Moves |

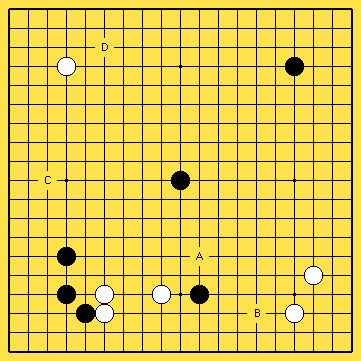
This was the next move problem of last episode. Black A
seems the most natural move. Black B or D do not seem
to be bad moves either but they do not make it easier
for black to let the center stone come out nice. Black
C was not discussed or suggested at all by the study
group pro's in Gifu. If I'd be forced to come up with a
plausible sounding reason for this I guess it is because
of the Tengen stone, again. Of the four moves A-D, black
C seems to be the least concerned about Tengen.
|
Diagram 4 |
|
|
|
A Kind of a Defect |

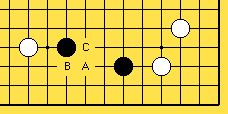
Although this black formation is natural in a way too, it
has the drawback of being vulnerable to a white invasion at A.
If white plays here too soon black is not really worried
since he can choose between either blocking at B or C. A
black stone at B will make white's left weaker so black
is not complaining there. Later on, however, black will
start to feel the need for eyes, to get settled he will
have to add a full move for a piece of the board which
is territorial wise not at all interesting.
|
Diagram 5 |
|
|
|
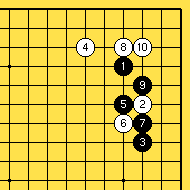
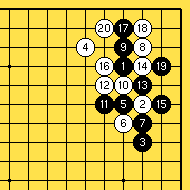
Learn to Let Stones Go |

This is definitely the last word I'm going to say about
this next move problem, I promise to get on with the
game in a minute.
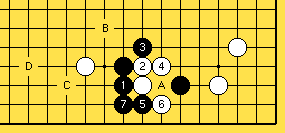
After the white invasion one point to the left of A
in dia 5a, many a players' first instinct is maybe
to try to somehow connect the black stones. Although
this is often a good idea, if possible that is, it is
not the only option and it often throws away golden
opportunities to attack, all for the sake of one lousy
stone. Black 1 in dia 5a is a move you should remember
and come to like. After white 2 black seems to have
achieved nothing at all but when black plays the skilful
shape-moves of 3 and 5 next, suddenly white's capture
does not seem so big anymore.
If white really wants the black stone he even will have
to add another move after black 7, although connecting
at A makes a rather awkward shape. If white plays at A
black has several interesting moves. The fancy loose
connection play at B is nice to move out to the center
but black C is very attractive, too.
Black C is not cutable and white's stone is afloat.
Depending on the situation black D is also a move worth
thinking about (although this move does not apply to the
game). By the way, instead of white 4 a play at 7 (hane)
is sometimes better, for one thing it probably will
avoid making the white stones look like a blob of putty.
|
Diagram 5a |
|
|
|
White Plays Steady |

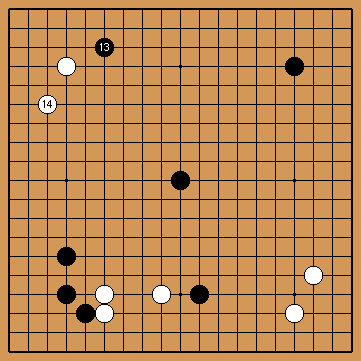
In the game black played the approach move of 13,
perhaps to inquire if white would pincer or play an
extension. White, after having given it some thought,
decided to maintain his original attitude of playing
steady moves, making solid positions and waiting to see
what on earth black is going to do with his stone on
Tengen.
|
Game Diagram 9 |
|
|
|
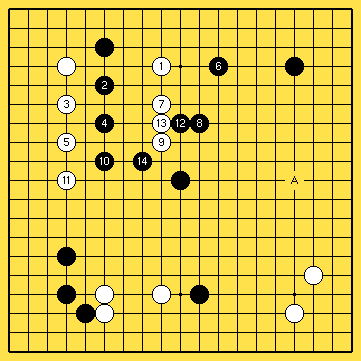
Bold Attack |

To play a pincer at for example white 1 feels like a
challenge to black to finally show what he's got and
at the same time gives the black player the chance to
bring Tengen (back) into the game. Black, hating Joseki,
plays the fierce counter pincer of black 6 and if white
continues with an orthodox approach, the one-space jump
of 7, black goes all-out with 8-14. Although playing a
pincer (like white 1) seems possible white should be
very careful to not end up as in dia 6. Black's position
is still thin but there does not seem to be an easy
way out for white. To avoid being locked up like this
perhaps playing a two-space jump with white 5 after
which white'll ignore black 10 is better.
Note that black's aim is to put pressure on white and
get a strong position on the outside while holding the
initiative which is worth very much since for either
player it will mean the chance of playing around A
first. Black is not thinking about capturing the white
stones, of course not, (coughbucoughllsh coughitcough).
|
Diagram 6 |
|
|
|
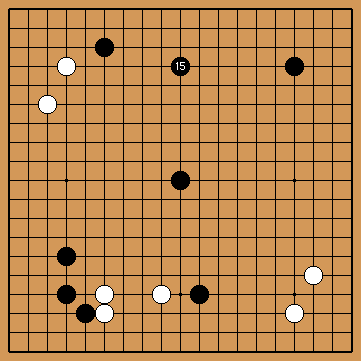
Going for Influence |

Black 15 seems pretty much in the same spirit as his
previous moves, i.e., going for influence and not
worrying about thin shapes or territory so much.
By the way, when doing the post mortem you always feel
like asking: "But why can't black play one space to the
left?" or "Isn't playing on the third line possible?".
Speaking for myself, I used to not take questions like
this very serious when there was a difference of say
5 stones or more. This not taking the weaker player
serious can be rather convenient, it is an excellent way
of masking that you actually have not the faintest idea
of how to answer the question. It goes without saying
that I'm doing my best to atone to the go community for
my poor attitude (of the past, I hope).
|
Game Diagram 10 |
|
|
|
In the opening, to correctly explain what all
the differences are between a given play and the same
play on an adjacent spot is very hard
When analyzing with the Gifu professional players they
often just put a white stone on the board when I suggest
a certain black move. "The move you're suggesting might
be playable but you have to show what you have in mind"
is what the pro is saying when silently waiting for your
next move. If you don't come up with some interesting
continuation you'll get the cold shoulder: "If you
didn't even bother to read out a continuation what are
you asking questions for?" is what the chilled piece of
meat is telling you.
The second way of reacting is less pride-harming and
makes you feel like a pro yourself for a minute or
two. Sometimes when you suggest a move a pro will say
something like: "Sore mo ikkyoku". "That move is also a
game" what the pro means is that the move suggested is
possible too and it would take a lot of analyzing see
whether is was good or bad and why exactly.
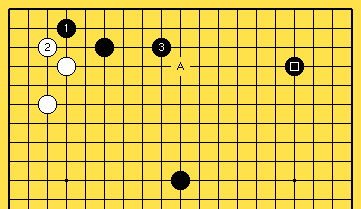
A Little Low |

Black 1 in dia 7 feels too low. Even if white would
play the most peaceful continuation somehow black's
stones seem to be too far apart to make an effective
framework. For example if the upper side is threatening
to become a huge potential territory then white has the
nice reducing move of A to hold the black position in
hand.
After white A black has to choice whether he is
going to crawl along the third line or whether he will
move out and try to attack the white reducing move, the
latter one is often more interesting.
Furthermore, the gap between black
![[]](../img/m/bs.gif) and black 3 is a little wide, white could at any time play
in between and settle himself easily.
and black 3 is a little wide, white could at any time play
in between and settle himself easily.
|
Diagram 7 |
|
|
|
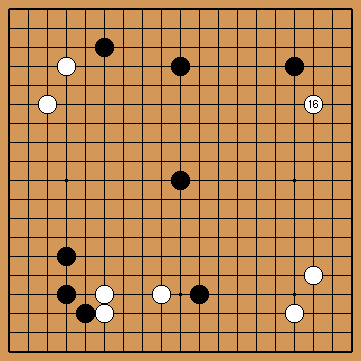
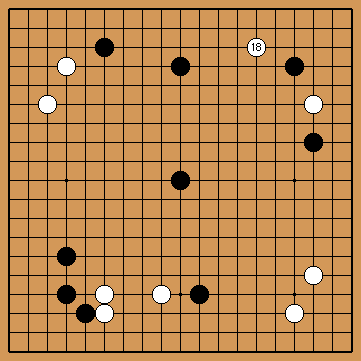
Kakari, White Approaches |

White 16 is a move as common as they come, it also
bridges the widest open space on the board so it only
seems natural.
|
Game Diagram 11 |
|
|
|
Usually when I want to show you a sequence longer than 3
moves I restrict myself to stuff I saw the pro's put on
the board or moves I'm pretty sure are joseki. Dia 8 is
an exception on this "rule" and although I'm confident
that this sequence up to white 7 is not too outrageous,
at least it looks natural, after black 8 my sight grows
fuzzy. Although I probably could stare at my monitor
for three hours and (fall asleep) read out what is most
likely to happen I will let that up to you, dear reader.
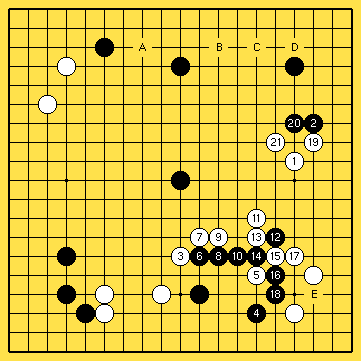
Anti-Tengen Strategy |

Anyway, whatever the proper continuation might be, it
seems that white 1 is better than the game move, the
small knight approach move in the upper right corner.
White 1 does not give black the opportunity of playing
a pincer and this will surely help avoiding ways of
playing for black which might make good use of Tengen.
Black 2 seems to be good enough a response and next
white plays a very nice keima at 3. If black 4 white 5
is an excellent way of putting some pressure on black,
who now has to start being serious about settling his
stones.
Keeping the initiative is very important for
white because after successfully having sealed in black,
white gets the chance of playing 19 and 21. White almost
has isolated the black Tengen stone and he succeeded in
making some dandy (I must cut back on the Marilyn Monroe
movies) territory along the way.
Black's upper territory is by no means secure yet and
white has many points he can choose from to enter (A-D).
In the lower left corner, to be honest, white has a
defect left at E, too. When black gets the chance of
playing here first white will most likely have to let go
of some points (answering the black move on the second
line, to the right of E).
|
Diagram 08 |
|
|
|
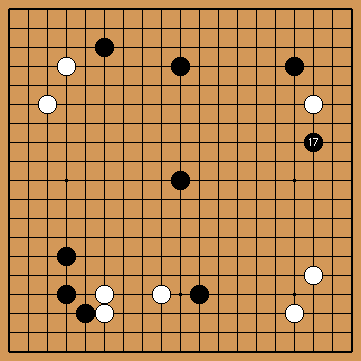
Questionable Pincer? |

Black 1 is the closest pincer possible, any closer and
the black move will become an attachment which is a
different kind of move. Black 17 tries to force white
into the corner after which black can seal white off and
try to make the most of his center oriented strategy.
|
Game Diagram 12 |
|
|
|
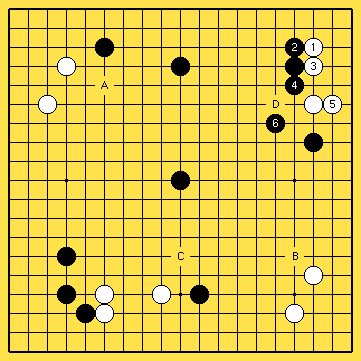
Not Bad for White |

Here white entered the corner at 1, just as black seemed
to hope. At a glance the result looks better for black,
his tengen stone really seems to do something there in
the middle of the board. Dia 9 may look ok for black but
it actually is not too bad for white either. He managed
to take over the corner in sente (while holding the
initiative) so he can choose where to play next, which
usually makes all the difference in the world. Besides
the sente issue there is another reason why white is
doing ok here. Black's tengen stone is not in a very
good place. If black would be allowed to take the center
stone of the board and place it elsewhere he would be
much helped by adding a move at A or somewhere around B.
Although both these moves are better moves than tengen
this does not necessarily mean that tengen is useless.
White will have to be very careful how he goes about
invading the upper part of the board later on.
White's continuation after black 6, by the way, could be
at C, making sure his bottom left stones will not get
in trouble later on in the game while at the same time
inquiring what black is going to do with his stone at
the bottom. After having played out the situation at the
lower part of the board a bit white will take his time
thinking out the best move for invading black's moyo and
play there.
Instead of entering at the 3-3 point jumping out with
white D feels a little better. I think, however that
both moves, entering the corner or jumping out are
playable here and that neither move is clearly superior.
Although I guess that not a few players would rather
jump out and prevent black from getting a big looking
framework instead of entering the corner. Well, in many
situations it is not so much that there is only one move
possible which is determined by pure logic, the game of
go is often about choosing the playing style you like
and which fits your character.
|
Diagram 09 |
|
|
|
If I really would start preaching I could say that in
these fast, modern times the emphasis seems to be on
standing out, no matter if there's something to stand
out for or not. Standing out can be put in go terms as
playing bold moves, staking out huge moyo's, getting
involved in any fight, regardless of the fact if there's
actually is something worth fighting about. On the other
hand, representing the wisdom of time, there is the
patient and quiet attitude which reflects on the playing
style. Not necessarily meaning playing low moves but
sometimes low, sometimes a little higher though never
in a hurry is the idea. Getting involved in a fight is
sometimes a must but never something to seek out or
go after. Each generation has go pro's of both styles
although it feels that in Japan the "silent" playing
style has the upper hand. Not one of my pro turned
insei buddies has a flashy style. As a matter of fact,
Nakane 7p, Nakao 7p and Hane Naoki 8p all have a very
tight, very solid rather slow looking style. All of
them, however, have a convincing positive score in their
tournament games.
Going over a bunch of Go Seigen games I strongly got
the impression that the demi-god from China does not
fit either category. All his games are so fierce and
incredible complex but his style always seems to say:
"Oops, there we go again, three groups having only one
eye and another two groups which might be alive if I
could get a ko-fight going and set-up some kind of a
swap". In other words, he doesn't seem to be after
trouble but he *never* takes the easy way out once
things are starting to get hairy.
Well, excuse me for getting carried away a bit there, back to the game
Fashionable |

The double approach move of white, even though black
played a severe pincer, was already popular among Go
Seigen and Kitani Minoru well over 60 years ago. For
some 40 years it was not seen too much anymore but in
the 90's they got it out of stasis and until the day of
today it has been enjoying extreme popularity. I very
much doubt these surges of popularity have much to do
with the move in question being a breakthrough in go
theory. It seems that the moment somebody realizes that
there are still some uncharted corridors of a given move
this move will hit the spotlight for a couple of years
until a next move takes its place. The international
go scene should be thankful to the youngest generation
go-stars in Korea who seem to be running down any
corridor like crazy, the darker the better, never mind
the pitfalls or barbed wire.
|
Game Diagram 13 |
|
|
|
Standard Pattern |

This is a variation which has stood its ground for some
years, it seems that both sides can live with the end
result, although pro's have been wrecking their brains
to see whether it is possible to get similar shape on
the board without the white 6 - black 7 exchange. White
would be very happy if he could omit this since it is
helping black to fix up his shape a lot.
|
Diagram 10 |
|
|
|
Bad for White |

This is from a game between two Chinese female pro's
although one has changed her nationality and the other
is playing in Korea :-)
Entering at 8 is supposed to be inferior to dia 10 for
white. Although white can take over the corner black is
doing well because his outside position is incredibly
thick. Black has sente too, and is happy.
|
Diagram 10a |
|
|
|
Go Seigen |

Now, tell me honestly, don't you think that black 5
is a calm, peaceful move? Go Seigen played this in a
number of games and every time he played it got really
complicated. The point is that no matter how much white
would like to play at A since the black corner is alive
and not weak black will immediately push through and
cut. When this happens white suddenly realizes that he
is in trouble. White 4 might be fashionable but if you
play it without having thought about dia 10b you're in
for a nasty surprise. (Well you could, of course, count
on the fact that your opponent knows the joseki in dia
10 and is rather proud about it, if that's the case you
don't need to worry about a thing since he'll play the
joseki through to the last move, no matter what.)
|
Diagram 10b |
|
|
|
2000-01-13, Fuchan-Cup, Semifinal |

Black: Okada Yumiko 4p
White: Rui Naiwei 9p (+ resign)
Result: White by resign
This is a good example of "living Joseki". The exchange
I talked about in dia 10 would normally be played
instead of black 11, black at A and white cuts at B.
After this exchange entering at 11 is regarded as better
for white, but without it black felt she could enter at
3-3. Ms. Okada most likely attended a study group where
this way of playing was analyzed.
Unfortunately not every pro makes up a new move per
game, that kind of creative power is but bestowed on
few mortals, a mere few blessed men among the ignorant.
Carrying the torch of the dream and originality, the
future of go.
|
Diagram 10c |
|
|
|
(Sorry, I'll cut that out next time, I suddenly had to
think of Kawabata Yasunari's style which in Japanese
reads very much like the above, when that man got
started he just wouldn't stop.)
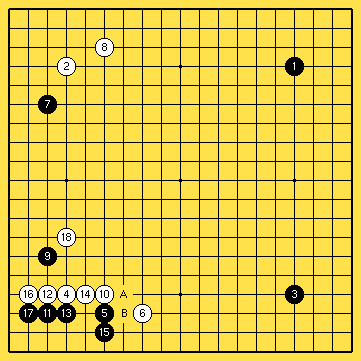
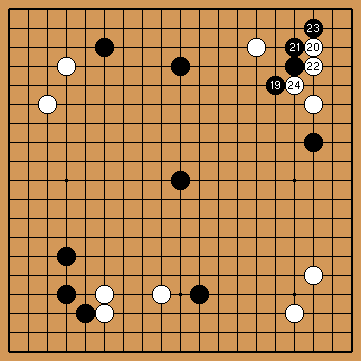
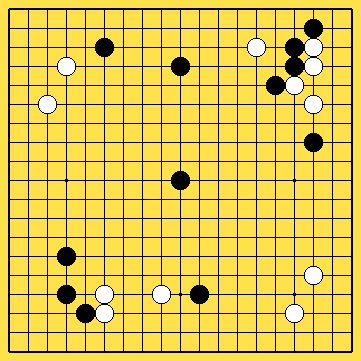
The Kosumi |

Black chose a rare move in response to the white double
approach move, the diagonal move of 19. Black 19 is
usually a little slack, it is solid but does not put
much pressure on white. White enters at the 3-3 point,
if he would not do that now black will play here with
his next move, regardless of where white played.
Blocking at 21 is natural, it's the side which is more
attractive for black to make a potential territory.
You might want to try playing white 22 above black 21
(hane). It seems a possible way of playing, even so, it
probably will turn out to be just a move order change,
giving the same end result.
Black 23 looks funny but there is a lot to say for this move
|
Game Diagram 14 |
|
|
|
Do Not Forget White 2
|

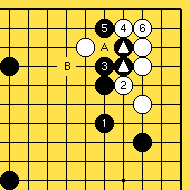
Black 1 looks like a standard move. Now white has a move
worth memorizing, the innocent looking trust of white
2. Black has some choice what to do next but eventually
he'll have to defend at 3. White plays hane at 4, black
blocks and white defend. At first sight the black player
would be tempted to defend at A but here we've reached a
delicate matter having to do with good and bad shape.
|
Diagram 11 |
|
|
|
People love talking about it but mostly that just
adds to the confusion, I'll try to make an example
of briefness (adding only little confusion, the more
Coca-Cola Light you drink, the thinner you'll get :-)
Black does not want to play at A. If black would play at A the
 stones
might as well not be on the board
since they serve close to no purpose anymore (they
would provide the black stones with 2 extra liberties
if they would not be there!). Especially in the early
stage of the game to find yourself with stones, which
are "wasted" without compensation is a disaster, which
spells "Bad Shape". stones
might as well not be on the board
since they serve close to no purpose anymore (they
would provide the black stones with 2 extra liberties
if they would not be there!). Especially in the early
stage of the game to find yourself with stones, which
are "wasted" without compensation is a disaster, which
spells "Bad Shape".
So black does not play at A but plays elsewhere or
perhaps the shoulder hit of B.
Next Move Problem |

Black to play, Is black going to be cut in pieces, will
a trade-off follow where each party gets to eat one
stone of the opponent?
|
Diagram 12 |
|
|
|
Find out the answer in the next episode of DAIGO.
Credits
Many thanks go to:
Simon Goss,
for proofreading.
Jan van der Steen,
for checking and adjusting the html and for hosting this column.
[Daigo 1]
[Daigo 2]
[Daigo 3]
[Daigo 4]
[Daigo 5]
[Daigo 6]
[Daigo 7]
Copyright by
Pieter Mioch, September 2001
| |


![]() stones
might as well not be on the board
since they serve close to no purpose anymore (they
would provide the black stones with 2 extra liberties
if they would not be there!). Especially in the early
stage of the game to find yourself with stones, which
are "wasted" without compensation is a disaster, which
spells "Bad Shape".
stones
might as well not be on the board
since they serve close to no purpose anymore (they
would provide the black stones with 2 extra liberties
if they would not be there!). Especially in the early
stage of the game to find yourself with stones, which
are "wasted" without compensation is a disaster, which
spells "Bad Shape".

