
It is largely a matter of taste whether in the early stages of the game to play for territory, or for influence (expressed either as frameworks or solid positions that are hardened against future fighting, so-called thickness). Professional Go shows great respect for territory, cash in hand. One reason is that pros can defend very skilfully. Amateurs do not, which is one explanation why amateur dan players often systematically overestimate frameworks.
So far these articles have looked at a typical framework on the side, from the point of view of the player building it. It is quite possible for the other player to prevent this framework arising in the first place.
There are two different ideas that you might use for that. You can choose a different type of corner opening, applying a pincer. Pincer openings must sometimes be played, in order to develop a 4-4 point in the correct direction. Or you can treat the corner differently, leaving the opening unfinished. This is a technique that is often seen in professional play; we discuss how it relates to the miai concept.

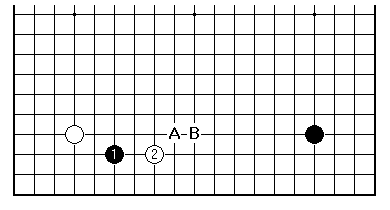
When Black approaches with 1, White 2 announces the intention of denying Black control of the lower side. Currently this pincer is popular, as are those at A and B also. In each of these cases Black has a simple way to play, invading the corner at the 3-3 point. This is in fact a peaceful plan, and leads to settled positions. Black can also choose more complex variations, by playing a second approach to the 4-4 point from the other side, or simply by jumping out with 1.
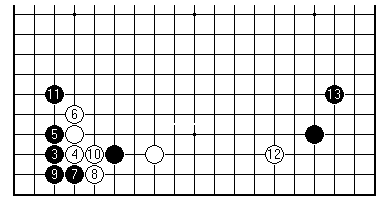
This is the standard continuation up to 11, when Black invades the corner. Evidently it is now Black who takes secure territory. At 12 White has the initiative. The whole board situation ought to be taken into account at this point. If White decides to continue on the lower side, the approach at 12 makes a framework for White. It could be somewhat unreasonable for Black to pincer now, given the strength of White's position to the left; White would probably choose a variation jumping out from 12, and the whole lower side might become a fighting area.
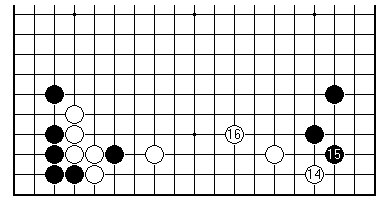
Therefore this end result may arise, White 16 taking into account balance exactly as was explained in the previous part.
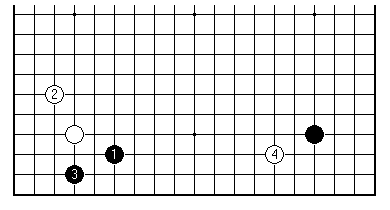
The second idea comes from a considered analysis of breakaway variations (Japanese tenuki, literally "omitting a move"). In this case White leaves the normal progression in the left-hand corner in a state of suspense, to play 4.
There really needs to be an adequate motivation for plays like this, above and beyond simply being "busy". The idea that one can put something over on the opponent by leaving unfinished business all round the board is a temptation that must be resisted. It seems to peak at around 1 kyu level. The lesson is much the same as budgetary control, on first getting a credit card. Simply deferring responsibilities and debts isn't a successful way of dealing with them.
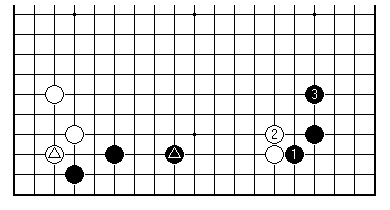
In this case there is a clear explanation for White's behaviour. The exchange of the white marked stone for the black marked stone in this position is a minus for White. It was already seen in the first article of this series that Black is now ideally placed to attack, with 1 and 3. Therefore it occurs to White, to postpone that exchange.
This is proper reasoning, consistent with an intention on White's part to prevent Black making the lower side into a framework. If White really wishes to approach the right-hand corner on the "inside", within the potential side framework for Black, it would be better not to play out the left-hand corner first.
So much for the basic concept, showing "transmission" from one corner to the adjacent one. There remains the other issue: survivability. How much damage will White take in the left-hand corner?
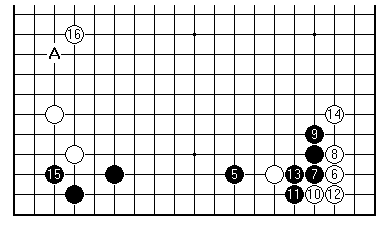
In this concrete variation Black plays the pincer 5 to take the initiative and return to the left corner. It takes an effort to look at this position objectively. "Always pincer" is just as bad a guide to play as "never pincer". Look, Black has a framework once more! Yes, but White has the territory in the right-hand corner.
Black 15 is a very big point. It is a typical multi-purpose play:
White really must answer, with a play at 16 for balance, or A for a definite base on the side. Success? Well, anyway, not abject failure. White would probably want to control the top left corner already, to feel happy with this result. Black's framework seems to require two further plays to become really substantial.
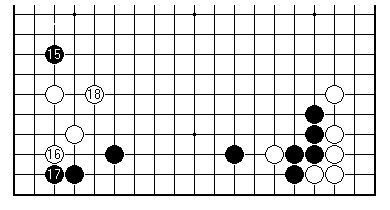
This would be Black's other idea for putting White under pressure. Black 17 is a key point but when White jumps out at 18 Black needs a play on the left side to reinforce 15, before anything else.
Does it seem that Black is thwarting White's intentions here, rather than the other way around? Actually White is showing flexibility, while Black is simply and consistently pushing ahead with a set plan. When does "lateral thinking" yield to "high-concept" Go, to steal a term from Hollywood? Normally ideas in Go do not work in their original form, but in a second phase that depends on the opponent's response; so you might say that the burden of proof is on the player who has the whole game mapped out. One thing to bear in mind: in a symmetrical position it's only the first player who can afford an inflexible plan.
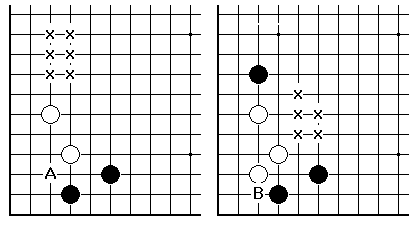
The point here is really the mechanism by which White manages to shore up the defence of the left corner, once having lost the initiative on the right. The Japanese term miai means, roughly speaking, having a pair of good options open: "I can play this way or that way". Sometimes there is an identifiable pair of points: "if she goes there I'm going here, and vice versa". So one talks of a "pair of miai".
In this example we can indicate the miai concept in action at least twice. Firstly (left-hand diagram) White thinks of a play at A, and a play somewhere in the area of the 'x' points, as miai. If Black plays at A White extends up the left side, if Black obstructs the left side White plays A. Then, once Black has gone down the second of those roads and we have the right-hand diagram, White still has to react adequately to Black pressure. Once more point B is in miai relation with the whole area of 'x' points. If Black plays in the centre, White quite gratefully plays B. If Black attacks White's base with B, White must at all costs not be shut in, but must escape to the centre. Then Black has to defend the single stone on the left side, while White's group isn't so very weak.
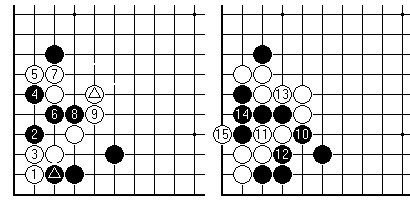
A tactical note to back up that assertion: Black 2 following White 1 is an implicit idea once Black has pushed into the corner (marked black stone). Provided White has the marked stone in the centre in place, White is just strong enough to resist 4 with 5.
As a bit of intellectual apparatus for playing Go, the miai concept is extremely useful. That's something often concealed by a restrictive version quoted as "points P and Q are miai if Black P, White Q and Black Q, White P are completely fair exchanges not giving either player advantage". This definition is what people have in mind when translating miai as "equivalent points". It does on occasion present itself in that fashion, for example P and Q two endgame plays each worth eight points.
What we have been looking at here is one-sided miai - White's point of view only - as an explanation of defence in a position where one doesn't mind if the opponent plays first.
[01]
[02]
[03]
[04]
[05]
[06]
[07]
[08]
[09]
[10]
[11]
[12]
[13]
[14]
[15]
[16]
[17]
[18]
[19]
[20]
[21]
[22]
[23]
[24]
[25]
[26]
First published 12 October 2000 as On Your Side on MindZine,
Go Learning
© Charles Matthews 2000.