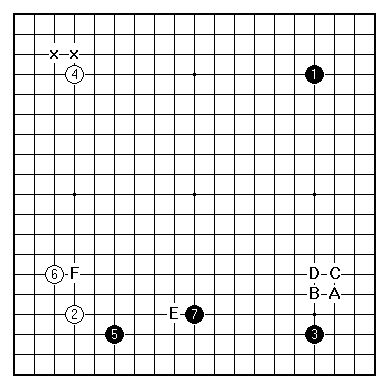

The Chinese formation doesn't suit everyone's Go temperament. An important development was the vigorous style that has Kobayashi Koichi's name attached to it.

Black spreads out along the lower side, assuming a White 4-4 point in the lower left corner. After that a black enclosure such as A becomes ideal, and it is therefore natural for White 8 to contest the lower right. A serious theoretical debate raged over the best point (out of A, B, C, D) during the 1980s. Now C is the standard play, while D is still seen, in line with the '21st century' style promulgated in a best-selling book by Go Seigen.
In fact there is a cluster of openings here. In increasing order of relevance to the lower right corner: White might have occupied the upper left at one of the 'x' points; White 6 might be at F; Black 7 might be at E. This complex was seen in a string of top matches in the 1980s, often but not always involving Kobayashi. His brand name attached to the formation can have done it no harm at all, since he was at his most impressive in the same period. (The 'later' Kobayashi style is Black 5 at A, leaving an obvious big point around 7 that White is normally quick to take.)
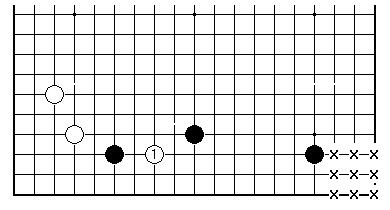
From a theoretical stance, the 'x' points of eye space in the right-hand corner have an important role in stabilising the black framework across the side. White can invade at 1. How hard Black can fight back is conditioned by the state of the longer extension to the right. That in turn is affected by how well the right-hand corner is anchored.
Therefore how close White can approach the right-hand corner may be seen as a crux. The popularity of the Kobayashi formation rests on the conclusion that White does best to play with restraint there.
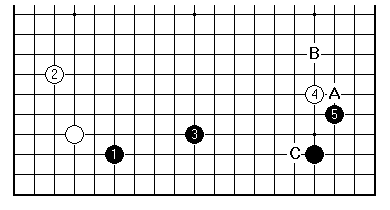
An early game with the pattern (Rin-Shimamura Kisei 1978) went like this. White now played away, with Black A White B coming later. This is a light way to play, aiming at White C.
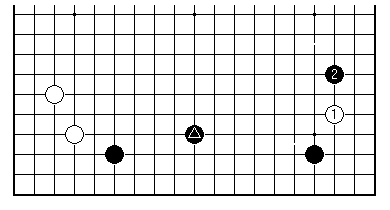
It is perhaps in line with professional instincts to consider first the low approach White 1 here. When White is most concerned with immediate life, recourse to this play is natural. Because of the presence of the marked black stone, Black looks to play the tightest pincer at 2. White's choice of variation is now constrained: many of the standard 'book' lines will run into trouble as the fighting spreads. Calling the tune for the opponent and trying for maximum plays were two of the traits in the Kobayashi style that propelled him to the top.
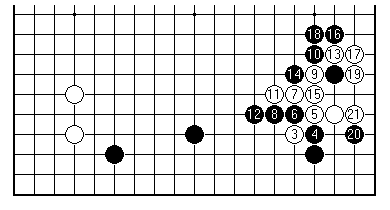
This is how it went in Kobayashi-Takemiya from the 1980 Honinbo League (which Takemiya won).
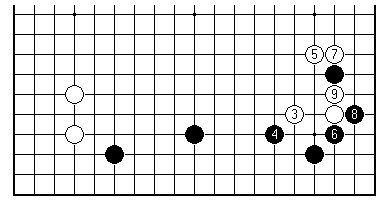
In 1982 in the deciding fifth game of the Tengen match it was Kataoka-Kato, and the typical corner-taking plays Black 6 and 8 were seen. Black takes the initiative here as well as territory. This variation seems more than adequate for Black. (Kataoka won the game by half a point.)
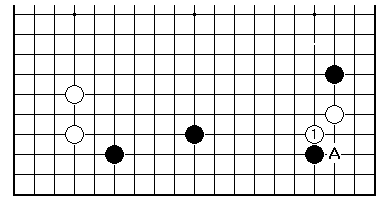
According to Yang Yilun (Whole Board Thinking in Joseki vol.1), White 1 here is correct in this type of position, because Black A in answer to deny White the corner is a doubtful play.
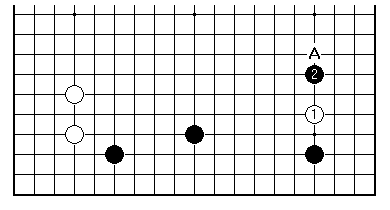
From the perspective of amateur Go, the high approach White 1 here is common. In early games of Cho Chikun the severe pincer at Black 2 was played. Theoretical attention has also been given to the Magic Sword pincer at A. (Black 2 was once known as the Magic Dirk, by the way, at least by British players.)
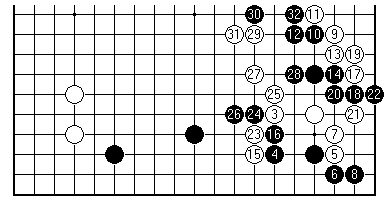
This is Cho-Otake from the 1981 Kakusei, with a big fight starting as White refuses the quiet option of 5 at 26.
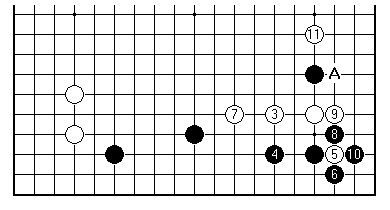
Later that year in Cho-Shiraishi (Honinbo League) it was more peaceful since Black considered it good enough to allow White to connect under later at A. (The meaning of White 5 is to prevent a counter-strike with Black at 9, minimising the loss if Black gives up the pincer stone.)
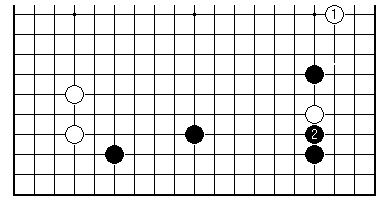
In a Chinese game from 1985 White played 1 here to take up position on the right side, whereupon Black (Cao Dayuan) took the corner with the solid butting play 2.
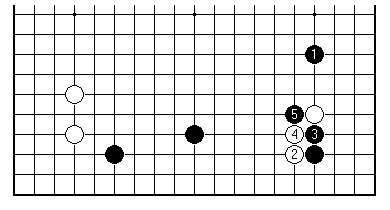
If Black plays the Magic Sword, White has a much broader range of variation. White 2 here is the most hair-raising choice. Chinese star Yu Bin played both sides of this line in 1996.
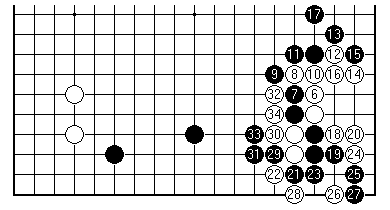
When he held Black it went this way, with Black taking influence and sacrificially rescuing the corner. More analysis is in the books of Yang Yilun and Go Seigen, but that is surely not yet definitive.
[01]
[02]
[03]
[04]
[05]
[06]
[07]
[08]
[09]
[10]
[11]
[12]
[13]
[14]
[15]
[16]
[17]
[18]
[19]
[20]
[21]
[22]
[23]
[24]
[25]
[26]
First published 1 February 2001 as On Your Side on MindZine,
Go Learning
© Charles Matthews 2000.