
There is another, so far less developed way for Black to respond in the position considered last time. In a fashion that has hardly been seen so far in this series, it speaks to the acquisition of raw power early in the opening.
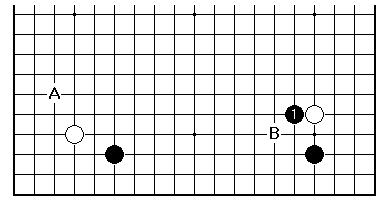
When Black plays 1 as here, the outside contact move, the meaning is quite different from contact on the other side of the white stone. The latter is a stand-by of professional Go, is a very steady play, and has been seen often in previous articles. Black 1 has a number of distinctive features:
Looking at the strategy Black is unrolling for the side as a whole:
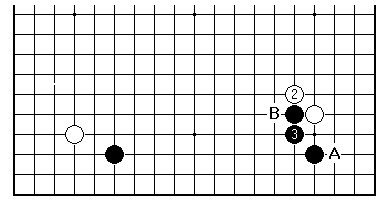
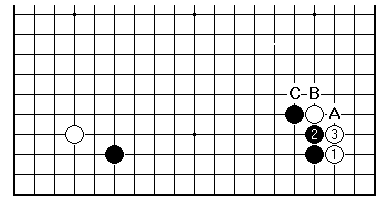
Much therefore depends on the next few plays in the right-hand corner. This is a fluid position, but it is in the nature of the set corner openings to bring the planning process down to earth. Here White 2 is the usual play; White also can play at A to try to get settled quickly without worrying so much about conceding influence. Black 3 is normal. This is also seen at B (for example in a game Sonoda-Wang from the 1983 China-Japan exchange series, an early occurrence of this pattern).
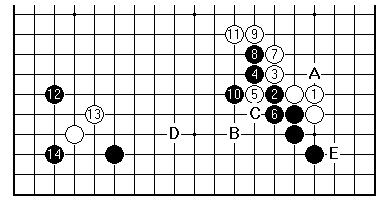
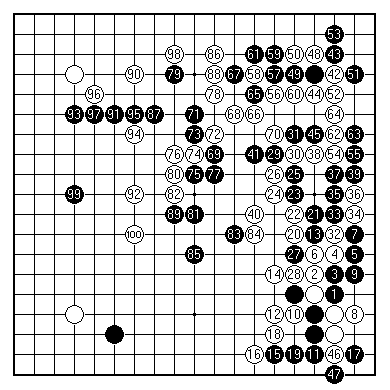
This was the continuation in the game Cho Hun-Hyeon against Takemiya, from the 1992 final of the TV Asia international title. First White 1 (rather than A) is a revision of the book line, and changes the tactics later after White E. With 2 and 4 Black expands at top speed into the centre; neither player can back down in the subsequent pushing battle. Having dealt swiftly with the left corner with 13, Takemiya built his own framework on the right side. Later White was able to play B, Black C, White D to enter Black's stronghold, for a close game.
This is a model strategy for Black. It seems to be favoured by Laurent Heiser (6 dan) of Luxembourg; see his game against Pedrini of Italy from the World Amateur, in the 1995 Ranka Handbook.
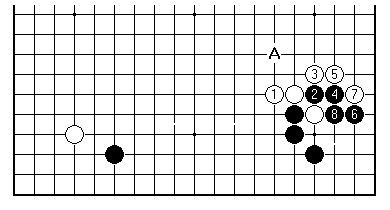
Supposing White dislikes losing control of the centre like this, it is possible to extend out with White 1 in this fashion. This was played in the game 'Jimmy' Ch'a Min-su (Black) against He Xiaoren in the 1997 North American Masters. After the sequence shown, White built a framework on the right side. The ladder question did however require attention and a white play shortly at A (a good ladder for White is a precondition for adopting the variation, but that leaves the possibility of a ladder-breaker from Black). It therefore looks very much as if Black can expect to exploit the double approach in the left corner.
The other way for White to play is to run for cover in the corner with White 1 here, leaving Black to claim influence. In reply Black invariably pushes up with 2, the most difficult move. Now after the inevitable White 3 Black at A is the traditional answer. It leads to some scary, not completely explored fighting variations. Black B and C are more modern plays, consistent with the aim of acquiring influence in a controlled manner.
In this game O Rissei-Cho Chikun from the 1990 Kakusei tournament in Japan, Black chose the cut and crawl variation with 1 and 3, an innovation. This led to some all-out fighting to the knife. It is relatively rare to see such uninhibited Go at the top level. In the plays given in the diagram here matters have been sorted out to some extent. According to the Kido Yearbook the game is still roughly in balance; a serious mistake shortly by White tipped it Black's way.
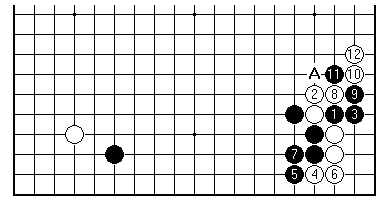
For reference, the normally seen continuation of Black 1 and 3 here involves a ladder. After White 10 Black relies on a ladder capture of White's cutting stones at A. In the game under examination, though, this ladder is good for White, broken as it is by White's 4-4 stone in the upper left.
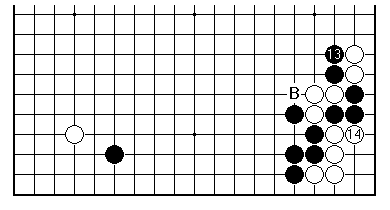
There is also this further, insidious ladder. After Black 13 White had better play 14, whereupon Black has a ladder at B. You can check that in the O-Cho game this too is broken by White's stone top left.
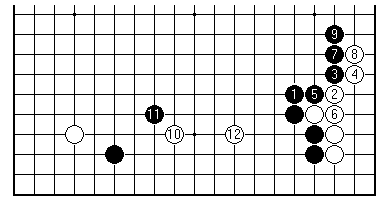
Black 1 as played here is an idea of Kajiwara's from around 30 years ago. Since it isn't mentioned in the Ishida Joseki Dictionary (English translation of first edition), which still counts as a standard reference for many, it perversely qualifies as a 'new' move. (In fact it is now common in pro play.) This line is taken from a Korean 1993 game Hwang Weon-chun (7 dan - Ch'oe Kyu-pyeong (6 dan), cited in a middlegame book by Yu Ch'ang-hyeok. Black having built substantial influence on the right, but giving up the initiative, White pincers at 10 and the middlegame is swiftly upon us.
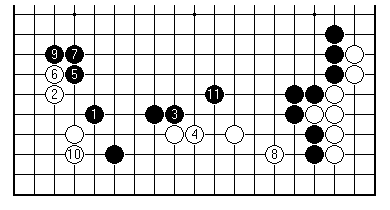
A complete analysis of this position would be very circumstantial (in fact it also occurs in volume 2 of the recently-published Ch'ung Am research archive mentioned earlier in this series, so I'm sure the point doesn't need further emphasis). Here anyway is one worked-out line. Black has a problem cutting point in the wall to the right. Time will be saved, at the expense of territory, by treating it as a side-issue. Black's plays here are vigorous and consistent, in the way of building a central framework.
There is clearly considerable mileage left in this opening pattern, which is still appearing in games from China.
[01]
[02]
[03]
[04]
[05]
[06]
[07]
[08]
[09]
[10]
[11]
[12]
[13]
[14]
[15]
[16]
[17]
[18]
[19]
[20]
[21]
[22]
[23]
[24]
[25]
[26]
First published 1 March 2001 as On Your Side on MindZine,
Go Learning
© Charles Matthews 2000.