
It has been noted already that the Chinese style poses a problem of timing for consolidation, and invasion. If White allows Black's development of the side to continue unhindered, the game may become a framework contest on the grand scale.
It is almost never seen in high-level Go that a game divided into two frameworks proceeds directly to the endgame. One side eventually leaps in. You may construe that as an act of aggression, but forming a weak group where your opponent is already strong will always lead into a few plays meeting a stiff defensive tariff.
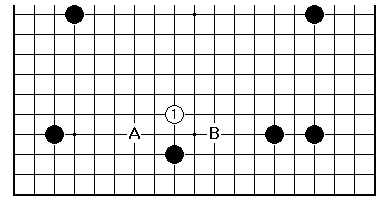
Defensive skill is a non-negotiable requirement to become strong. In a well-fortified framework such as this one, in which Black invested six plays before White replied, the capping play at 1 is a good choice. According to a proverb on shape, Black considers answering at A or B, in knight's move relation to the capped stone.
White 1 is a soft play. If White cannot afford to concede Black some territory, having played five times on the concealed half of the board, something has gone badly wrong. The main point is to avoid a bad quarter of an hour, as the French put it, trying to resuscitate an attempted invasion that intruded too deeply.
If Black answers on the right side, White seems not to have trouble making shape. If the order were changed to White 3, Black 4, White 1, Black's answer at 2 might look too passive.
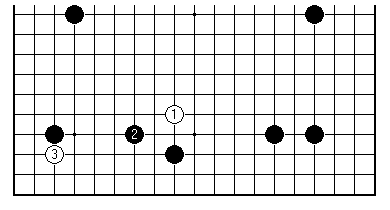
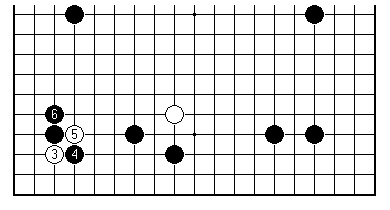
If Black answers on the other side, it is interesting to pay immediate attention to the left-hand corner with 3. To a professional this is an orthodox piece of technique.
Black 4 this way looks far too easy-going. After 5 we have transposed to an ordinary 3-3 invasion sequence. In practice Black 8 would be at 9 instead, for more active shape, but anyway the whole direction seems wrong.
Black 4 here is the expected answer in the early stages of the game. When White cuts at 5 to gain position, anything less than Black 6 in answer looks timid.
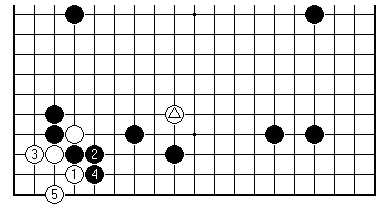
Therefore White has the later chance to construct a small live group in the corner (the notorious tripod group). For the moment White has to consider how to develop from the triangled capping stone - the fishing expedition (technically a probe) in the corner has come up with something, so the appropriate way of thinking is to count in 50% of the gain. At present that can probably be matched elsewhere.
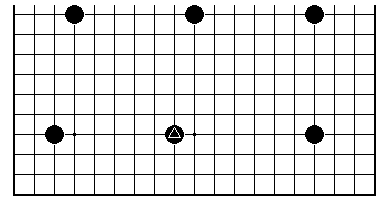
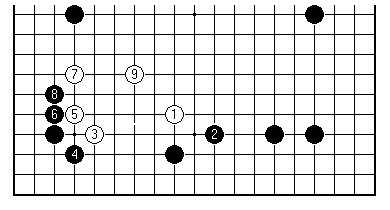
The use of the capping play against the low Chinese formation brings into focus an advantage of playing high (marked stone). This position is actually from one of my games at the 2000 World Amateur (Black was Jose Chacon 4 dan of Mexico). We had the benefit of professional commentary afterwards, from Sonoda Yuichi 9 dan.
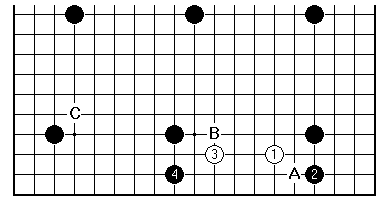
I came in at 1 - the logic is simply to start in the largest open space. Now common is Black A, White B. My opponent had his own ideas, and after 4 I was on my own. Sonoda's comment was that Black 4 could well be at C. Naturally that would allow White at 4, but is consistent with Black's emphasis on the centre.
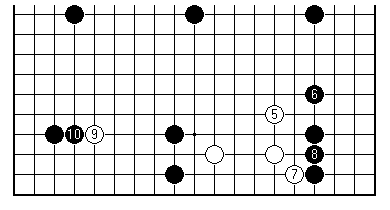
Having done something for the group on the right with 5 and 7, I came in with 9. By professional standards this is an overplay. Black's answer at 10 is interesting, and Sonoda said he understood the thinking behind it. Now White will not be able to pull any stunts in the left-hand corner. The group started by 9 will have to put together some shape without access to the 3-3 point.
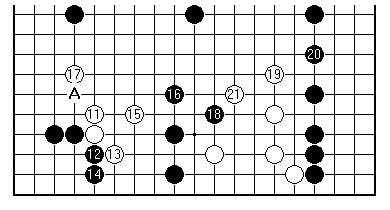
The consensus was that Black let himself down here with 12 (should be at A, a combination seen in pro Go). In a sense, if Black anyway wants to play 16 separating White, the chance also to connect along the edge to 14 is an overlap of effort. White 15 is ordinary good shape. White 17, however, is something a little bit special: a low-velocity shot that yet hits home hard. After it Black is short of a plan, and White has successfully erased the black framework, secure black territory having been cut back to the low end of the value of five net plays. The pro verdict was that Black's slacking off after the early base-stealing effort allowed White to claim a result here.
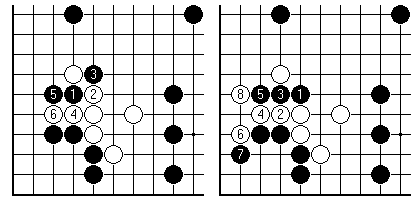
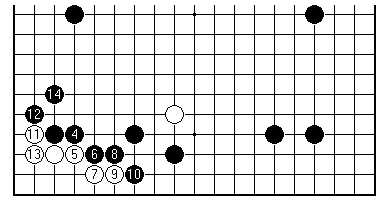
To clarify that point about White 17, another soft move in a harsh world, here are two parallel failed attempts by Black to cut off the white stone. In either case the black corner will suffer, or the cutting stones end up worse than useless. Black 12 and 14 of the previous diagram are potentially bad shape, so that Black shouldn't provoke such fights. What these variations actually prove is that White has resilient shape, so that any future black attack must be more carefully conceived.
[01]
[02]
[03]
[04]
[05]
[06]
[07]
[08]
[09]
[10]
[11]
[12]
[13]
[14]
[15]
[16]
[17]
[18]
[19]
[20]
[21]
[22]
[23]
[24]
[25]
[26]
First published 21 December 2000 as On Your Side on MindZine,
Go Learning
© Charles Matthews 2000.