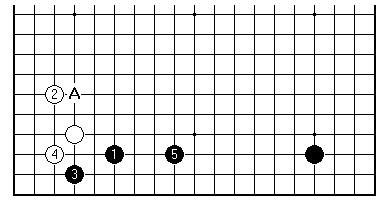

There is one more typical side to add to those associated with the Chinese style. It is a sort of cross between the Kobayashi and Shimamura formations considered earlier in this series.

This combination from Black, where White 2 may also be at A, we shall name for Iwata Tatsuaki 9 dan, a Kitani disciple from Nagoya, who played it in 1982. It was known before that for White. Black's three stones on the third line pose a problem for the opponent to find a good play in the whole right-hand area. Correspondingly, though, Black has to watch out for balance, avoiding a low position.
A comment on nomenclature. Attributing patterns to Japanese players is convenient, but may not meet with general approval. Going back 20 years the focus of Go was very much on the Japanese professional scene. No other arena at that time had a large group of players of 9 dan level, competing in well-documented events. Nowadays matters are different. In fact this formation was known in China in 1982 also (and earlier).
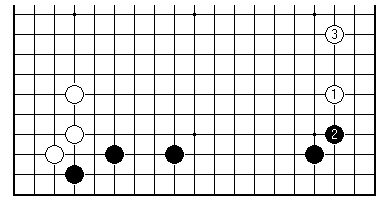
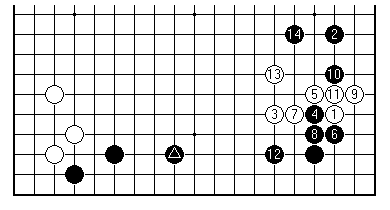
One way for White to treat this position is to play the distant approach 1, in line with the Kobayashi formation. This happened in Rin Kaiho-Sakata from the Meijin League in 1983, leading to a tight game. White later invaded the lower side, but Black's groups on both sides are solid. This is in contrast with the Kobayashi formation, where a porous group on the left implies that defending the lower side is urgent.
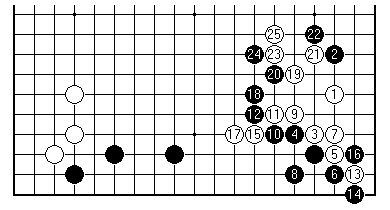
If Black plays a pincer such as 1 in this position, it is with the aim of building a well-balanced formation across the side. White 3 is an interesting way to resist. Black 4 avoids being pressed too low. However after 12, natural as it may be, Black is suffering from a lack of liberties; and plays 16 to relieve the pressure. An early fight ensues. The interest of this opening (Konishi Kazuko 5 dan against Nakazawa Ayako 4 dan, from the 1996 Women's Kakusei) lies in the tension created by the mere presence of Black's strong group to the left.
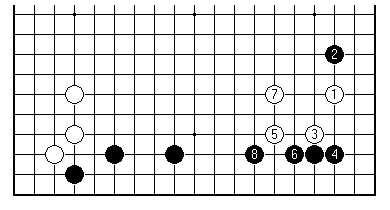
For comparison, this is the sort of result Black must avoid. The sequence up to 8 is standard, considered on its own; but is a major transgression against good balance if you look at all those black stones on the third line.
Michael Redmond relied on the Iwata formation when taking Black in the 1996 North American Masters, with 100% success. Here against Yang Yilun he played the three-point pincer Black 2 when White approached low. In the resulting position the marked black stone is working properly, because the white group to the right is still subject to attack.
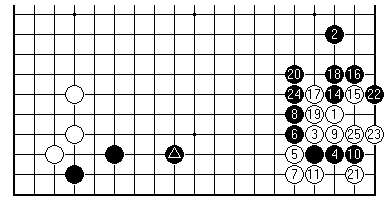
In his game against Huang Liping White played 3, aiming for immediate life in the corner with a play next at 4. Redmond opted for the complex variation at 4. Black 12 was played as a ladder-breaker in the upper left, and White 13 replied there (see next diagram). In the end Black built considerable influence, in sente, while White took the corner. Here the marked black stone and White's stones 5 and 7 pretty well cancel each other out.
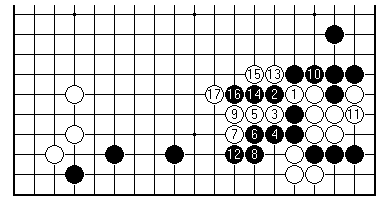
The ladder in question is well masked. White's resistance to Black's fencing play at 20 in the previous diagram would start with 1, 3 and 5 here. White is playing with fire, as far as lack of liberties is concerned. After White returns to 11 (a black play here would now connect along the edge while squeezing White), Black rescues the cutting stones with 12. At this point everything turns on the ladder with 13, 15 and 17 (Ishida Joseki Dictionary, 1996 edition). By the way, can you read what happens if 12 is at 13?
Redmond, a Nihon Ki-in professional who recently became 9 dan, has an orthodox, even sober style. Perhaps the unspectacular qualities of the Iwata formation appeal to him.
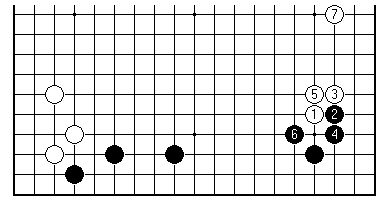
To conclude, a look at the balance issue once more. If White approaches high with 1 here, Black 2 to 6 are a simple way to play, and retain the initiative. Black 6 makes it easier for White to invade on the lower side; but with a solid position to the left Black isn't so concerned about this area.
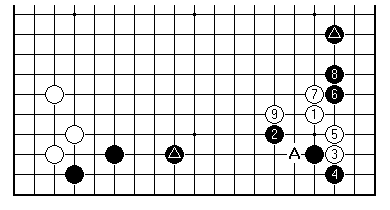
Normally the reply Black 2 to the approach White 1 would be good balance but too easy-going. However assuming the Chinese enclosure to the right is already in place, it leads into an interesting idea. Playing Black 6 leaves behind some weaknesses (for example at A), but it is hard for White to do other than move out with 7 and 9. In this position both marked black stones are working flat out. One can question whether White should actually play out the lower left before approaching the lower right.
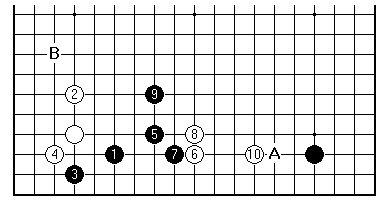
When White plays 2 on the fourth line, as here, it may occur to Black to try 5. This gives White a chance to challenge immediately with 6, gaining a base with 10 (or A). Black's idea is that B will become a good play shortly, putting the central play 9 to work. Just at the moment Black is likely to attend to the right-hand corner.
With this pattern we finish what has been a fairly thorough survey of formations from contemporary Go that stem in one way or another from the introduction of the Chinese style.
[01]
[02]
[03]
[04]
[05]
[06]
[07]
[08]
[09]
[10]
[11]
[12]
[13]
[14]
[15]
[16]
[17]
[18]
[19]
[20]
[21]
[22]
[23]
[24]
[25]
[26]
First published 15 March 2001 as On Your Side on MindZine,
Go Learning
© Charles Matthews 2000.