
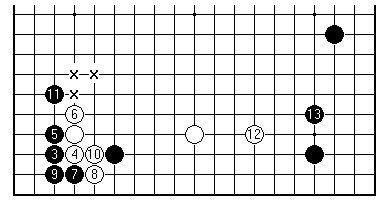
Here's a typical whole-board view of a game opening displaying the Chinese style, introduced in the previous article of this series.
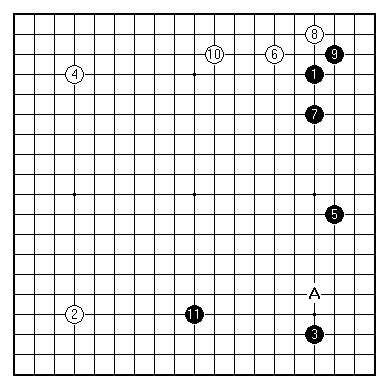
White approaches the upper right corner from the open side, and plays it out according to a common pattern. Black plays 7 on the fourth line for good balance with 5. Black's formation on the right side is beginning to look efficient.
When it comes to playing 11 on the lower side, Black reveals the basic conception behind the Chinese style. Why is Black 11 not played at A, to enclose the corner? Because White could then play at 11, leaving Black concentrated on one side of the board (and without a significant store of completely secure territory). Another kind of balance that ought to be borne in mind relates to spreading out over the whole available area on the 19x19 board. Putting it another way, with Black A already in place, Black at 5 is one of a number of big points you could choose, but not obviously the biggest.
Therefore you can say that Black is committed to a play like 11 from the outset, leaving White free to come into the corner at A. This provides the distinctive problem of the Chinese style. The open side approach White 6 anticipates that White will want to play at or near A in entering Black's framework, rather than between the stones 1 and 5. White must choose the correct moment to contest the corner, before (perhaps just before) Black consolidates there.
The open side approach is therefore commended as perfectly sound strategy. White must plan on later dealing with Black's framework, but has time to build a competing zone of influence. This lack of early panic about the opponent's prospects is characteristic of the cool detachment of professionals. It has to be said that the tentative methods of the first phase of Chinese style games showed nothing of the sort. In the absence of a good estimate of the value of the framework, White tended to get stuck in as soon as possible. Perhaps 1975, a year in which dozens of top games featured the Chinese, was the turning point, as the possible strategies started to be set in some order.
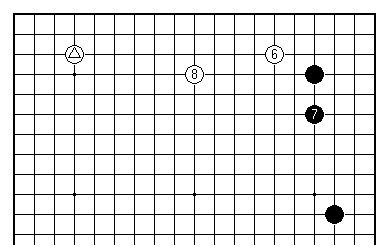
White, as I say, has a little time to look around. With the marked white stone in the top left, it is natural enough for White to play this way across the top side. The formation is now sometimes known as the Kobayashi style, and we'll come across it later, but strictly speaking Kobayashi Koichi's name attaches to it as a way for Black to develop. In this sort of position it was seen as a plan for White years before that came up. (This phenomenon of cross-dressing, Black borrowing White's typical plans and vice versa, is quite important for the history of opening theory in Go, and little remarked upon.)
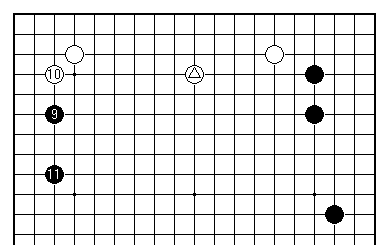
In that case the game might continue this way. The top left corner has become a significant area - if White encloses it, White's formation across the top side is very good. Black's more distant pincer at 9 is the most common choice in this position. If Black plays closer than that, White will pincer and the marked white stone is going to turn out to be very usefully placed. White 10 keeps matters simple. Black 11 is perfectly natural to settle in this area, a highly advisable preliminary before trying to trim White's top side framework. After that White has a free hand to deal with the lower side of the board.
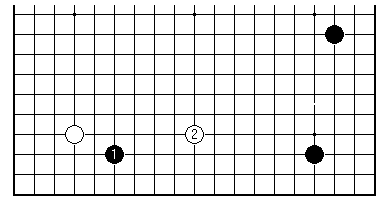
Returning to the lower side as a unit, might not Black play 1 here? Indeed Black might.
That would give White a chance to pincer, as with 2. White here gets an opportunity to play on a scale at least as grand as Black.
For after the 3-3 invasion Black 3, White can play 12 to control Black's holdings on the right, and then use the plays at the 'x' points to build a large-scale framework across the lower side.
It has to be said, though, that while plans of this kind have been seen in top level games, they haven't been so popular recently.
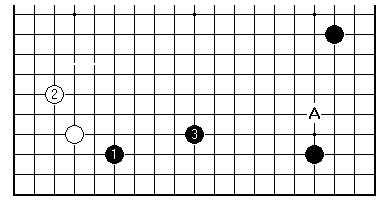
Therefore White should perhaps be content to allow Black to finish the framework on the lower side. White cannot put off invading at A for ever. In fact the moment might be imminent.
The way of thinking behind White 2 is worth a thought. White starts one step behind in the game. If both sides build frameworks it is hard to see White getting ahead. White is compensated by komi, but this will normally not be enough if White has to pick unfavourable fights just to keep in the game. White 2 is the sort of measured play that recognises the difference between the two players' tasks. Consistent with the open side approach, White aims simply to make the left side of the board an area in which Black can't achieve very much.
And so does White now invade the lower right? I don't want to be a tease, but are you ready for the discussion of how that would go? It involves, in some of the variations, special techniques and less common shapes. In a word, it's back to business as usual for corner openings.
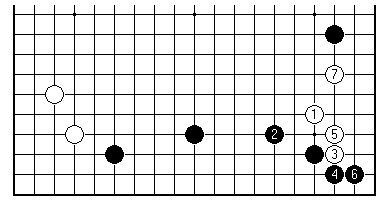
I do offer the best-known way to play. Black 2 looks to build up the lower side. White is happy up to 7 to secure a small base for the invading group. Further attempts to pressure White can be expected from Black.
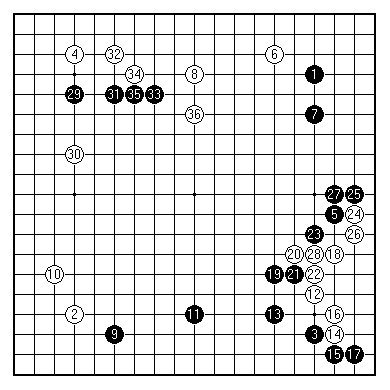
Here then is a hypothetical opening on the whole board, with both sides adhering to conventional methods. There is still little enough in the way of secure territory (Black has a chance to invade later between 6 and 8, as White has between 9 and 11). White's group in the lower right has settled, at the cost of answering a number of Black's plays. In contrast Black's group in the upper left is running out in search of security, but also seeking an active role in fighting. White is planning to develop territory between 10 and 30. If White attacks it overconfidently, it may turn out to be useful back-up for an invasion on the left side.
[01]
[02]
[03]
[04]
[05]
[06]
[07]
[08]
[09]
[10]
[11]
[12]
[13]
[14]
[15]
[16]
[17]
[18]
[19]
[20]
[21]
[22]
[23]
[24]
[25]
[26]
First published 30 November 2000 as On Your Side on MindZine,
Go Learning
© Charles Matthews 2000.