
One of Black's aims in playing the Chinese style is surely to hustle White early into middlegame positions.
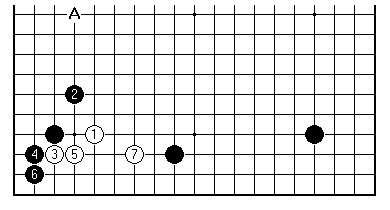
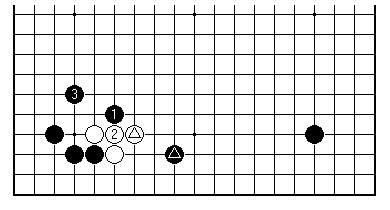
White's idea here has already been seen. Black may already have a stone at or near A. In playing immediately for a small base White emphasises settling a group early.
This is a sound plan, but there are others. A great deal is known in this context about plays either that vary at 5, to aim for alternate leverage on the corner space, or jump out earlier at 3 into the centre.
What these have in common is their 'light' quality: effects are achieved by not fussing about the fate of individual stones. In a sense White is taking up Black's challenge, responding with normal middlegame techniques.
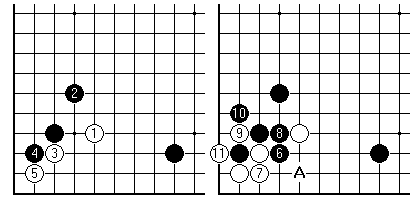
White 5 after 3 at the 3-3 point in the corner is a fundamental idea of light play. Since Black 6 at 7 is a bad idea, the continuation shown is nearly inevitable. White has lived neatly, and can later jump out at A. This isn't however considered to be a mainline variation. It would be very handy for White to play out the corner in this way, at some point in the middlegame. Do it too early, though, and Black's overall position can start to look very solid. That is the same strategic tension as limits use of a 3-3 invasion behind a 4-4 point.
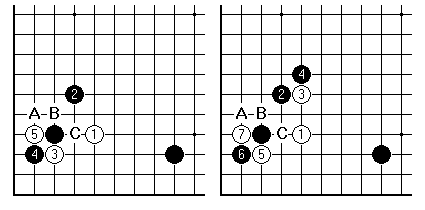
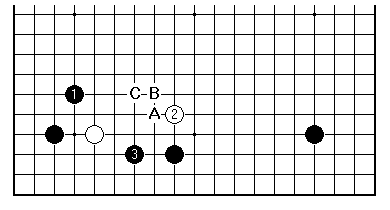
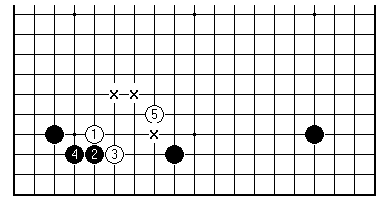
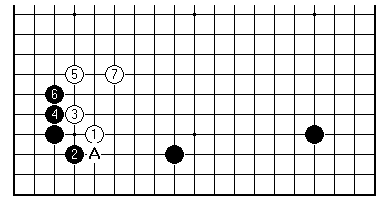
Moving through the normal tactical repertoire, the next idea that should be tried is the cross-cut 5 after 3 at the 3-3 point. Black answers A, B and C (left-hand diagram) are somewhat constrained: Black can't expect a great result if White can break through on the side with B. It was realised that White's idea is more effective if White first exchanges 3 for 4 (right-hand diagram). This has an impact on Black's response at A, to which White B becomes a good answer.
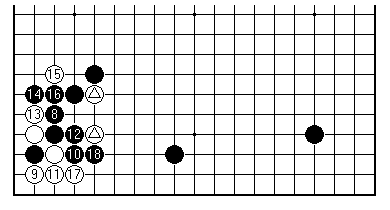
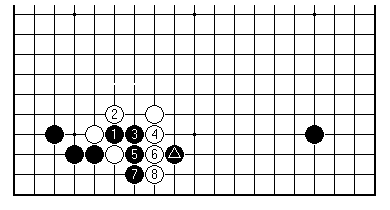
This therefore is one standard continuation. White does better in living in the corner than previously. Notice that White plays 17, not because it is intrinsically good - it weakens the two marked stones - but because a Black play here would actually threaten the corner.
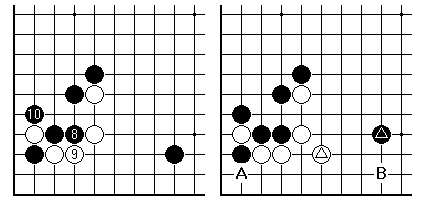
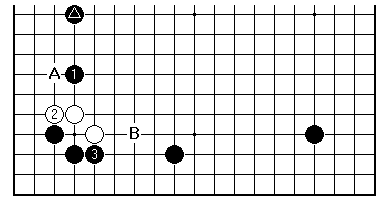
If Black exchanges 8 for 9, White can be content. However it goes after that, Black has put the two-stone chain including 8 into bad shape. Black 10 immediately is safest, but White's problem of making shape on the outside has become simplified. When Black plays the high Chinese formation, as in the right-hand diagram where the marked black stone is on the fourth line, the slide at B is very attractive for White, so that simply making the hanging connection (marked white stone) should be enough, making miai of A and B.
Another idea that prevailed in the early days of the Chinese is that White should jump out into the centre, for example with 2 here. The possibilities in the corner remain, and that takes the pressure off White as far as being immediately disconnected is concerned. It isn't clear that these plans have stood the test of time. Black 3 is a good answer to 2 as shown. There are also White A, aiming next to press Black down to the right; White B which is a one-off from a top match; and White C, which I have tried myself (Matthew Cocke 5 dan's idea of Black 3 seems to be good enough in answer).

This choice of 2 was played by Ishida in game 3 of the 1973 Meijin match against Rin Kaiho. The shape was unusual enough to stretch the Go lexicon - 'large leap' was suggested, from a Chinese term. Ishida's approach to Go is noted for its rationality, as contrasted with the traditional artistic ambitions. The game sequence shown here simply aims to control Black's framework to the right. White isn't concerned about Black at A while the chance to play at B remains.
A different idea for Black, now rare, is to play in contact with 2. At 5 White has a number of good plays, the other 'x' points being candidates too. The key thing is to develop shape that defends by indirect means the cut next to White 1 and 3.
That is, Black 1 here is a big failure. White 2 and so on are an example of the 'driving' manoeuvre. They leave Black wondering why the marked stone was ever played.
What White at all costs must avoid is a rigid adherence to the set patterns. For example the hanging connection with the marked white stone is bad. It is easy for Black to attack as shown. One cannot simply ignore nearby stones such as the marked black one. They must somehow be factored into the plan. White has ended up with a heavy group - one that is hard to defend. Normally making a heavy group signifies unskilful play of the stubborn persuasion.
Black's second string attack is in fact this quiet diagonal play at 2. White isn't going to answer at A, which would amount to the same as having approached at A in the first place, a heavy play as was seen in the first part on the Chinese. White 3 is recognised as correct in this case, and White makes shape in the centre (7 is seen also one to the right).
In 1998 some of the big beasts of the Go jungle started to disturb the peace by attacking forcefully from the direction of 1, when backed up by a stone such as the marked one. After 2 and 3 White has resources at A and B, but is still in danger of forming a heavy group. There seems no end in sight for the debate over how the game should go, when White comes close in to the Chinese framework.
[01]
[02]
[03]
[04]
[05]
[06]
[07]
[08]
[09]
[10]
[11]
[12]
[13]
[14]
[15]
[16]
[17]
[18]
[19]
[20]
[21]
[22]
[23]
[24]
[25]
[26]
First published 14 December 2000 as On Your Side on MindZine,
Go Learning
© Charles Matthews 2000.