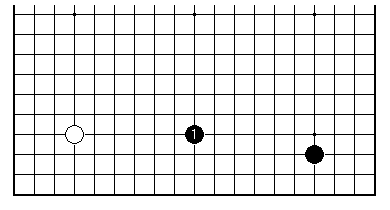

Takagi Shoichi 9 dan is one of the most admired stylists amongst Japanese professionals. In 1986 he started playing a variation on the Kobayashi formation, in which Black extends immediately to the middle of the side.

This is an unorthodox idea, but had enough advantages for it to be taken up at the time, appearing in two big matches (1986 Honinbo final game 3 Yamashiro-Takemiya, 1989 Kisei final game 3 Kobayashi-Takemiya). In recent years this is being played once more, in China.
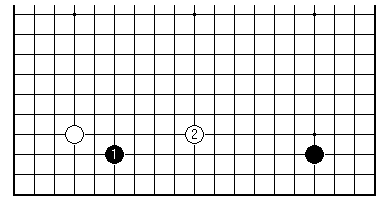
In the case of Takemiya's opponents, the thought may well have been to avoid the pincer 2. Now if Black invades the left corner at the 3-3 point, White can start building a large-scale framework. Therefore choosing the immediate extension can be seen as a way of retaining strategic control.
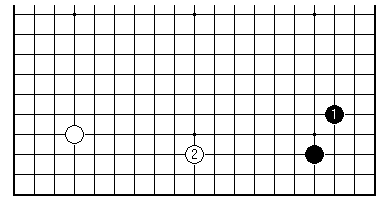
The textbooks have always disapproved. The corner enclosure 1 is supposed to be a bigger point than the extension to 2. Of course much of modern Go theory is based on disregarding this principle.
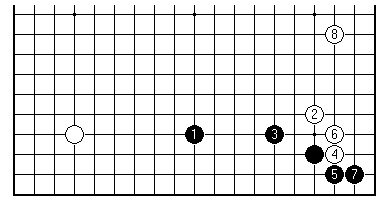
What is true is that for Black to play territorially with 1 and 3 here is somewhat disappointing. Black's territory may look healthy, but in fact it's not efficient or secure enough for this plan to rise above mediocrity.
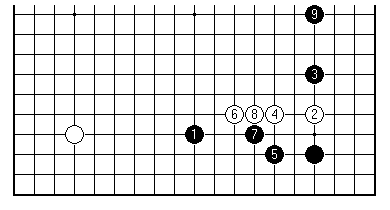
Black ought to make better use of the extension stone by playing a tight pincer such as 3. In this case Black develops quickly on both sides, while White is still unsettled.
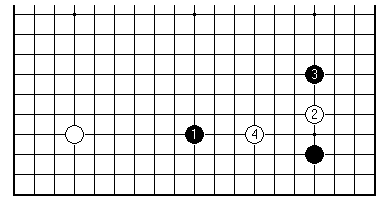
In a game Takagi-Fujisawa Shuko from the Judan Tournament in 1987, White tried 4. This is an early challenge. If White can play this way with impunity in Black's strong area, the game will start to look favourable.
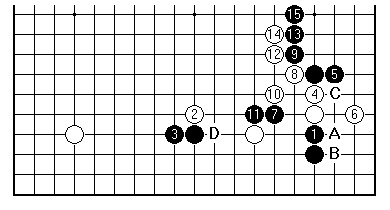
This was the continuation. Next White played D, to run out into the centre with a second weak group. However White 6 was criticised (analysis in Abe's New Moves, New Patterns for 1987). Instead White should keep Black separated with White A, Black B, White C. This would reduce the liberties on the pair of stones above including 5.
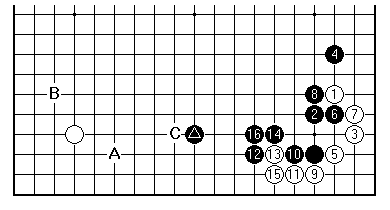
If the right-hand corner is played out according to normal patterns such as have been given in the previous two articles, one can look at whether the exchange Black A, White B would be a good one in context. For example here in a game from 1989 Black gives up the corner, gaining much outside and central influence. The lower edge is left open-skirted, and White can later jump in from 15. A general comment therefore applies: Black can be happy not to have exchanged A for B. European Champion Lee Hyuk has said, however, that the marked black stone belongs at C in this sort of position.
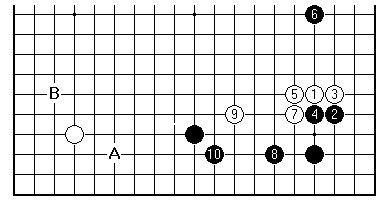
In the Kobayashi-Takemiya Kisei match game from 1989, White approached the lower right at 1, and what followed was a standard line for Takemiya. Next White attacked 6 with the influence built up below. However professional opinion, as represented by the Go World commentary, felt that Black had gained by omitting the A-B exchange. After Black has 10 in place, it may well suit Black to start at B in the left corner instead.
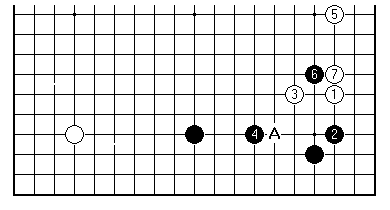
Finally a thought from China's imaginative Yu Bin for this position, in 1994. White 3 is an idea that is very tempting in the Kobayashi formation. Here Black would have to be careful about stealing White's base on the side with a play 4 at 5. White at A in answer would threaten to isolate the corner, and also leave a question mark over the original extension stone. Therefore White 3 comes across as a successful piece of opportunism, to exploit the absence of the exchange in the left corner. After 5 it seems clear that White's result has an edge over the comparable positions seen in the previous part.
[01]
[02]
[03]
[04]
[05]
[06]
[07]
[08]
[09]
[10]
[11]
[12]
[13]
[14]
[15]
[16]
[17]
[18]
[19]
[20]
[21]
[22]
[23]
[24]
[25]
[26]
First published 15 February 2001 as On Your Side on MindZine,
Go Learning
© Charles Matthews 2000.