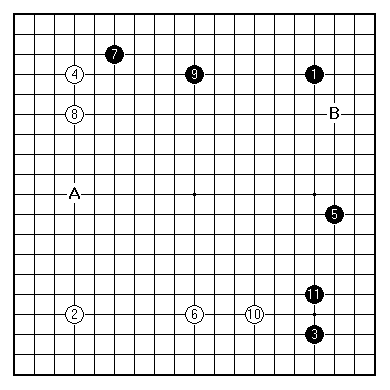

Speaking as we were of the Chinese-style opening pattern, which is the 'lower' side is conventionally determined.

This is the normal view Black has of the board, with first play at 4-4 top right (as is customary in Japan and Korea). White 6 is representative of the numerous possible lower side plays that have been tried.
White's idea is to pre-empt the expansion of Black's framework at the point that has special meaning (see last time). There is the same kind of relationship between White 6 as played, and a later invasion by White at B, as there is between White's open side approach on the upper side and a subsequent invasion at 11. That is, White can take an early view on the two gaps in Black's right-side formation, above and below, and act accordingly in occupying a side. After Black 11 it looks like a choice between White A, for a very large-scale game, and White B to keep Black's framework to within reasonable proportions by securing a small base for a group within it.
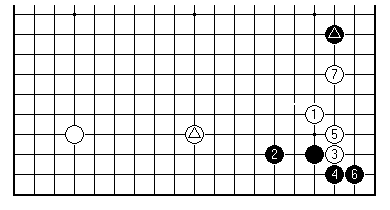
Could White challenge Black in the lower right corner directly, rather than play 10, which might come hard to those grudging their opponent any territory at all? Early research on the Chinese threw up the sober play 2 in answer to White 1 here. After 7 the black marked stone is still making a 100% contribution, cramping the new white group. On the other hand the white marked stone is 'out of focus' - harder to say what exactly it has achieved.
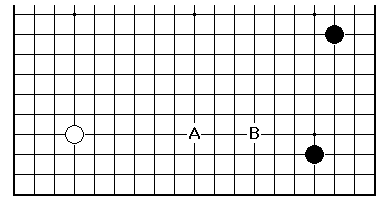
Instrumental in developing the theory of the Chinese enclosure seems to have been the realisation that the points A and B here can in a certain way be treated as miai.
In the variation given at the outset, White gets both of them. White is then constrained to play in a particular style, to suit the 4-4 points. In fact from the mid-1980s precisely that style, which you could call Takemiya-with-White, became increasingly popular in professional play. It is more subtle than Takemiya-with-Black, the more recognisable 'cosmic' style of early framework play of maximum breadth. That is however exactly what you'd expect: White's task is initially uphill work.
Therefore, as I say, there is scope for the interesting twists White A Black B, where Black plays to prevent the framework being pegged so far back to the right, and also White B Black A, the characteristic through-the-looking-glass pincer of the Chinese.
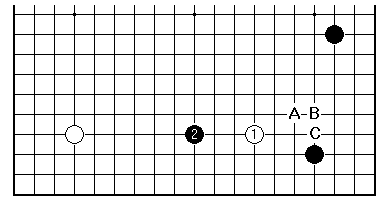
To emphasise the point, White 1 here is a transgressive play, according to conventional thinking. White is supposed to approach a 4-3 point in the corner from the other direction, say at B. Starting at 1 is therefore an imaginative idea , based on the whole board situation - White is indicating contentment with the position after Black at B, White at 2.
At this point Black can play from the right in other ways, to try for the corner but with extra efficiency. Black's positive answer at 2 may date from 1983; it has certainly become accepted. White is constrained to develop a group while outnumbered. The candidate plays at A, B and C have all been studied in depth.
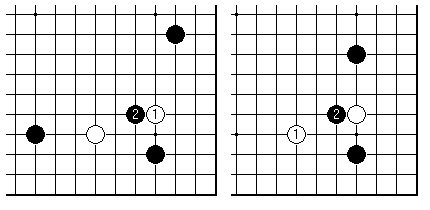
Choice B would be the one coming naturally to the informed player. With 1 and 2 as shown in the left-hand diagram we are wading towards firmer ground. The position in the right-hand diagram is the main line of the 'Magic Sword' corner opening.
On a historical note White 1 there is the innovation of Fujisawa Hosai 9 dan from a match game against Go Seigen in 1952. [Attribution is wrong in the recent book Essential Joseki by Rui Naiwei (Yutopian), which is a shame since Fujisawa's career was effectively broken by the unsuccessful effort to knock Go off his perch.]
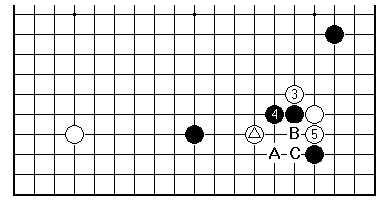
Continuing, with 3 and 5 following the Magic Sword pattern, this is all going to plan for White. Black A next is the Magic Sword main line, but surely too easy on White here. Therefore Black will spend time pondering B and C, sharper options discarded these days in the Sword. White is pleased, in fact, with this trend; the marked white stone is for sacrifice here, and Black is stretching to find a good way to play. Black 4 is perhaps questionable.
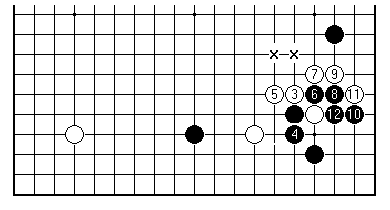
Black chooses 4 instead, to make more of the position. This lets us out of the Magic Sword rut. It is one thing to realise that context changes everything in Go, something else again to implement that flexibility. This variation gets into the new edition of the Ishida Joseki Dictionary (sorry, Japanese only for the foreseeable future). White has allowed Black the corner, and needs an honest move at one of the 'x' points to make shape round here.
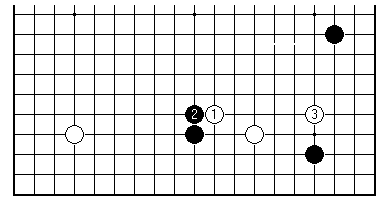
Innovation rolls on, however, especially in the Korean powerhouse of goal-directed research. Here's an astonishing Cho Hun-hyun idea, reported in the third volume of Lee Chang-ho's Novelties (the first two volumes are available now in English translation from Yutopian). Play White 1 first, presumably getting the answer 2, before coming in at 3.
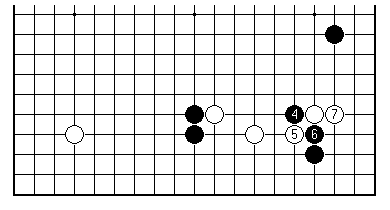
The intention is to mix it after Black plays 4. The warlike 5 and 7 are a concerted attempt to isolate Black's corner, the heart, as you will recall, of Black's intended grand framework.
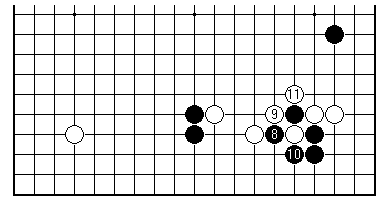
Black can't go down this road with 8. White 9 sets up a well-known tactic for confinement. The physicist Richard Feynman used to say that giving identifiable things their own names does nothing special; but the case of concept formation in Go seems to contradict that, and the Victor Chow term 'ko lock' for plays like 9 seems a useful addition.
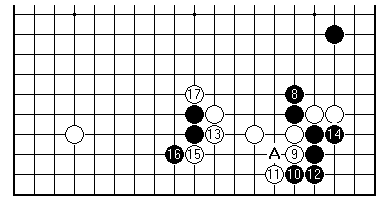
Extending up with Black 8 is also a relative failure. White leaves the cutting point at A behind, since 11 can be sacrificed in a couple of interesting ways. Black 14 to close down the corner gives White a free hand on the outside with 15 and 17.
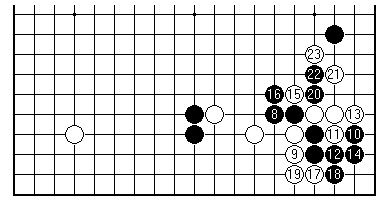
This is given as the correct continuation (in the actual game White missed 15). Black is in trouble because the corner group is dead as it stands, while White can escape on both sides.
[01]
[02]
[03]
[04]
[05]
[06]
[07]
[08]
[09]
[10]
[11]
[12]
[13]
[14]
[15]
[16]
[17]
[18]
[19]
[20]
[21]
[22]
[23]
[24]
[25]
[26]
First published 7 December 2000 as On Your Side on MindZine,
Go Learning
© Charles Matthews 2000.